2010年10月28日星期四

通過Java程序碼, 運行時設置屏幕方向 - setRequestedOrientation()

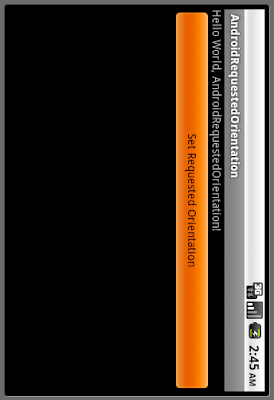
上文"通過XML設置屏幕方向(android:screenOrientation)"中, 在AndroidManifest.xml文件設定屏幕方向. 這種方法有一個缺點:不能在程序運行時改變屏幕方向. 這篇文章用另一種方法 - 使用setRequestedOrientation()方法, 在程序運行時設置屏幕方向.

通過Java程序碼, 運行時設置屏幕方向 - setRequestedOrientation()

main.xml
<?xml version="1.0" encoding="utf-8"?>
<LinearLayout xmlns:android="http://schemas.android.com/apk/res/android"
android:orientation="vertical"
android:layout_width="fill_parent"
android:layout_height="fill_parent"
>
<TextView
android:layout_width="fill_parent"
android:layout_height="wrap_content"
android:text="@string/hello"
/>
<Button
android:id="@+id/setrequestedorientation"
android:layout_width="fill_parent"
android:layout_height="wrap_content"
android:text="Set Requested Orientation"
/>
</LinearLayout>


SetRequestedOrientationActivity.java 負責選擇屏幕方向.
package com.AndroidRequestedOrientation;

import android.app.ListActivity;
import android.content.Intent;
import android.content.pm.ActivityInfo;
import android.os.Bundle;
import android.view.View;
import android.widget.ArrayAdapter;
import android.widget.ListView;

public class SetRequestedOrientationActivity extends ListActivity {

@Override
protected void onCreate(Bundle savedInstanceState) {
// TODO Auto-generated method stub
super.onCreate(savedInstanceState);

setListAdapter(new ArrayAdapter<String>(this,
android.R.layout.simple_list_item_1, OrientationString));
getListView().setTextFilterEnabled(true);
}

static final String[] OrientationString = new String[] {
"SCREEN_ORIENTATION_UNSPECIFIED",
"SCREEN_ORIENTATION_LANDSCAPE",
"SCREEN_ORIENTATION_PORTRAIT",
"SCREEN_ORIENTATION_USER",
"SCREEN_ORIENTATION_BEHIND",
"SCREEN_ORIENTATION_SENSOR",
"SCREEN_ORIENTATION_NOSENSOR"
};

static final int[] OrientationSetting = new int[] {
ActivityInfo.SCREEN_ORIENTATION_UNSPECIFIED,
ActivityInfo.SCREEN_ORIENTATION_LANDSCAPE,
ActivityInfo.SCREEN_ORIENTATION_PORTRAIT,
ActivityInfo.SCREEN_ORIENTATION_USER,
ActivityInfo.SCREEN_ORIENTATION_BEHIND,
ActivityInfo.SCREEN_ORIENTATION_SENSOR,
ActivityInfo.SCREEN_ORIENTATION_NOSENSOR
};

@Override
protected void onListItemClick(ListView l, View v, int position, long id) {
// TODO Auto-generated method stub
super.onListItemClick(l, v, position, id);

Intent intent = new Intent();
Bundle bundle = new Bundle();

bundle.putInt("setting", OrientationSetting[position]);
intent.putExtras(bundle);
setResult(RESULT_OK, intent);
finish();
}

}


主代碼 - AndroidRequestedOrientation.java
在onActivityResult()方法, 從SetRequestedOrientationActivity返回值, 使用setRequestedOrientation()方法, 設置屏幕方向.
package com.AndroidRequestedOrientation;

import android.app.Activity;
import android.content.Intent;
import android.content.pm.ActivityInfo;
import android.os.Bundle;
import android.view.View;
import android.widget.Button;

public class AndroidRequestedOrientation extends Activity {
/** Called when the activity is first created. */
@Override
public void onCreate(Bundle savedInstanceState) {
super.onCreate(savedInstanceState);
setContentView(R.layout.main);
Button buttonSetRequestedOrientation = (Button)findViewById(R.id.setrequestedorientation);
buttonSetRequestedOrientation.setOnClickListener(new Button.OnClickListener(){

@Override
public void onClick(View v) {
// TODO Auto-generated method stub
Intent intent = new Intent();
intent.setClass(AndroidRequestedOrientation.this,
SetRequestedOrientationActivity.class);

startActivityForResult(intent, 0);
}});
}

@Override
protected void onActivityResult(int requestCode, int resultCode, Intent data) {
// TODO Auto-generated method stub
super.onActivityResult(requestCode, resultCode, data);

if (requestCode==0)
{
if(resultCode == RESULT_OK){
int OrientationSetting = data.getIntExtra("setting",
ActivityInfo.SCREEN_ORIENTATION_UNSPECIFIED);
setRequestedOrientation(OrientationSetting);
}
}
}
}


記得在AndroidManifest.xml文件加入SetRequestedOrientationActivity活動.
<?xml version="1.0" encoding="utf-8"?>
<manifest xmlns:android="http://schemas.android.com/apk/res/android"
package="com.AndroidRequestedOrientation"
android:versionCode="1"
android:versionName="1.0">
<application android:icon="@drawable/icon" android:label="@string/app_name">
<activity android:name=".AndroidRequestedOrientation"
android:label="@string/app_name">
<intent-filter>
<action android:name="android.intent.action.MAIN" />
<category android:name="android.intent.category.LAUNCHER" />
</intent-filter>
</activity>
<activity android:name=".SetRequestedOrientationActivity"></activity>
</application>
<uses-sdk android:minSdkVersion="4" />

</manifest>

2010年10月27日星期三

通過XML設置屏幕方向(android:screenOrientation)

在某些情況下, 程序員要設定屏幕在一定的方向, 這可以通過AndroidManifest.xml設定. 例如:


<activity android:name=".MyActivity"
android:label="@string/app_name"
android:screenOrientation="portrait">


android:screenOrientation設定該活動的方向, 該值可以是任何一個下面的字符串:

"unspecified"
- 默認值. 由系統選擇顯示方向. 在不同的設備可能會有所不同.

"landscape"
- 橫向

"portrait"
- 縱向

"user"
- 用戶當前的首選方向

"behind"
- 與在活動堆棧下的活動相同方向

"sensor"
- 根據物理方向傳感器確定方向. 取決於用戶手持的方向, 當用戶轉動設備, 它跟隨改變.

"nosensor"
- 不經物理方向傳感器確定方向. 該傳感器被忽略, 所以當用戶轉動設備, 顯示不會跟隨改變. 除了這個區別,系統選擇使用相同的政策取向對於“未指定”設置. 系統根據“未指定”("unspecified")設定選擇相同顯示方向.


相關文章: 通過Java程序碼, 運行時設置屏幕方向 - setRequestedOrientation()


2010年10月24日星期日

用戶界面/應用程序訓練猴(Monkey)

猴子(Monkey)是運行在Android模擬器或設備上的一個程序, 它產生偽隨機(pseudo-random)的用戶事件, 例如點擊(clicks), 觸摸(touches), 或手勢(gestures), 以及一些系統級的事件. 可以使用猴子以隨機重複的方式對應用程序進行壓力測試.

下面的指令是使用猴子最簡單的方式, 這將啟動應用程序並發送500個偽隨機事件給它.

$ adb shell monkey -v -p your.package.name 500

如需有關猴子指令的更多選項資料, 可以參閱完整的用戶界面/應用程序訓練猴文檔(UI/Application Exerciser Monkey)頁面.

2010年10月23日星期六

投票: 誰是最好的移動操作系統?

華爾街日報網站的Question of the Day正進行誰是最好的移動操作系統投票, 候選的移動操作系統包括: Apple, Google, Microsoft, Palm, RIM/Blackberry及其他.

包括我的一票, Google現正以49.2%領先.


更新: 目前Microsoft以42.7%領先!


更更新: Microsoft曾一度"不合理地"(純筆者個人意見)領先, 經網上一番熱烈流傳, Google"更不合理地"(純筆者個人意見)以97.4%再度領先.


2010年10月22日星期五

Google I/O 2010 - The world of ListView

ListView是一個最廣泛使用的Android Widget, 也是最複雜的之一.

觀看Youtube視頻"Google I/O 2010 - The world of ListView", 學習如何掌握ListView和了解所有關於它的功能,優化,怪癖和局限性.


2010年10月20日星期三

使用內部存儲(Internal Storage)

可以直接在設備上的內部存儲(Internal Storage)保存文件. 默認情況下, 文件保存到內部存儲是應用程式私有的, 其他應用程序(用戶)無法訪問. 當用戶卸載應用程序, 這些文件也會被刪除.

範例:

使用內部存儲(Internal Storage)

main.xml
<?xml version="1.0" encoding="utf-8"?>
<LinearLayout xmlns:android="http://schemas.android.com/apk/res/android"
android:orientation="vertical"
android:layout_width="fill_parent"
android:layout_height="fill_parent"
>
<TextView
android:layout_width="fill_parent"
android:layout_height="wrap_content"
android:text="@string/hello"
/>
<EditText
android:id="@+id/input"
android:layout_width="fill_parent"
android:layout_height="wrap_content"
/>
<Button
android:id="@+id/write"
android:layout_width="fill_parent"
android:layout_height="wrap_content"
android:text="Write"
/>
<Button
android:id="@+id/read"
android:layout_width="fill_parent"
android:layout_height="wrap_content"
android:text="Read"
/>
<TextView
android:id="@+id/output"
android:layout_width="fill_parent"
android:layout_height="wrap_content"
/>
</LinearLayout>


主代碼, AndroidInternalStorage.java
package com.AndroidInternalStorage;

import java.io.FileInputStream;
import java.io.FileNotFoundException;
import java.io.FileOutputStream;
import java.io.IOException;

import android.app.Activity;
import android.content.Context;
import android.os.Bundle;
import android.view.View;
import android.widget.Button;
import android.widget.EditText;
import android.widget.TextView;

public class AndroidInternalStorage extends Activity {

String FILENAME = "MyFile";

EditText edittextInput;
TextView textviewOutput;

/** Called when the activity is first created. */
@Override
public void onCreate(Bundle savedInstanceState) {
super.onCreate(savedInstanceState);
setContentView(R.layout.main);
edittextInput = (EditText)findViewById(R.id.input);
Button buttonWrite = (Button)findViewById(R.id.write);
Button buttonRead = (Button)findViewById(R.id.read);
textviewOutput = (TextView)findViewById(R.id.output);

buttonWrite.setOnClickListener(buttonWriteOnClickListener);
buttonRead.setOnClickListener(buttonReadOnClickListener);
}

private Button.OnClickListener buttonWriteOnClickListener
= new Button.OnClickListener(){

@Override
public void onClick(View v) {
// TODO Auto-generated method stub

String string = edittextInput.getText().toString();

FileOutputStream fos;
try {
fos = openFileOutput(FILENAME, Context.MODE_PRIVATE);
fos.write(string.getBytes());
fos.close();
} catch (FileNotFoundException e) {
// TODO Auto-generated catch block
e.printStackTrace();
} catch (IOException e) {
// TODO Auto-generated catch block
e.printStackTrace();
}


}};

private Button.OnClickListener buttonReadOnClickListener
= new Button.OnClickListener(){

@Override
public void onClick(View v) {
// TODO Auto-generated method stub

FileInputStream fis;
try {
fis = openFileInput(FILENAME);
byte[] input = new byte[fis.available()];
while (fis.read(input) != -1) {}
textviewOutput.setText(new String(input));
} catch (FileNotFoundException e) {
// TODO Auto-generated catch block
e.printStackTrace();
} catch (IOException e) {
// TODO Auto-generated catch block
e.printStackTrace();
}


}};
}

2010年10月19日星期二

使用SharedPreferences

SharedPreferences類提供一個保存和檢索持久的鍵值對原始數據類型的框架.

可以使用SharedPreferences保存任何原始數據:布爾型(booleans),浮點(floats),整數(ints),長整數(ongs)和字符串(strings). 這些數據將保持不變(即使應用程序被終止).

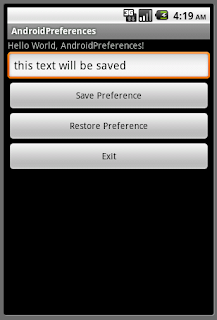
使用SharedPreferences

要獲得 SharedPreferences對象, 可以使用兩種方法之一:

- getSharedPreferences() : 如果你需要使用多個Preferences文件, 使用第一個參數指定Preferences文件的名稱.
- getPreferences() : 如果只需要一個Preferences文件.

要寫入:
1。呼叫edit()來獲得SharedPreferences.Editor.
2。呼叫如putBoolean()putString()添加值.
3。呼叫commit()提交新的值.

讀取, 使用使用SharedPreferences的方法,如getBoolean()getString().

範例:

main.xml
<?xml version="1.0" encoding="utf-8"?>
<LinearLayout xmlns:android="http://schemas.android.com/apk/res/android"
android:orientation="vertical"
android:layout_width="fill_parent"
android:layout_height="fill_parent"
>
<TextView
android:layout_width="fill_parent"
android:layout_height="wrap_content"
android:text="@string/hello"
/>
<EditText
android:id="@+id/preferencestring"
android:layout_width="fill_parent"
android:layout_height="wrap_content"
/>
<Button
android:id="@+id/savepreference"
android:layout_width="fill_parent"
android:layout_height="wrap_content"
android:text="Save Preference"
/>
<Button
android:id="@+id/restorepreference"
android:layout_width="fill_parent"
android:layout_height="wrap_content"
android:text="Restore Preference"
/>
<Button
android:id="@+id/exit"
android:layout_width="fill_parent"
android:layout_height="wrap_content"
android:text="Exit"
/>
</LinearLayout>


主代碼, AndroidPreferences.java
package com.AndroidPreferences;

import android.app.Activity;
import android.content.SharedPreferences;
import android.os.Bundle;
import android.view.View;
import android.widget.Button;
import android.widget.EditText;

public class AndroidPreferences extends Activity {

EditText myText;

/** Called when the activity is first created. */
@Override
public void onCreate(Bundle savedInstanceState) {
super.onCreate(savedInstanceState);
setContentView(R.layout.main);

myText = (EditText)findViewById(R.id.preferencestring);
Button buttonSave = (Button)findViewById(R.id.savepreference);
Button buttonRestore = (Button)findViewById(R.id.restorepreference);
Button buttonExit = (Button)findViewById(R.id.exit);

buttonSave.setOnClickListener(buttonSaveOnClickListener);
buttonRestore.setOnClickListener(buttonRestoreOnClickListener);
buttonExit.setOnClickListener(buttonExitOnClickListener);

SharedPreferences myPreferences = getPreferences(0);
String myPreferencesString = myPreferences.getString("key", "default value");

myText.setText(myPreferencesString);

}

private Button.OnClickListener buttonSaveOnClickListener
= new Button.OnClickListener(){

@Override
public void onClick(View v) {
// TODO Auto-generated method stub

SharedPreferences settings = getPreferences(0);
SharedPreferences.Editor editor = settings.edit();
editor.putString("key", myText.getText().toString());
editor.commit();

}};

private Button.OnClickListener buttonRestoreOnClickListener
= new Button.OnClickListener(){

@Override
public void onClick(View v) {
// TODO Auto-generated method stub
SharedPreferences myPreferences = getPreferences(0);
String myPreferencesString = myPreferences.getString("key", "default value");

myText.setText(myPreferencesString);
}};

private Button.OnClickListener buttonExitOnClickListener
= new Button.OnClickListener(){

@Override
public void onClick(View v) {
// TODO Auto-generated method stub
finish();
}};

}


2010年10月17日星期日

使用getExternalFilesDir()訪問外部存儲上的文件

Android提供了幾個保存持久應用程序數據的方法. 可根據具體需求來選擇解決方案, 如數據是否應用程序私有的或其他應用程序(用戶)可訪問的, 和需要多少空間. 其中一個方法是使用外部存儲(External Storage).

每個 Android兼容的設備支持共享"外部存儲",你可以用它來保存文件. 這可以是一個可移動存儲介質(如SD卡)或內部(不可移動)存儲. 文件保存到外部存儲是全世界可讀的, 當啟用電腦USB存儲傳輸文件時可以修改的.

首先, 調用getExternalStorageState()檢查是否有可用的媒體.

訪問外部存儲上的文件 -

如果使用API Level 8(Android 2.2)或以上, 使用getExternalFilesDir()來打開一個文件, 表示你應該保存文件在該外部存儲目錄. 這個方法接受一個類型參數指定子目錄的類型; 如DIRECTORY_MUSIC和DIRECTORY_RINGTONES(傳遞 null, 以得到應用程序文件的根目錄). 此方法將創建相應的目錄. 通過指定類型的目錄, 確保在Android的媒體掃描器可以適當的分類你的文件(例如, 鈴聲被確定為不鈴聲和音樂). 如果用戶卸載(uninstall)應用程序,這個目錄及其所有內容將被刪除.

如果你使用API Level 7或以下, 使用getExternalStorageDirectory()打開一個文件表示外部存儲的根目錄, 你應該在下面的目錄寫入你的數據:

/Android/data/<package_name>/files/

例子:


main.xml

<?xml version="1.0" encoding="utf-8"?>
<LinearLayout xmlns:android="http://schemas.android.com/apk/res/android"
android:orientation="vertical"
android:layout_width="fill_parent"
android:layout_height="fill_parent"
>
<TextView
android:layout_width="fill_parent"
android:layout_height="wrap_content"
android:text="@string/hello"
/>
<TextView
android:layout_width="fill_parent"
android:layout_height="wrap_content"
android:text="Very simple code to copy a picture from the application's resource into the external file"
/>
<TextView
android:id="@+id/info"
android:layout_width="fill_parent"
android:layout_height="wrap_content"
/>
</LinearLayout>


AndroidExternalFiles.java

package com.AndroidExternalFiles;

import java.io.File;
import java.io.FileOutputStream;
import java.io.IOException;
import java.io.InputStream;
import java.io.OutputStream;

import android.app.Activity;
import android.os.Bundle;
import android.os.Environment;
import android.widget.TextView;

public class AndroidExternalFiles extends Activity {

TextView textInfo;

/** Called when the activity is first created. */
@Override
public void onCreate(Bundle savedInstanceState) {
super.onCreate(savedInstanceState);
setContentView(R.layout.main);
textInfo = (TextView)findViewById(R.id.info);

String state = Environment.getExternalStorageState();

if (Environment.MEDIA_MOUNTED.equals(state)) {
createExternalStoragePrivateFile();
} else if (Environment.MEDIA_MOUNTED_READ_ONLY.equals(state)) {
textInfo.setText("The media is Read Only!");
} else {
textInfo.setText("Something Wrong!");
}
}

void createExternalStoragePrivateFile() {
// Create a path where we will place our private file on external
// storage.
File file = new File(getExternalFilesDir(null), "myFile.jpg");

try {
// Very simple code to copy a picture from the application's
// resource into the external file.
InputStream is = getResources().openRawResource(R.drawable.icon);
OutputStream os = new FileOutputStream(file);
byte[] data = new byte[is.available()];
is.read(data);
os.write(data);
is.close();
os.close();
textInfo.setText("File have been wrote.");
} catch (IOException e) {
// Unable to create file, likely because external storage is
// not currently mounted.
textInfo.setText("IOException: " + e.toString());
}
}
}


在AndroidManifest.xml加入"android.permission.WRITE_EXTERNAL_STORAGE"權限:

<?xml version="1.0" encoding="utf-8"?>
<manifest xmlns:android="http://schemas.android.com/apk/res/android"
package="com.AndroidExternalFiles"
android:versionCode="1"
android:versionName="1.0">
<application android:icon="@drawable/icon" android:label="@string/app_name">
<activity android:name=".AndroidExternalFiles"
android:label="@string/app_name">
<intent-filter>
<action android:name="android.intent.action.MAIN" />
<category android:name="android.intent.category.LAUNCHER" />
</intent-filter>
</activity>

</application>
<uses-sdk android:minSdkVersion="8" />
<uses-permission android:name="android.permission.WRITE_EXTERNAL_STORAGE" />
</manifest>

2010年10月13日星期三

Sony推出Android開發者網站


Sony推出了一個新網站(http://http://android.sonydeveloper.com/)給開發者登記, 以獲得Sony及相關Android產品的相關消息.


2010年10月11日星期一

檢測Android的方向(Orientation) - Azimuth, Pitch, Roll

前文談到如何使用SensorEventListener()檢測加速度計(Accelerometer)的數據. 本文使用同樣的方法, 檢測Android的方向(Orientation), 方位(Azimuth), 俯仰(Pitch)和橫滾(Roll).

簡單不過: 把sensorManager.getSensorList(Sensor.TYPE_ACCELEROMETER)修改為sensorManager.getSensorList(Sensor.TYPE_ORIENTATION)便成.

SensorEventListener()的onSensorChanged事件傳回的是一個傳感器事件對象(SensorEvent), 其中SensorEvent.value[0], SensorEvent.value[1]和SensorEvent.value[2]就是Azimuth, Pitch和Roll值, 以度角(degree)為單位.
SensorEvent.value[0]:方位(Azimuth), 圍繞Z軸(0~359), Y軸和磁北之間的角度. 0=北,90=東,180=南,270=西.
SensorEvent.value[1]:俯仰(Pitch),圍繞X軸(-180~180), Z軸向Y軸為正數.
SensorEvent.value[2]:橫滾(Roll),圍繞Y軸(-90~90),與正面的價值觀當 X軸向Z軸為正數.

因為Android Emulator沒有帶方向傳感器, 所以需要在真正的設備上運行.

main.xml
<?xml version="1.0" encoding="utf-8"?>
<LinearLayout xmlns:android="http://schemas.android.com/apk/res/android"
android:orientation="vertical"
android:layout_width="fill_parent"
android:layout_height="fill_parent"
>
<TextView
android:layout_width="fill_parent"
android:layout_height="wrap_content"
android:text="@string/hello"
/>
<TextView
android:id="@+id/info"
android:layout_width="fill_parent"
android:layout_height="wrap_content"
/>
<TextView
android:id="@+id/textx"
android:layout_width="fill_parent"
android:layout_height="wrap_content"
android:text="X: "
/>
<TextView
android:id="@+id/texty"
android:layout_width="fill_parent"
android:layout_height="wrap_content"
android:text="Y: "
/>
<TextView
android:id="@+id/textz"
android:layout_width="fill_parent"
android:layout_height="wrap_content"
android:text="Z: "
/>
</LinearLayout>


AndroidOrientationInfo.java
package com.AndroidOrientationInfo;

import java.util.List;

import android.app.Activity;
import android.content.Context;
import android.hardware.Sensor;
import android.hardware.SensorEvent;
import android.hardware.SensorEventListener;
import android.hardware.SensorManager;
import android.os.Bundle;
import android.widget.TextView;
import android.widget.Toast;

public class AndroidOrientationInfo extends Activity {

SensorManager sensorManager;
boolean accelerometerPresent;
Sensor accelerometerSensor;

TextView textInfo, textX, textY, textZ;

/** Called when the activity is first created. */
@Override
public void onCreate(Bundle savedInstanceState) {
super.onCreate(savedInstanceState);
setContentView(R.layout.main);

textInfo = (TextView)findViewById(R.id.info);
textX = (TextView)findViewById(R.id.textx);
textY = (TextView)findViewById(R.id.texty);
textZ = (TextView)findViewById(R.id.textz);

sensorManager = (SensorManager)getSystemService(Context.SENSOR_SERVICE);
List<Sensor> sensorList = sensorManager.getSensorList(Sensor.TYPE_ORIENTATION);

if(sensorList.size() > 0){
accelerometerPresent = true;
accelerometerSensor = sensorList.get(0);

String strSensor = "Name: " + accelerometerSensor.getName()
+ "\nVersion: " + String.valueOf(accelerometerSensor.getVersion())
+ "\nVendor: " + accelerometerSensor.getVendor()
+ "\nType: " + String.valueOf(accelerometerSensor.getType())
+ "\nMax: " + String.valueOf(accelerometerSensor.getMaximumRange())
+ "\nResolution: " + String.valueOf(accelerometerSensor.getResolution())
+ "\nPower: " + String.valueOf(accelerometerSensor.getPower())
+ "\nClass: " + accelerometerSensor.getClass().toString();
textInfo.setText(strSensor);
}
else{
accelerometerPresent = false;
}

}

@Override
protected void onResume() {
// TODO Auto-generated method stub
super.onResume();

if(accelerometerPresent){
sensorManager.registerListener(accelerometerListener, accelerometerSensor, SensorManager.SENSOR_DELAY_NORMAL);
Toast.makeText(this, "Register accelerometerListener", Toast.LENGTH_LONG).show();
}
}

@Override
protected void onStop() {
// TODO Auto-generated method stub
super.onStop();

if(accelerometerPresent){
sensorManager.unregisterListener(accelerometerListener);
Toast.makeText(this, "Unregister accelerometerListener", Toast.LENGTH_LONG).show();
}
}

private SensorEventListener accelerometerListener = new SensorEventListener(){

@Override
public void onAccuracyChanged(Sensor arg0, int arg1) {
// TODO Auto-generated method stub

}

@Override
public void onSensorChanged(SensorEvent event) {
// TODO Auto-generated method stub
textX.setText("X: " + String.valueOf(event.values[0]));
textY.setText("Y: " + String.valueOf(event.values[1]));
textZ.setText("Z: " + String.valueOf(event.values[2]));
}};
}

2010年10月10日星期日

檢測加速度計(Accelerometer)的詳細數據, SensorEventListener()

前文談到如何使用getSensorList()方法獲取系統傳感器的信息, 現在以加速度計(Accelerometer)作為一個例子, 進一步檢測某一傳感器的數據.

Accelerometer: 加速規,又稱加速計、加速針、加速度传感器、重力加速度传感器等等,是測量加速度的裝置。相對於遠距感測的裝置,它測量的是自身的運動 ~ (ref: 加速規 - 维基百科)

檢測加速度計(Accelerometer)的詳細數據

首先, 調用getSensorList(Sensor.TYPE_ACCELEROMETER), 檢查返回列表的長度, 以確保加速度計存在.

如果存在,在onResume()註冊一個事件監聽器(accelerometerListener())為SensorEventListener. 並在onStop()註銷.

在SensorEventListener()的onSensorChanged事件傳回的是一個傳感器事件對象(SensorEvent), 其中SensorEvent.value[0], SensorEvent.value[1]和SensorEvent.value[2]就是x, y, z值, 測量接觸力, 以SI(m/s^2)為單位.
- 當設備從左邊移向右邊時, X為負加速度值.
- 當設備平放在一張桌子,加速度值是-STANDARD_GRAVITY.

main.xml
<?xml version="1.0" encoding="utf-8"?>
<LinearLayout xmlns:android="http://schemas.android.com/apk/res/android"
android:orientation="vertical"
android:layout_width="fill_parent"
android:layout_height="fill_parent"
>
<TextView
android:layout_width="fill_parent"
android:layout_height="wrap_content"
android:text="@string/hello"
/>
<TextView
android:id="@+id/info"
android:layout_width="fill_parent"
android:layout_height="wrap_content"
/>
<TextView
android:id="@+id/textx"
android:layout_width="fill_parent"
android:layout_height="wrap_content"
android:text="X: "
/>
<TextView
android:id="@+id/texty"
android:layout_width="fill_parent"
android:layout_height="wrap_content"
android:text="Y: "
/>
<TextView
android:id="@+id/textz"
android:layout_width="fill_parent"
android:layout_height="wrap_content"
android:text="Z: "
/>
</LinearLayout>


AndroidAccelerometer.java
package com.AndroidAccelerometer;

import java.util.List;

import android.app.Activity;
import android.content.Context;
import android.hardware.Sensor;
import android.hardware.SensorEvent;
import android.hardware.SensorEventListener;
import android.hardware.SensorManager;
import android.os.Bundle;
import android.widget.TextView;
import android.widget.Toast;

public class AndroidAccelerometer extends Activity {

SensorManager sensorManager;
boolean accelerometerPresent;
Sensor accelerometerSensor;

TextView textInfo, textX, textY, textZ;

/** Called when the activity is first created. */
@Override
public void onCreate(Bundle savedInstanceState) {
super.onCreate(savedInstanceState);
setContentView(R.layout.main);

textInfo = (TextView)findViewById(R.id.info);
textX = (TextView)findViewById(R.id.textx);
textY = (TextView)findViewById(R.id.texty);
textZ = (TextView)findViewById(R.id.textz);

sensorManager = (SensorManager)getSystemService(Context.SENSOR_SERVICE);
List<Sensor> sensorList = sensorManager.getSensorList(Sensor.TYPE_ACCELEROMETER);

if(sensorList.size() > 0){
accelerometerPresent = true;
accelerometerSensor = sensorList.get(0);

String strSensor = "Name: " + accelerometerSensor.getName()
+ "\nVersion: " + String.valueOf(accelerometerSensor.getVersion())
+ "\nVendor: " + accelerometerSensor.getVendor()
+ "\nType: " + String.valueOf(accelerometerSensor.getType())
+ "\nMax: " + String.valueOf(accelerometerSensor.getMaximumRange())
+ "\nResolution: " + String.valueOf(accelerometerSensor.getResolution())
+ "\nPower: " + String.valueOf(accelerometerSensor.getPower())
+ "\nClass: " + accelerometerSensor.getClass().toString();
textInfo.setText(strSensor);
}
else{
accelerometerPresent = false;
}

}

@Override
protected void onResume() {
// TODO Auto-generated method stub
super.onResume();

if(accelerometerPresent){
sensorManager.registerListener(accelerometerListener, accelerometerSensor, SensorManager.SENSOR_DELAY_NORMAL);
Toast.makeText(this, "Register accelerometerListener", Toast.LENGTH_LONG).show();
}
}

@Override
protected void onStop() {
// TODO Auto-generated method stub
super.onStop();

if(accelerometerPresent){
sensorManager.unregisterListener(accelerometerListener);
Toast.makeText(this, "Unregister accelerometerListener", Toast.LENGTH_LONG).show();
}
}

private SensorEventListener accelerometerListener = new SensorEventListener(){

@Override
public void onAccuracyChanged(Sensor arg0, int arg1) {
// TODO Auto-generated method stub

}

@Override
public void onSensorChanged(SensorEvent event) {
// TODO Auto-generated method stub
textX.setText("X: " + String.valueOf(event.values[0]));
textY.setText("Y: " + String.valueOf(event.values[1]));
textZ.setText("Z: " + String.valueOf(event.values[2]));
}};
}


相關文章: 檢測Android的方向(Orientation) - Azimuth, Pitch, Roll

2010年10月9日星期六

獲取系統傳感器的信息, getSensorList()

Android系統提供多種類型的傳感器, 應用程序可以使用getSensorList()方法獲取系統傳感器的信息.

下面是一個例子, 首先擴展ListActivity創建一個Activity, 使用getSensorList()方法獲取系統傳感器的信息, 它的內容是一個可用傳感器(android.hardware.Sensor)的列表, 當任何一項被點擊, 它的詳細信息將顯示在對話框裡面.


(當運行在真正的設備時, 將顯示更多的傳感器.)

package com.AndroidSensor;

import java.util.List;

import android.app.AlertDialog;
import android.app.ListActivity;
import android.content.Context;
import android.content.DialogInterface;
import android.hardware.Sensor;
import android.hardware.SensorManager;
import android.os.Bundle;
import android.view.View;
import android.widget.ArrayAdapter;
import android.widget.ListView;

public class AndroidSensor extends ListActivity {

List<Sensor> sensorList;

/** Called when the activity is first created. */
@Override
public void onCreate(Bundle savedInstanceState) {
super.onCreate(savedInstanceState);
//setContentView(R.layout.main);

SensorManager sensorManager = (SensorManager)getSystemService(Context.SENSOR_SERVICE);
sensorList = sensorManager.getSensorList(Sensor.TYPE_ALL);

setListAdapter(new ArrayAdapter<Sensor>(this,
android.R.layout.simple_list_item_1, sensorList));
getListView().setTextFilterEnabled(true);
}

@Override
protected void onListItemClick(ListView l, View v, int position, long id) {
// TODO Auto-generated method stub
super.onListItemClick(l, v, position, id);
Sensor tSensor = sensorList.get(position);
String strSensor
= "Name: " + tSensor.getName()
+ "\nVersion: " + String.valueOf(tSensor.getVersion())
+ "\nVendor: " + tSensor.getVendor()
+ "\nType: " + String.valueOf(tSensor.getType())
+ "\nMax: " + String.valueOf(tSensor.getMaximumRange())
+ "\nResolution: " + String.valueOf(tSensor.getResolution())
+ "\nPower: " + String.valueOf(tSensor.getPower())
+ "\nClass: " + tSensor.getClass().toString();

new AlertDialog.Builder(this)
.setTitle("Title").setMessage(strSensor)
.setPositiveButton("OK",
new DialogInterface.OnClickListener() {
public void onClick(DialogInterface dialog, int which) {}
}).show();
}
}


相關文章: 檢測加速度計(Accelerometer)的詳細數據, SensorEventListener()


2010年10月6日星期三

計算機編程的21法則

在網上看到非常有趣的"計算機編程的21法則(21 Laws of Computer Programming)":

1. 任何程式, 一旦部署, 已經過時.
2. 修改規範以適應程式, 比修改程式以適應規範容易.
3. 如果一個程式是有用的, 它必須被改變.
4. 如果一個程式是沒用的, 它必須被記錄下來.
5. 只有百分之十的代碼會常常被執行.
6. 軟件會擴展到佔用所有可用資源為止.
7. 任何不平凡的程式至少包含一個錯誤.
8. 一個完美示範的可能性跟觀看人數成反比, 隨投入金錢的乘方上升.
9. 最有害的錯誤要直到生產至少六個月之後才被發現.
10. 不可檢測的錯誤有無限變種, 而相比之下, 可檢測的錯誤是有限的.
11. 糾正錯誤需要的努力隨時間呈指數增加.
12. 程式的複雜性增加直到它超出了有關程序員的能力.
13. 你自己的代碼,沒有看過幾個月, 形同別人寫的.
14. 每個小程式裡面都有一個大程式蠢蠢欲動.
15. 越早開始編寫一個程式, 時間越長.
16. 一個不小心計劃的項目需比預期長三倍的時間才能完成, 一個精心策劃的項目只需要兩倍的時間.
17. 為後期項目添加程序員, 使它更遲完成.
18. 一個程式是不低於90%完成, 並從未超過95%完成.
19. 如果你希望麻煩被自動處理, 你只會得到自動的麻煩.
20. 建立一個即使是傻瓜都會用的程式, 只有傻瓜才會想使用它.
21. 用戶真的不知道自己想要什麼, 直到他在程式中使用它.

1. Any given program, once deployed, is already obsolete.
2. It is easier to change the specification to fit the program than vice versa.
3. If a program is useful, it will have to be changed.
4. If a program is useless, it will have to be documented.
5. Only ten percent of the code in any given program will ever execute.
6. Software expands to consume all available resources.
7. Any non-trivial program contains at least one error.
8. The probability of a flawless demo is inversely proportional to the number of people watching, raised to the power of the amount of money involved.
9. Not until a program has been in production for at least six months will its most harmful error be discovered.
10. Undetectable errors are infinite in variety, in contrast to detectable errors, which by definition are limited.
11. The effort required to correct an error increases exponentially with time.
12. Program complexity grows until it exceeds the capabilities of the programmer who must maintain it.
13. Any code of your own that you haven’t looked at in months might as well have been written by someone else.
14. Inside every small program is a large program struggling to get out.
15. The sooner you start coding a program, the longer it will take.
16. A carelessly planned project takes three times longer to complete than expected; a carefully planned project takes only twice as long.
17. Adding programmers to a late project makes it later.
18. A program is never less than 90% complete, and never more than 95% complete.
19. If you automate a mess, you get an automated mess.
20. Build a program that even a fool can use, and only a fool will want to use it.
21. Users truly don’t know what they want in a program until they use it.

原來的文: 21 Laws of Computer Programming


準備...谷歌電視應用程序(Google TV apps)

谷歌電視(Google TV)是一種全新的電視方式: 這是一個結合當前的電視節目和網絡開放的一個單一, 無縫的娛樂平台.

Google 剛剛推出了一個新網站 http://www.google.com/tv/, 提供更多有關Google TV應用程序(App)的信息和所有其他Google TV的功能。

Apps for Google TV

Your smartphone has apps. Now your TV does too. Here's a sneak preview of the apps that will be available on Google TV this fall. www.google.com/tv

明年(2011)年初開始,開發人員將能夠開發和銷售Google TV的Android App. (了解更多...)

參考鏈接: Google TV Blog - Here comes Google TV

2010年10月1日星期五

Android Market更新:更多國家,更多的賣家,更多的買家


從現在開始, 來自20個新加國家的開發人員可以在Android Market出售付費軟件. 此外, 在未來2週, 新加18個國家的用戶將能夠從Android Market購買付費軟件.

支持開發人員出售付費軟件的國家現已擴大到29個國家, 包括今天新增加的20個國家: 阿根廷, 澳大利亞, 比利時, 巴西, 加拿大, 丹麥, 芬蘭, 香港, 愛爾蘭, 以色列, 墨西哥, 新西蘭, 挪威, 葡萄牙, 俄羅斯, 新加坡, 韓國, 瑞典, 瑞士和台灣.

能夠從Android Market購買付費軟件的國家現已擴大到32個, 包括今天新增加的18個國家: 阿根廷, 比利時, 巴西, 捷克共和國, 丹麥, 芬蘭, 香港, 印度, 愛爾蘭, 以色列, 墨西哥, 挪威, 波蘭, 葡萄牙, 俄羅斯, 新加坡, 瑞典和台灣.


來源和更多詳細消息: Android Developers Blog: More Countries, More sellers, More buyers