2010年4月30日星期五

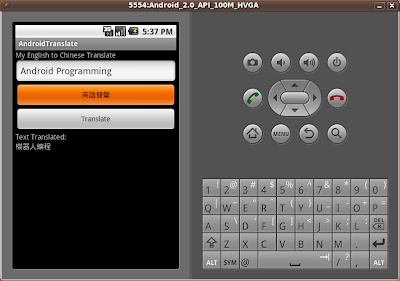
為Android詞典加入英語發聲功能

前文"使用Google Translate API編寫自己的Android詞典"介紹了如何使用Google的翻譯功能. "究竟"Android"如何讀? Text-To-Speech (TTS)"及"檢查語音合成功能, Text-To-Speech (TTS)"介紹了Android的檢查語音合成功能. 現在, 可以把它們集合起來, 為之前自己的Android詞典加入英語發聲功能.

Android英語發聲詞典

參考"在Android應用程序內使用Google Translate API, google-api-translate-java", 下載並添加jar, 和在AndroidMainfest.xml文件中添加"android.permission.INTERNET"權限.

修改main.xml, 多添加一個英語發聲按鍵
<?xml version="1.0" encoding="utf-8"?>
<LinearLayout xmlns:android="http://schemas.android.com/apk/res/android"
android:orientation="vertical"
android:layout_width="fill_parent"
android:layout_height="fill_parent"
>
<TextView
android:layout_width="fill_parent"
android:layout_height="wrap_content"
android:text="My English to Chinese Translate"
/>
<EditText
android:layout_width="fill_parent"
android:layout_height="wrap_content"
android:id="@+id/texttotranlate"
/>
<Button
android:layout_width="fill_parent"
android:layout_height="wrap_content"
android:enabled="false"
android:text = "英語發聲"
android:id="@+id/tospeech"
/>
<Button
android:layout_width="fill_parent"
android:layout_height="wrap_content"
android:text = "Translate"
android:id="@+id/totranslate"
/>
<TextView
android:layout_width="fill_parent"
android:layout_height="wrap_content"
android:id="@+id/comment"
/>
<TextView
android:layout_width="fill_parent"
android:layout_height="wrap_content"
android:id="@+id/translatedtext"
/>
</LinearLayout>


修改主代碼.
package com.AndroidTranslate;

import java.util.Locale;

import android.app.Activity;
import android.content.Intent;
import android.os.Bundle;
import android.speech.tts.TextToSpeech;
import android.speech.tts.TextToSpeech.OnInitListener;
import android.view.View;
import android.widget.Button;
import android.widget.EditText;
import android.widget.TextView;

import com.google.api.translate.Language;
import com.google.api.translate.Translate;


public class AndroidTranslate extends Activity implements OnInitListener{

EditText textToTranlate;
Button buttonToTranslate;
Button buttonToSpeech;
TextView textComment;
TextView translatedText;

final int MY_TTS_CHECK_CODE=1;
private TextToSpeech myTTS;

/** Called when the activity is first created. */
@Override
public void onCreate(Bundle savedInstanceState) {
super.onCreate(savedInstanceState);
setContentView(R.layout.main);

textToTranlate = (EditText)findViewById(R.id.texttotranlate);
buttonToTranslate = (Button)findViewById(R.id.totranslate);
buttonToSpeech = (Button)findViewById(R.id.tospeech);
textComment = (TextView)findViewById(R.id.comment);
translatedText = (TextView)findViewById(R.id.translatedtext);

buttonToTranslate.setOnClickListener(buttonToTranslateOnClickListener);
buttonToSpeech.setOnClickListener(buttonToSpeechOnClickListener);

//Check if TextToSpeech Engine installed.
Intent checkIntent = new Intent();
checkIntent.setAction(TextToSpeech.Engine.ACTION_CHECK_TTS_DATA);
startActivityForResult(checkIntent, MY_TTS_CHECK_CODE);

}

private Button.OnClickListener buttonToTranslateOnClickListener = new Button.OnClickListener(){

@Override
public void onClick(View v) {
// TODO Auto-generated method stub
String strTranslatedText = null;
String strTextToTranlate = textToTranlate.getText().toString();
Translate.setHttpReferrer("http://androidbiancheng.blogspot.com/");

try {
strTranslatedText = Translate.execute(strTextToTranlate, Language.ENGLISH, Language.CHINESE_TRADITIONAL);
textComment.setText("Text Translated:");
translatedText.setText(strTranslatedText);
} catch (Exception e) {
// TODO Auto-generated catch block
textComment.setText("--- Error in Translate ---");
translatedText.setText(null);
e.printStackTrace();
}

}};

private Button.OnClickListener buttonToSpeechOnClickListener = new Button.OnClickListener(){

@Override
public void onClick(View arg0) {
// TODO Auto-generated method stub
String textToSpeech = textToTranlate.getText().toString();
myTTS.setLanguage(Locale.ENGLISH);
myTTS.speak(textToSpeech, TextToSpeech.QUEUE_ADD, null);
}

};

@Override
protected void onActivityResult(int requestCode, int resultCode, Intent data) {
// TODO Auto-generated method stub
if (requestCode == MY_TTS_CHECK_CODE){
if(resultCode==TextToSpeech.Engine.CHECK_VOICE_DATA_PASS){
//TextToSpeech Engine installed.
myTTS = new TextToSpeech(this, this);
}else{
//TextToSpeech Engine NOT installed, request to install.
Intent installIntent = new Intent();
installIntent.setAction(TextToSpeech.Engine.ACTION_INSTALL_TTS_DATA);
startActivity(installIntent);
}
}
}

@Override
public void onInit(int arg0) {
// TODO Auto-generated method stub

//Check if Language available
switch(myTTS.isLanguageAvailable(Locale.ENGLISH)){
case(TextToSpeech.LANG_AVAILABLE):
buttonToSpeech.setEnabled(true);
break;
case(TextToSpeech.LANG_COUNTRY_AVAILABLE):
buttonToSpeech.setEnabled(true);
break;
case(TextToSpeech.LANG_COUNTRY_VAR_AVAILABLE):
buttonToSpeech.setEnabled(true);
break;
case(TextToSpeech.LANG_MISSING_DATA):
buttonToSpeech.setEnabled(false);
break;
case(TextToSpeech.LANG_NOT_SUPPORTED):
buttonToSpeech.setEnabled(false);
break;
default:
buttonToSpeech.setEnabled(false);
break;
}
}

@Override
protected void onDestroy() {
// TODO Auto-generated method stub
super.onDestroy();
myTTS.shutdown();
}


}

2010年4月27日星期二

Hongkong Google Technology User Group - 香港谷歌技術用戶組

香港GTUG(Google Technology User Group)成立於2009年12月, 它是一個立足於香港, 針對開發人員社區的非盈利性體團, 讓開發人員學習和分享關於谷歌的技術知識,網絡開發技術,以及互聯網應用.


其他大中華區GTUGs:
- 北京 GTUG
- 上海 GTUG
- 廣州 GTUG
- 杭州 GTUG
- 台北 GTUG

2010年4月25日星期日

檢查語音合成功能, Text-To-Speech (TTS).

自從Android平台1.6版後, Android加入語音合成功能, Text-To-Speech (TTS). 該附帶的語音合成引擎(TTS engine)支持英語,法語,德語,意大利語和西班牙語. 此外, 根據你的區域, 另外支持美國口音和英國口音的英語.

儘管所有的Android設備,都支持該語音功能, 但部分設備因為儲存空間有限,可能缺少該語言的資源文件. 所以應用程序應先檢查設備是否存在語音合成資源(TTS resources)與相應的意圖(intent).


main.xml
<?xml version="1.0" encoding="utf-8"?>
<LinearLayout xmlns:android="http://schemas.android.com/apk/res/android"
android:orientation="vertical"
android:layout_width="fill_parent"
android:layout_height="fill_parent"
>
<TextView
android:layout_width="fill_parent"
android:layout_height="wrap_content"
android:text="@string/hello"
/>
<TextView
android:layout_width="fill_parent"
android:layout_height="wrap_content"
android:id="@+id/englishresult"
/>
<TextView
android:layout_width="fill_parent"
android:layout_height="wrap_content"
android:id="@+id/chineseresult"
/>
</LinearLayout>


主代碼
package com.AndroidTTS;

import java.util.Locale;

import android.app.Activity;
import android.content.Intent;
import android.os.Bundle;
import android.speech.tts.TextToSpeech;
import android.speech.tts.TextToSpeech.OnInitListener;
import android.widget.TextView;

public class AndroidTTS extends Activity implements OnInitListener{

final int MY_TTS_CHECK_CODE=1;
private TextToSpeech myTTS;

TextView englishResult, chineseResult;

/** Called when the activity is first created. */
@Override
public void onCreate(Bundle savedInstanceState) {
super.onCreate(savedInstanceState);
setContentView(R.layout.main);

englishResult = (TextView)findViewById(R.id.englishresult);
chineseResult = (TextView)findViewById(R.id.chineseresult);

//Check if TextToSpeech Engine installed.
Intent checkIntent = new Intent();
checkIntent.setAction(TextToSpeech.Engine.ACTION_CHECK_TTS_DATA);
startActivityForResult(checkIntent, MY_TTS_CHECK_CODE);
}

@Override
protected void onActivityResult(int requestCode, int resultCode, Intent data) {
// TODO Auto-generated method stub
if (requestCode == MY_TTS_CHECK_CODE){
if(resultCode==TextToSpeech.Engine.CHECK_VOICE_DATA_PASS){
//TextToSpeech Engine installed.
myTTS = new TextToSpeech(this, this);
}else{
//TextToSpeech Engine NOT installed, request to install.
Intent installIntent = new Intent();
installIntent.setAction(TextToSpeech.Engine.ACTION_INSTALL_TTS_DATA);
startActivity(installIntent);
}
}
}

@Override
public void onInit(int status) {
// TODO Auto-generated method stub

int isLanguageAvailable;

//Check if Language available
isLanguageAvailable = myTTS.isLanguageAvailable(Locale.ENGLISH);
englishResult.setText("ENGLISH: "+ getStringResult(isLanguageAvailable));

isLanguageAvailable = myTTS.isLanguageAvailable(Locale.CHINESE);
chineseResult.setText("CHINESE: "+ getStringResult(isLanguageAvailable));
}

private String getStringResult(int resultLanguageAvailable)
{
String strResult;

switch(resultLanguageAvailable){
case(TextToSpeech.LANG_AVAILABLE):
strResult = "LANG_AVAILABLE";
break;
case(TextToSpeech.LANG_COUNTRY_AVAILABLE):
strResult = "LANG_COUNTRY_AVAILABLE";
break;
case(TextToSpeech.LANG_COUNTRY_VAR_AVAILABLE):
strResult = "LANG_COUNTRY_VAR_AVAILABLE";
break;
case(TextToSpeech.LANG_MISSING_DATA):
strResult = "LANG_MISSING_DATA";
break;
case(TextToSpeech.LANG_NOT_SUPPORTED):
strResult = "LANG_NOT_SUPPORTED";
break;
default:
strResult = "err: Should not happen!";
break;
}
return strResult;
}

@Override
protected void onDestroy() {
// TODO Auto-generated method stub
super.onDestroy();
myTTS.shutdown();
}
}


相關文章: 究竟"Android"如何讀? Text-To-Speech (TTS)
相關文章: 為Android詞典加入英語發聲功能


2010年4月23日星期五

ase_r21.apk, Android設備上的腳本語言

android-scripting(Android設備上的腳本語言)推出了最新版本, ase_r21.apk
, 可以瀏覽android-scripting下載.

相關文章: Android Scripting Environment (ASE) - Android設備上的腳本語言.

2010年4月22日星期四

使用Google Translate API編寫自己的Android詞典

通過上一篇文章"在Android應用程序內使用Google Translate API, google-api-translate-java", 原來通過Google Translate API實現Android的翻譯功能就是這麼簡單.

現在便進一步實現一個可以輸入的英譯中詞典.


要在Android應用程序內使用Google的Translate API, 除了按照文章google-api-translate-java下載並添加jar之外, 還需要在AndroidMainfest.xml文件中添加"android.permission.INTERNET"權限.
<?xml version="1.0" encoding="utf-8"?>
<manifest xmlns:android="http://schemas.android.com/apk/res/android"
package="com.AndroidTranslate"
android:versionCode="1"
android:versionName="1.0">
<application android:icon="@drawable/icon" android:label="@string/app_name">
<activity android:name=".AndroidTranslate"
android:label="@string/app_name">
<intent-filter>
<action android:name="android.intent.action.MAIN" />
<category android:name="android.intent.category.LAUNCHER" />
</intent-filter>
</activity>
</application>
<uses-sdk android:minSdkVersion="4" />
<uses-permission android:name="android.permission.INTERNET" />
</manifest>


修改main.xml
<?xml version="1.0" encoding="utf-8"?>
<LinearLayout xmlns:android="http://schemas.android.com/apk/res/android"
android:orientation="vertical"
android:layout_width="fill_parent"
android:layout_height="fill_parent"
>
<TextView
android:layout_width="fill_parent"
android:layout_height="wrap_content"
android:text="My English to Chinese Translate"
/>
<EditText
android:layout_width="fill_parent"
android:layout_height="wrap_content"
android:id="@+id/texttotranlate"
/>
<Button
android:layout_width="fill_parent"
android:layout_height="wrap_content"
android:text = "Translate"
android:id="@+id/totranslate"
/>
<TextView
android:layout_width="fill_parent"
android:layout_height="wrap_content"
android:id="@+id/comment"
/>
<TextView
android:layout_width="fill_parent"
android:layout_height="wrap_content"
android:id="@+id/translatedtext"
/>
</LinearLayout>


主代碼
package com.AndroidTranslate;

import android.app.Activity;
import android.os.Bundle;
import android.view.View;
import android.widget.Button;
import android.widget.EditText;
import android.widget.TextView;

import com.google.api.translate.Language;
import com.google.api.translate.Translate;


public class AndroidTranslate extends Activity {

EditText textToTranlate;
Button buttonToTranslate;
TextView textComment;
TextView translatedText;

/** Called when the activity is first created. */
@Override
public void onCreate(Bundle savedInstanceState) {
super.onCreate(savedInstanceState);
setContentView(R.layout.main);

textToTranlate = (EditText)findViewById(R.id.texttotranlate);
buttonToTranslate = (Button)findViewById(R.id.totranslate);
textComment = (TextView)findViewById(R.id.comment);
translatedText = (TextView)findViewById(R.id.translatedtext);

buttonToTranslate.setOnClickListener(buttonToTranslateOnClickListener);

}

private Button.OnClickListener buttonToTranslateOnClickListener = new Button.OnClickListener(){

@Override
public void onClick(View v) {
// TODO Auto-generated method stub
String strTranslatedText = null;
String strTextToTranlate = textToTranlate.getText().toString();
Translate.setHttpReferrer("http://androidbiancheng.blogspot.com/");

try {
strTranslatedText = Translate.execute(strTextToTranlate, Language.ENGLISH, Language.CHINESE_TRADITIONAL);
textComment.setText("Text Translated:");
translatedText.setText(strTranslatedText);
} catch (Exception e) {
// TODO Auto-generated catch block
textComment.setText("--- Error in Translate ---");
translatedText.setText(null);
e.printStackTrace();
}
}};
}


相關文章: 為Android詞典加入英語發聲功能


2010年4月21日星期三

在Android應用程序內使用Google Translate API, google-api-translate-java


要在Android應用程序內使用Google的Translate API, 除了按照文章google-api-translate-java下載並添加jar之外, 還需要在AndroidMainfest.xml文件中添加"android.permission.INTERNET"權限.
<?xml version="1.0" encoding="utf-8"?>
<manifest xmlns:android="http://schemas.android.com/apk/res/android"
package="com.AndroidTranslate"
android:versionCode="1"
android:versionName="1.0">
<application android:icon="@drawable/icon" android:label="@string/app_name">
<activity android:name=".AndroidTranslate"
android:label="@string/app_name">
<intent-filter>
<action android:name="android.intent.action.MAIN" />
<category android:name="android.intent.category.LAUNCHER" />
</intent-filter>
</activity>

</application>
<uses-sdk android:minSdkVersion="4" />
<uses-permission android:name="android.permission.INTERNET" />
</manifest>


main.xml
<?xml version="1.0" encoding="utf-8"?>
<LinearLayout xmlns:android="http://schemas.android.com/apk/res/android"
android:orientation="vertical"
android:layout_width="fill_parent"
android:layout_height="fill_parent"
>
<TextView
android:layout_width="fill_parent"
android:layout_height="wrap_content"
android:text="@string/hello"
android:id="@+id/mytext"
/>
</LinearLayout>


主代碼
package com.AndroidTranslate;

import android.app.Activity;
import android.os.Bundle;
import android.widget.TextView;

import com.google.api.translate.Language;
import com.google.api.translate.Translate;


public class AndroidTranslate extends Activity {
/** Called when the activity is first created. */
@Override
public void onCreate(Bundle savedInstanceState) {
super.onCreate(savedInstanceState);
setContentView(R.layout.main);

TextView myTranslatedText = (TextView)findViewById(R.id.mytext);

Translate.setHttpReferrer("http://androidbiancheng.blogspot.com/");
try {
String trText = Translate.execute("Hello Android Translate!",
Language.ENGLISH, Language.CHINESE_TRADITIONAL);
myTranslatedText.setText(trText);
} catch (Exception e) {
// TODO Auto-generated catch block
e.printStackTrace();
myTranslatedText.setText("Can't Translate!");
}
}
}


相關文章: 使用Google Translate API編寫自己的Android詞典


google-api-translate-java

google-api-translate-java是一項谷歌代碼項目(Google Code project), 它提供一種簡單的, 非官方的Java客戶端API, 以使用谷歌翻譯項目(Google Translate).

使用google-api-translate-java, 首先從網頁下載jar檔案到你的電腦上, 然後添加External JARs, 從Eclipse, 在你的project上右擊選擇Properties>Java Build Path, 選擇libraries標籤, 再選擇Add External JARs以添加剛才下載的jar檔案.

相關文章: 在Android應用程序內使用Google Translate API, google-api-translate-java

2010年4月17日星期六

Nine-Patch Images(可伸展圖像)及Draw 9-patch工具


Nine-Patch Images (可伸展圖像)

Android支援一種可伸展圖像,稱為NinePatch圖形. 這是一個PNG圖像,其中可以定義可拉伸區段, Android顯示時, 可調整這個可拉伸區段以適應不同對象的大小,如文本字符串. 通常這種資源會指定給視圖背景. 按鈕的背景是一個例子; 按鈕必須延伸,以適應不同長度的字符串.


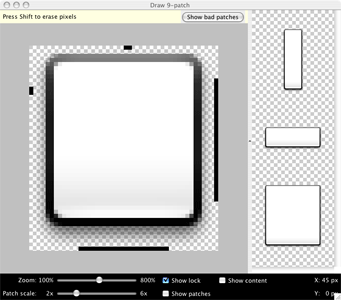
Draw 9-patch

Draw 9-patch 是一個所見即所得(WYSIWYG)的編輯器, 讓你輕鬆地創建Nine-Patch圖形.

2010年4月13日星期二

在Sun VirtualBox上安裝LiveAndroid

在文章"LiveAndroid, 讓Android在x86平台上面跑"中介紹了LiveAndroid, 根據我自己的經驗, LiveAndroid不是可以順利在每個x86平台上安裝, 而Sun VirtualBox是一個很好的平台, 它是一個非常流行的開源虛擬化軟件. 你可以在VirtualBox上安裝LiveAndroid.

- 在http://www.sun.com/software/products/virtualbox/index.jsp下載並安裝VirtualBox.
- 啟動VirtualBox
- 點擊New, 然後Next, 創建新的虛擬機.
- 輸入新虛擬機的名稱(LiveAndroid), 選擇操作系統類型: 操作系統(Linux)和版本(Linux 2.6).

- 接受預設的基本內存大小(Base Memory Size).

- 點選Boot Hard Disk和Create new hard disk, 點擊Next, 再點擊Next.


- 點選Dynamically expanding storage, 點擊Next.

- 接受預設的虛擬磁盤位置和大小, 點擊Next.

- 點擊Finish兩次.


基本上已安裝了新的虛擬機, 但還須設定ISO文檔.

- 參考文章"LiveAndroid, 讓Android在x86平台上面跑"下載並連接ISO檔案.
- 在VirtualBox之上, 點選File->Virtual Media Manager...

- 選擇CD/DVD images, 點擊Add.

- 瀏覽和選擇LiveAndroid的ISO檔案, 點擊OK.


現在,可以點擊Start啟動新安裝的LiveAndroid虛擬機.

- 在歡迎頁面點擊Next.

- 再點擊Next.

- 點擊Finish.


現在, LiveAndroid正式在虛擬機之上運行.

2010年4月12日星期一

谷歌2010全球编程挑战赛正式启动

Google Developer Blog - China; 谷歌中国 开发者网站 博客: 谷歌2010全球编程挑战赛正式启动 - 大家来参加!

去爱尔兰首都都柏林,和来自全世界的编程高手面对面一决高低?没错,谷歌全球编程挑战赛很快就能帮您实现梦想!2010年4月8日,新赛季的谷歌全球编程挑战赛正式启动,开始报名。

谷歌编程挑战赛要求参赛者在有限的时间内通过编程来解决复杂的算法问题。竞赛允许参赛者选择自己所熟悉的编码语言和开发环境。2010赛季的报名日期为2010年4月8日至2010年5月7日。

2010年5月7日,谷歌编程挑战赛将正式拉开序幕,来自世界各地的参赛者将首先在网上进行比赛,从中选出25名最佳参赛者到都柏林进行现场决赛。决赛时间初定于2010年7月30日,届时,新一届的全球冠军将会诞生。

2010年4月8日星期四

Java格式字符串(Java Format String)

除了在字符串資源(String Resources)文章中提到簡單格式化的字符串外, Android也可使用Java格式的字符串(Java Format String).


在/res/values/文件夾下面, 創建XML文件定義字符串資源:
<?xml version="1.0" encoding="utf-8"?>
<resources>
<string name="jave_format_string">Hello %1$s, it's %2$s.</string>
</resources>


main.xml
<?xml version="1.0" encoding="utf-8"?>
<LinearLayout xmlns:android="http://schemas.android.com/apk/res/android"
android:orientation="vertical"
android:layout_width="fill_parent"
android:layout_height="fill_parent"
>
<TextView
android:layout_width="fill_parent"
android:layout_height="wrap_content"
android:text="@string/hello"
/>
<TextView
android:layout_width="fill_parent"
android:layout_height="wrap_content"
android:id="@+id/mystring"
/>
</LinearLayout>


Java源代碼
package com.AndroidString;

import android.app.Activity;
import android.os.Bundle;
import android.widget.TextView;

public class AndroidString extends Activity {
/** Called when the activity is first created. */
@Override
public void onCreate(Bundle savedInstanceState) {
super.onCreate(savedInstanceState);
setContentView(R.layout.main);

TextView myString = (TextView)findViewById(R.id.mystring);
myString.setText(String.format(getString(R.string.jave_format_string), "Android", "Java Format String"));

}
}


字符串資源(String Resources)

字符串資源(String Resources)是其中一種最簡單的資源; 它可以是一個定義為資源的簡單字符串, 也可以是一個格式化的字符串. 來看看這裡的例子:


要使用XML文件定義字符串資源, 該XML文件需要放置在/res/values/文件夾下面, 可以使用任意的文件名.
<?xml version="1.0" encoding="utf-8"?>
<resources>
<string name="simple_string">simple string</string>
<string name="formatted_string">It's <b><i>BOLD string</i></b>!</string>
</resources>


main.xml
<?xml version="1.0" encoding="utf-8"?>
<LinearLayout xmlns:android="http://schemas.android.com/apk/res/android"
android:orientation="vertical"
android:layout_width="fill_parent"
android:layout_height="fill_parent"
>
<TextView
android:layout_width="fill_parent"
android:layout_height="wrap_content"
android:text="@string/hello"
/>
<TextView
android:layout_width="fill_parent"
android:layout_height="wrap_content"
android:text="@string/simple_string"
/>
<TextView
android:layout_width="fill_parent"
android:layout_height="wrap_content"
android:text="@string/formatted_string"
/>
</LinearLayout>

2010年4月7日星期三

有關數據與 AdapterView的綁定

AdapterView是ViewGroup的子類, 它的子視圖取決於一個綁定到某些數據類型的適配器(Adapter). 當需要在佈局(layout)中顯示一些存儲的數據(相對於字符串或drawables資源)時, AdapterView是非常有用的.

Gallery, ListView, 和 Spinner 就是AdapterView子類的例子, 可以用作把特定類型的數據和特定的顯示方式綁定起來.

AdapterView對象有兩個主要責任:
* 在佈局中填上數據
* 處理用戶的選擇

有關AdapterView, 詳細可以參考"Binding to Data with AdapterView | Android Developers".

本Blog相關文章:
- 適配器(Adapter), 列表適配器(ListAdapter)和數組適配器(ArrayAdapter)
- 下拉列表 (Spinner)
- 畫廊 (Gallery)