2010年7月20日星期二

怎麼設定layout_width為50%

關於layout_width, 最常見的設定可能是"wrap_content"和"fill_parent", 但它沒有"50%"設定, 那麼怎麼設定layout_width為50%? 可以使用以下方法:

<?xml version="1.0" encoding="utf-8"?>
<LinearLayout xmlns:android="http://schemas.android.com/apk/res/android"
android:orientation="horizontal"
android:layout_width="fill_parent"
android:layout_height="fill_parent"
>
<LinearLayout
android:orientation="vertical"
android:layout_height="wrap_content"
android:layout_width="0dip"
android:layout_weight="1"
>
<TextView
android:layout_height="wrap_content"
android:layout_width="fill_parent"
android:text="50%"
/>
<Button
android:layout_height="wrap_content"
android:layout_width="fill_parent"
android:text="OK"
/>
</LinearLayout>
<Button
android:layout_height="wrap_content"
android:layout_width="0dip"
android:layout_weight="1"
android:text="50 %"
/>
</LinearLayout>


怎麼設定layout_width為50%

相關文章:
- 通過 Java 代碼設定 layout_width 為 50%

2010年7月18日星期日

HTC Wildfire — A closer look


The HTC Wildfire is one of our friendliest phones yet. It features app-sharing, so you can recommend your favorite apps to your friends; Friend Stream so you can see Facebook, Twitter and Flickr updates in one place; And HTC Caller ID so you can see what the latest Facebook status of the person who'e calling you.

2010年7月16日星期五

Android的人面識別功能(Face Detection)

Android的人面識別功能(Face Detection)

Android提供android.media.FaceDetector類, 它可以從一個位圖圖形(Bitmap)對象中辨認人面. 下面是一個使用FaceDetector的例子.

Android的人面識別功能(Face Detection)

首先複製一個有人面的位圖文件到SD Card上, 名為face1.jpg. (參考"如何複製檔案到 SD Card")

創建FaceView.java

package com.AndroidFaceDetection;

import android.content.Context;
import android.graphics.Bitmap;
import android.graphics.BitmapFactory;
import android.graphics.Canvas;
import android.graphics.Color;
import android.graphics.Paint;
import android.graphics.PointF;
import android.media.FaceDetector;
import android.media.FaceDetector.Face;
import android.util.AttributeSet;
import android.view.View;

public class FaceView extends View {

private final String faceImageUri = "/sdcard/face1.jpg";;

private Bitmap bitmapFace;
private int imageWidth, imageHeight;
private FaceDetector myFaceDetect;
private FaceDetector.Face[] faceDetected;
private final int numberOfFace = 5;
private int numberOfFaceDetected;

Paint paint;

public FaceView(Context context) {
super(context);
// TODO Auto-generated constructor stub
initFaceView();
}

public FaceView(Context context, AttributeSet attrs) {
super(context, attrs);
// TODO Auto-generated constructor stub
initFaceView();
}

public FaceView(Context context, AttributeSet attrs, int defStyle) {
super(context, attrs, defStyle);
// TODO Auto-generated constructor stub
initFaceView();
}

private void initFaceView(){
BitmapFactory.Options BitmapFactoryOptionsbfo = new BitmapFactory.Options();
BitmapFactoryOptionsbfo.inPreferredConfig = Bitmap.Config.RGB_565;
bitmapFace = BitmapFactory.decodeFile(faceImageUri);
imageWidth = bitmapFace.getWidth();
imageHeight = bitmapFace.getHeight();
faceDetected = new FaceDetector.Face[numberOfFace];
myFaceDetect = new FaceDetector(imageWidth, imageHeight, numberOfFace);
numberOfFaceDetected = myFaceDetect.findFaces(bitmapFace, faceDetected);

paint = new Paint();
paint.setColor(Color.WHITE);
paint.setStyle(Paint.Style.STROKE);
paint.setStrokeWidth(3);
}

@Override
protected void onDraw(Canvas canvas) {
// TODO Auto-generated method stub

canvas.drawBitmap(bitmapFace, 0, 0, null);

for(int i=0; i < numberOfFaceDetected; i++)
{
Face face = faceDetected[i];
PointF faceMidPoint = new PointF();
face.getMidPoint(faceMidPoint);
canvas.drawPoint(faceMidPoint.x, faceMidPoint.y, paint);
canvas.drawCircle(faceMidPoint.x, faceMidPoint.y, face.eyesDistance(), paint);
}
}

}


修改main.xml使用FaceView類

<?xml version="1.0" encoding="utf-8"?>
<LinearLayout xmlns:android="http://schemas.android.com/apk/res/android"
android:orientation="vertical"
android:layout_width="fill_parent"
android:layout_height="fill_parent"
>
<TextView
android:layout_width="fill_parent"
android:layout_height="wrap_content"
android:text="@string/hello"
/>
<com.AndroidFaceDetection.FaceView
android:layout_width="fill_parent"
android:layout_height="fill_parent"
/>
</LinearLayout>


主程序AndroidFaceDetection.java無需修改.


2010年7月11日星期日

Android應用程式的生命週期(Life Cycle)

這是一個認識Android應用程式生命週期的練習.

Android應用程式的生命週期(Life Cycle)

通過這個練習知道, 原來按下HOME按鈕離開應用程式, 和按下BACK按鈕或調用finish()方法離開應用程式是不相同的.

按下HOME按鈕離開應用程式, 會順序調用: OnPause() -> OnStop().
再次進入應用程式會調用: OnReStart() -> OnStart() -> OnResume().

按下BACK按鈕或調用finish()方法離開應用程式: OnPause() -> OnStop() -> onDestroy().
再次進入應用程式會調用: OnCreate() -> OnStart() -> OnResume().

main.xml

<?xml version="1.0" encoding="utf-8"?>
<LinearLayout xmlns:android="http://schemas.android.com/apk/res/android"
android:orientation="vertical"
android:layout_width="fill_parent"
android:layout_height="fill_parent"
>
<TextView
android:layout_width="fill_parent"
android:layout_height="wrap_content"
android:text="@string/hello"
/>
<Button
android:id="@+id/finish"
android:layout_width="fill_parent"
android:layout_height="wrap_content"
android:text="exit App by finish()"
/>
</LinearLayout>


主要Java代碼

package com.AndroidLifeCycle;

import android.app.Activity;
import android.os.Bundle;
import android.view.View;
import android.widget.Button;
import android.widget.Toast;

public class AndroidLifeCycle extends Activity {
/** Called when the activity is first created. */
@Override
public void onCreate(Bundle savedInstanceState) {
super.onCreate(savedInstanceState);
setContentView(R.layout.main);

Button finish = (Button)findViewById(R.id.finish);
finish.setOnClickListener(new Button.OnClickListener(){

@Override
public void onClick(View v) {
// TODO Auto-generated method stub
finish();
}});

Toast.makeText(this, "onCreate", Toast.LENGTH_LONG).show();

}

@Override
protected void onDestroy() {
// TODO Auto-generated method stub
super.onDestroy();
Toast.makeText(this, "onDestroy", Toast.LENGTH_LONG).show();
}

@Override
protected void onPause() {
// TODO Auto-generated method stub
super.onPause();
Toast.makeText(this, "onPause", Toast.LENGTH_LONG).show();
}

@Override
protected void onRestart() {
// TODO Auto-generated method stub
super.onRestart();
Toast.makeText(this, "onRestart", Toast.LENGTH_LONG).show();
}

@Override
protected void onResume() {
// TODO Auto-generated method stub
super.onResume();
Toast.makeText(this, "onResume", Toast.LENGTH_LONG).show();
}

@Override
protected void onStart() {
// TODO Auto-generated method stub
super.onStart();
Toast.makeText(this, "onStart", Toast.LENGTH_LONG).show();
}

@Override
protected void onStop() {
// TODO Auto-generated method stub
super.onStop();
Toast.makeText(this, "onStop", Toast.LENGTH_LONG).show();
}
}

2010年7月9日星期五

安裝 OPhone SDK 2.0

OPhone SDK 2.0是以Android SDK的一個組件形式發布, 稱為附加組件(Add-ons).


可以參考"在 Linux(ubuntu)上安裝Eclipse + Android SDK"的步驟(Eclipse 3.6/Ubuntu 10.04同樣可以). 分別是先把下載的OPhone-SDK-2.0Beta.zip解壓到Android SDK的add-ons文件夾之下, 而當在Eclipse安裝Android Development Tools(ADT)時選擇Archive, 並選擇/add-ons/OPhone-SDK-2.0Beta/tools/ODT-2.0.0.zip便可. (其實, 使用Android的ADT或OPhone的ODT似乎都可以, 但不能同時使用.)

然後, 創建AVD時, 便有OPhone可以選擇.


OPhone 2.0 SDK BETA发布

OPhone SDK 2.0是专为OPhone 2.0平台设计的软件开发套件。它包括OPhone可视化软件开发工具(ODT),OPhone API,示例代码和SDK帮助文档。其中,ODT是专为OPhone平台开发者设计的一整套可视化软件开发工具,它可以方便、快捷地构建OPhone应用程序的界面,并自动生成界面代码及控件的事件处理代码,从而极大地提高了OPhone软件的开发效率。
OPhone SDK 2.0以Android SDK Add-on的形式发布,OPhone SDK 2.0兼容于Android SDK 2.1。开发者在开发OPhone应用的时候可以同时使用OPhone API和Android API。

OPhone可视化软件开发工具
OPhone可视化软件开发工具(OPhone Development Tools,ODT)是专为OPhone平台开发者设计的一整套可视化软件开发工具。在兼容ADT(Android Development Tools)的基础上,ODT提供了一个所见即所得、控件可拖放、属性可编辑、代码可自动生成、支持OPhone UI样式的界面编辑器。通过可视化编辑的方式,ODT可以方便、快捷地构建OPhone应用程序的界面,并自动生成OPhone应用程序界面(User Interface,UI)代码。ODT可以把软件开发人员从繁琐的UI设计中解脱出来,使之更关注于应用程序内部逻辑的实现,从而极大地提高了 OPhone软件的开发效率。当前的ODT版本号为2.0.0。

信息來源: OPhone SDN [OPhone Software Developer Network]


使用多媒體播放器(MediaPlayer)播放MP3音樂

Android的多媒體播放器(MediaPlayer)類可以用來控制播放的音頻/視頻文件和流(Stream).

使用多媒體播放器(MediaPlayer)播放MP3音樂

首先, mp3文件複製到/res/raw夾, 名為sample.mp3.

main.xml

<?xml version="1.0" encoding="utf-8"?>
<LinearLayout xmlns:android="http://schemas.android.com/apk/res/android"
android:orientation="vertical"
android:layout_width="fill_parent"
android:layout_height="fill_parent"
>
<TextView
android:layout_width="fill_parent"
android:layout_height="wrap_content"
android:text="@string/hello"
/>
<Button
android:id="@+id/play"
android:layout_width="fill_parent"
android:layout_height="wrap_content"
android:text="Play"
/>
<Button
android:id="@+id/continueplay"
android:layout_width="fill_parent"
android:layout_height="wrap_content"
android:text="Continue Play"
/>
<Button
android:id="@+id/pause"
android:layout_width="fill_parent"
android:layout_height="wrap_content"
android:text="Pause"
/>
<Button
android:id="@+id/stop"
android:layout_width="fill_parent"
android:layout_height="wrap_content"
android:text="Stop"
/>
<TextView
android:id="@+id/state"
android:layout_width="fill_parent"
android:layout_height="wrap_content"
/>
</LinearLayout>


AndroidMediaPlayer.java

package com.AndroidMediaPlayer;

import android.app.Activity;
import android.media.MediaPlayer;
import android.os.Bundle;
import android.view.View;
import android.widget.Button;
import android.widget.TextView;

public class AndroidMediaPlayer extends Activity {

private Button buttonPlay, buttonContinuePlay, buttonPause, buttonStop;
private TextView textState;
private MediaPlayer mediaPlayer;

/** Called when the activity is first created. */
@Override
public void onCreate(Bundle savedInstanceState) {
super.onCreate(savedInstanceState);
setContentView(R.layout.main);
buttonPlay = (Button)findViewById(R.id.play);
buttonContinuePlay = (Button)findViewById(R.id.continueplay);
buttonPause = (Button)findViewById(R.id.pause);
buttonStop = (Button)findViewById(R.id.stop);
textState = (TextView)findViewById(R.id.state);

mediaPlayer = new MediaPlayer();

buttonPlay.setOnClickListener(buttonPlayOnClickListener);
buttonContinuePlay.setOnClickListener(buttonContinuePlayOnClickListener);
buttonPause.setOnClickListener(buttonPauseOnClickListener);
buttonStop.setOnClickListener(buttonStopOnClickListener);

textState.setText("- idle -");
buttonPlay.setEnabled(true);
buttonContinuePlay.setEnabled(false);
buttonPause.setEnabled(false);
buttonStop.setEnabled(false);

}

Button.OnClickListener buttonPlayOnClickListener
= new Button.OnClickListener(){

@Override
public void onClick(View v) {
// TODO Auto-generated method stub

mediaPlayer = MediaPlayer.create(AndroidMediaPlayer.this, R.raw.sample);
try {
mediaPlayer.start();
textState.setText("- Playing -");
buttonPlay.setEnabled(false);
buttonContinuePlay.setEnabled(false);
buttonPause.setEnabled(true);
buttonStop.setEnabled(true);
} catch (IllegalStateException e) {
// TODO Auto-generated catch block
e.printStackTrace();
}
}

};

Button.OnClickListener buttonContinuePlayOnClickListener
= new Button.OnClickListener(){

@Override
public void onClick(View v) {
// TODO Auto-generated method stub

try {
mediaPlayer.start();
textState.setText("- Playing -");
buttonPlay.setEnabled(false);
buttonContinuePlay.setEnabled(false);
buttonPause.setEnabled(true);
buttonStop.setEnabled(true);
} catch (IllegalStateException e) {
// TODO Auto-generated catch block
e.printStackTrace();
}
}

};

Button.OnClickListener buttonPauseOnClickListener
= new Button.OnClickListener(){

@Override
public void onClick(View v) {
// TODO Auto-generated method stub

try {
mediaPlayer.pause();
textState.setText("- Pause -");
buttonPlay.setEnabled(true);
buttonContinuePlay.setEnabled(true);
buttonPause.setEnabled(false);
buttonStop.setEnabled(true);
} catch (IllegalStateException e) {
// TODO Auto-generated catch block
e.printStackTrace();
}
}

};

Button.OnClickListener buttonStopOnClickListener
= new Button.OnClickListener(){

@Override
public void onClick(View v) {
// TODO Auto-generated method stub

try {
mediaPlayer.stop();
textState.setText("- Stop -");
buttonPlay.setEnabled(true);
buttonContinuePlay.setEnabled(false);
buttonPause.setEnabled(false);
buttonStop.setEnabled(false);
} catch (IllegalStateException e) {
// TODO Auto-generated catch block
e.printStackTrace();
}
}
};
}

2010年7月8日星期四

通過AudioManager的adjustVolume()方法調節音量

調節音量


通過AudioManager的adjustVolume()方法調節音量: 調節最相關聲源(stream)的音量. 例如, 如果正在通話中, 話音音量的優先權最高. 一個呼叫處於活動狀態,這將有最高的優先權,不論是否在通話屏幕顯示. 又例如, 如果不是在通話中, 而後台正在播放音樂, 音樂的音量將被調整.

main.xml

<?xml version="1.0" encoding="utf-8"?>
<LinearLayout xmlns:android="http://schemas.android.com/apk/res/android"
android:orientation="vertical"
android:layout_width="fill_parent"
android:layout_height="fill_parent"
>
<TextView
android:layout_width="fill_parent"
android:layout_height="wrap_content"
android:text="@string/hello"
/>
<Button
android:id="@+id/volup"
android:layout_width="fill_parent"
android:layout_height="wrap_content"
android:text="VOL +"
/>
<Button
android:id="@+id/voldown"
android:layout_width="fill_parent"
android:layout_height="wrap_content"
android:text="VOL -"
/>
</LinearLayout>


AndroidVolume.java

package com.AndroidVolume;

import android.app.Activity;
import android.content.Context;
import android.media.AudioManager;
import android.os.Bundle;
import android.view.View;
import android.widget.Button;

public class AndroidVolume extends Activity {

AudioManager audioManager;

/** Called when the activity is first created. */
@Override
public void onCreate(Bundle savedInstanceState) {
super.onCreate(savedInstanceState);
setContentView(R.layout.main);
Button buttonVolUp = (Button)findViewById(R.id.volup);
Button buttonVolDown = (Button)findViewById(R.id.voldown);

audioManager = (AudioManager)getSystemService(Context.AUDIO_SERVICE);

buttonVolUp.setOnClickListener(new Button.OnClickListener(){

@Override
public void onClick(View arg0) {
// TODO Auto-generated method stub
audioManager.adjustVolume(AudioManager.ADJUST_RAISE, 0);
}});

buttonVolDown.setOnClickListener(new Button.OnClickListener(){

@Override
public void onClick(View arg0) {
// TODO Auto-generated method stub
audioManager.adjustVolume(AudioManager.ADJUST_LOWER, 0);
}});

}
}

2010年7月7日星期三

如何在Toast之上顯示圖像

本練習通過創建一個新的佈局, 把文本及圖像加入, 並使用Toast.setView()把佈局加進Toast中, 從而做到在Toast之上顯示圖像.

在Toast之上顯示圖像

main.xml
<?xml version="1.0" encoding="utf-8"?>
<LinearLayout xmlns:android="http://schemas.android.com/apk/res/android"
android:orientation="vertical"
android:layout_width="fill_parent"
android:layout_height="fill_parent"
>
<TextView
android:layout_width="fill_parent"
android:layout_height="wrap_content"
android:text="@string/hello"
/>
<Button
android:id="@+id/buttonshowtoast"
android:layout_width="fill_parent"
android:layout_height="wrap_content"
android:text="Show Toast"
/>
</LinearLayout>


AndroidImageToast.java
package com.AndroidImageToast;

import android.app.Activity;
import android.os.Bundle;
import android.view.View;
import android.widget.Button;
import android.widget.ImageView;
import android.widget.LinearLayout;
import android.widget.TextView;
import android.widget.Toast;

public class AndroidImageToast extends Activity {
/** Called when the activity is first created. */
@Override
public void onCreate(Bundle savedInstanceState) {
super.onCreate(savedInstanceState);
setContentView(R.layout.main);

Button buttonShowToast = (Button)findViewById(R.id.buttonshowtoast);
buttonShowToast.setOnClickListener(new Button.OnClickListener(){

@Override
public void onClick(View arg0) {
// TODO Auto-generated method stub

Toast myToast = new Toast(AndroidImageToast.this);
LinearLayout toastLayout = new LinearLayout(AndroidImageToast.this);
toastLayout.setOrientation(LinearLayout.HORIZONTAL);
ImageView toastImage = new ImageView(AndroidImageToast.this);
TextView toastText = new TextView(AndroidImageToast.this);
toastImage.setImageResource(R.drawable.icon);
toastText.setText("It's a Toast with image and text!");
toastLayout.addView(toastImage);
toastLayout.addView(toastText);
myToast.setView(toastLayout);
myToast.setDuration(Toast.LENGTH_LONG);
myToast.show();


}});

}
}

聯想 「樂Phone」

Lenovo LePhone


2010年7月5日星期一

利用Matrix類旋轉位圖(bitmap)

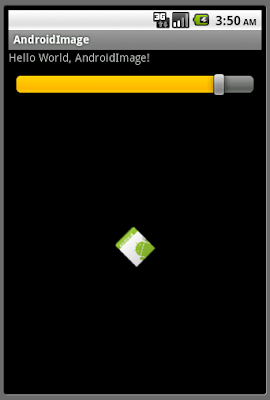
本練習利用Matrix類的setRotate()方法, 通過Bitmap.createBitmap()方法從一個源位圖創建另一個複製的位圖, 從而做到旋轉的效果.

利用Matrix類旋轉位圖(bitmap)

main.xml
<?xml version="1.0" encoding="utf-8"?>
<LinearLayout xmlns:android="http://schemas.android.com/apk/res/android"
android:orientation="vertical"
android:layout_width="fill_parent"
android:layout_height="fill_parent"
>
<TextView
android:layout_width="fill_parent"
android:layout_height="wrap_content"
android:text="@string/hello"
/>
<LinearLayout
android:orientation="horizontal"
android:layout_width="fill_parent"
android:layout_height="wrap_content"
android:gravity="center_horizontal"
>
<SeekBar
android:layout_width="fill_parent"
android:layout_height="wrap_content"
android:layout_margin="10px"
android:id="@+id/rotatebar"
android:max="360"
android:progress="0"
/>
</LinearLayout>
<ImageView
android:id="@+id/imageview"
android:layout_gravity="center"
android:layout_width="fill_parent"
android:layout_height="fill_parent"
android:scaleType="center"
/>
</LinearLayout>


AndroidImage.java
package com.AndroidImage;

import android.app.Activity;
import android.graphics.Bitmap;
import android.graphics.BitmapFactory;
import android.graphics.Matrix;
import android.os.Bundle;
import android.widget.ImageView;
import android.widget.SeekBar;

public class AndroidImage extends Activity {

private ImageView myImageView;
private float scale, rotateDegree;
private Bitmap bitmap;
int bmpWidth, bmpHeight;
SeekBar rotateBar;

/** Called when the activity is first created. */
@Override
public void onCreate(Bundle savedInstanceState) {
super.onCreate(savedInstanceState);
setContentView(R.layout.main);

myImageView = (ImageView)findViewById(R.id.imageview);
rotateBar = (SeekBar)findViewById(R.id.rotatebar);

bitmap = BitmapFactory.decodeResource(getResources(), R.drawable.icon);
bmpWidth = bitmap.getWidth();
bmpHeight = bitmap.getHeight();
scale = 1;
rotateDegree = 0;

loadImage();

rotateBar.setOnSeekBarChangeListener(new SeekBar.OnSeekBarChangeListener() {

@Override
public void onStopTrackingTouch(SeekBar seekBar) {
// TODO Auto-generated method stub
}

@Override
public void onStartTrackingTouch(SeekBar seekBar) {
// TODO Auto-generated method stub
}

@Override
public void onProgressChanged(SeekBar seekBar, int progress,
boolean fromUser) {
// TODO Auto-generated method stub
rotateDegree = (float)progress;
loadImage();
}
});
}

private void loadImage(){

Matrix matrix = new Matrix();
matrix.postScale(scale, scale);
matrix.setRotate(rotateDegree);

Bitmap scaledBitmap = Bitmap.createBitmap(bitmap, 0, 0, bmpWidth, bmpHeight, matrix, true);
myImageView.setImageBitmap(scaledBitmap);

}
}


2010年7月3日星期六

利用Matrix類對位圖(bitmap)進行放大和縮小

本練習利用Matrix類的postScale()方法, 通過Bitmap.createBitmap()方法從一個源位圖創建另一個縮放位圖, 從而做到放大和縮小的效果.

(本應用程序如果進行太大的縮放會發生錯誤, 但這不是本練習的重點, 所以筆者沒有特別處理.)

利用Matrix類對位圖(bitmap)進行放大和縮小

main.xml
<?xml version="1.0" encoding="utf-8"?>
<LinearLayout xmlns:android="http://schemas.android.com/apk/res/android"
android:orientation="vertical"
android:layout_width="fill_parent"
android:layout_height="fill_parent"
>
<TextView
android:layout_width="fill_parent"
android:layout_height="wrap_content"
android:text="@string/hello"
/>
<LinearLayout
android:orientation="horizontal"
android:layout_width="fill_parent"
android:layout_height="wrap_content"
android:gravity="center_horizontal"
>
<Button
android:id="@+id/enlarge"
android:layout_width="wrap_content"
android:layout_height="wrap_content"
android:text=" Enlarge + "
/>
<Button
android:id="@+id/reset"
android:layout_width="wrap_content"
android:layout_height="wrap_content"
android:text=" Original Size "
/>
<Button
android:id="@+id/Reduce"
android:layout_width="wrap_content"
android:layout_height="wrap_content"
android:text=" Reduce - "
/>
</LinearLayout>
<ImageView
android:id="@+id/imageview"
android:layout_gravity="center"
android:layout_width="fill_parent"
android:layout_height="fill_parent"
android:scaleType="center"
/>
</LinearLayout>


AndroidImage.java
package com.AndroidImage;

import android.app.Activity;
import android.graphics.Bitmap;
import android.graphics.BitmapFactory;
import android.graphics.Matrix;
import android.os.Bundle;
import android.view.View;
import android.widget.Button;
import android.widget.ImageView;

public class AndroidImage extends Activity {

private ImageView myImageView;
private float scale;
private Bitmap bitmap;
int bmpWidth, bmpHeight;

/** Called when the activity is first created. */
@Override
public void onCreate(Bundle savedInstanceState) {
super.onCreate(savedInstanceState);
setContentView(R.layout.main);

myImageView = (ImageView)findViewById(R.id.imageview);

Button buttonEnlarge = (Button)findViewById(R.id.enlarge);
Button buttonReset = (Button)findViewById(R.id.reset);
Button buttonReduce = (Button)findViewById(R.id.Reduce);

bitmap = BitmapFactory.decodeResource(getResources(), R.drawable.icon);
bmpWidth = bitmap.getWidth();
bmpHeight = bitmap.getHeight();
scale= 1;

loadImage();

buttonEnlarge.setOnClickListener(new Button.OnClickListener(){

@Override
public void onClick(View v) {
// TODO Auto-generated method stub
scale *= 2;
loadImage();

}});

buttonReset.setOnClickListener(new Button.OnClickListener(){

@Override
public void onClick(View v) {
// TODO Auto-generated method stub
scale = 1;
loadImage();

}});

buttonReduce.setOnClickListener(new Button.OnClickListener(){

@Override
public void onClick(View v) {
// TODO Auto-generated method stub
scale *= 0.5;
loadImage();

}});

}

private void loadImage(){

Matrix matrix = new Matrix();
matrix.postScale(scale, scale);

Bitmap resizedBitmap = Bitmap.createBitmap(bitmap, 0, 0, bmpWidth, bmpHeight, matrix, true);
myImageView.setImageBitmap(resizedBitmap);

}
}


2010年7月2日星期五

獲取顯示屏幕的信息

通過DisplayMetrics, 可以獲取顯示屏幕的有關信息, 包括:
widthPixels: 屏幕的水平分辨率.
heightPixels: 屏幕的垂直分辨率.
density: 屏幕的邏輯密度.
densityDpi: 以每英寸多少點(dots-per-insh)顯示屏幕的邏輯密度.
scaledDensity: 字體顯示的縮放係數.
xdpi: 水平的每英寸多少確切的物理像素.
ydpi: 水平的每英寸多少確切的物理像素.

顯示屏幕的信息

main.xml
<?xml version="1.0" encoding="utf-8"?>
<LinearLayout xmlns:android="http://schemas.android.com/apk/res/android"
android:orientation="vertical"
android:layout_width="fill_parent"
android:layout_height="fill_parent"
>
<TextView
android:layout_width="fill_parent"
android:layout_height="wrap_content"
android:text="@string/hello"
/>
<TextView
android:layout_width="fill_parent"
android:layout_height="wrap_content"
android:id="@+id/textscreen"
/>
</LinearLayout>


AndroidDisplayResolution.java
package com.AndroidDisplayResolution;

import android.app.Activity;
import android.os.Bundle;
import android.util.DisplayMetrics;
import android.widget.TextView;

public class AndroidDisplayResolution extends Activity {
/** Called when the activity is first created. */
@Override
public void onCreate(Bundle savedInstanceState) {
super.onCreate(savedInstanceState);
setContentView(R.layout.main);

TextView textScreen = (TextView)findViewById(R.id.textscreen);

DisplayMetrics dm = new DisplayMetrics();
getWindowManager().getDefaultDisplay().getMetrics(dm);
textScreen.setText(
"Screen Width: " + String.valueOf(dm.widthPixels) + "\n" +
"Screen Height: " + String.valueOf(dm.heightPixels) + "\n" +
"Density: " + String.valueOf(dm.density) + "\n" +
"DensityDPI: " + String.valueOf(dm.densityDpi) + "\n" +
"Scaled Density: " + String.valueOf(dm.scaledDensity) + "\n" +
"X DPI: " + String.valueOf(dm.xdpi) + "\n" +
"Y DPI: " + String.valueOf(dm.ydpi) + "\n");
}
}

2010年7月1日星期四

從網絡加載圖像視圖(ImageView)

從網絡加載圖像視圖(ImageView)

修改清單文件(AndroidManifest.xml), 添加 Internet訪問權限, <uses-permission android:name="android.permission.INTERNET" />.

AndroidManifest.xml
<?xml version="1.0" encoding="utf-8"?>
<manifest xmlns:android="http://schemas.android.com/apk/res/android"
package="com.AndroidImage"
android:versionCode="1"
android:versionName="1.0">
<application android:icon="@drawable/icon" android:label="@string/app_name">
<activity android:name=".AndroidImage"
android:label="@string/app_name">
<intent-filter>
<action android:name="android.intent.action.MAIN" />
<category android:name="android.intent.category.LAUNCHER" />
</intent-filter>
</activity>

</application>
<uses-sdk android:minSdkVersion="4" />
<uses-permission android:name="android.permission.INTERNET" />
</manifest>


仍沿用上文"從內部文件 夾加載圖像視圖(ImageView)"中main.xml

AndroidImage.java
package com.AndroidImage;

import java.io.IOException;
import java.io.InputStream;
import java.net.HttpURLConnection;
import java.net.MalformedURLException;
import java.net.URL;
import java.net.URLConnection;

import android.app.Activity;
import android.graphics.Bitmap;
import android.graphics.BitmapFactory;
import android.os.Bundle;
import android.widget.ImageView;

public class AndroidImage extends Activity {

private String imageFileURL = "https://blogger.googleusercontent.com/img/b/R29vZ2xl/AVvXsEhuy2cXRN6hyphenhyphenA6L1PYzdV77gMWfNPpMp0HzE1a6Qh3cvF3ibtUSv2UYr5F6YyT2Dzmo78479nzaN51dShCy0yJB2HRdHn3krcTuTL2eBeHClUSzyNjUZz9kmZkRVmJ1t17yU89Lz_JlqrzV/s150/androidbiancheng.png";

/** Called when the activity is first created. */
@Override
public void onCreate(Bundle savedInstanceState) {
super.onCreate(savedInstanceState);
setContentView(R.layout.main);

ImageView myImageView = (ImageView)findViewById(R.id.imageview);

try {
URL url = new URL(imageFileURL);
URLConnection conn = url.openConnection();

HttpURLConnection httpConn = (HttpURLConnection)conn;
httpConn.setRequestMethod("GET");
httpConn.connect();

if (httpConn.getResponseCode() == HttpURLConnection.HTTP_OK) {
InputStream inputStream = httpConn.getInputStream();

Bitmap bitmap = BitmapFactory.decodeStream(inputStream);
inputStream.close();
myImageView.setImageBitmap(bitmap);
}
} catch (MalformedURLException e1) {
// TODO Auto-generated catch block
e1.printStackTrace();
} catch (IOException e) {
// TODO Auto-generated catch block
e.printStackTrace();
}

}
}


相關文章:
從內部文件夾加載圖像視圖(ImageView)
從SD Card加載圖像視圖(ImageView)
利用BitmapFactory.Options的inSampleSize對bitmap進行優化