2011年4月30日星期六

通過資產管理員(AssetManager)讀取資產(assets)

一般我們將把我們的資源(resources)保存於 /res/raw/ 文件夾中.

然而,如果你需要存取原始文件名和文件的層次結構,可能會考慮保存一些資源在/assets/(資產)文件夾(而不是/res/raw/)。在 /assets/ 的文件沒有一個資源 ID,所以只可以通過資產管理員(AssetManager)存取在 /assets/ 文件夾下的文件。

通過資產管理員(AssetManager)讀取資產(assets)

package com.AndroidAssets;

import java.io.ByteArrayOutputStream;
import java.io.IOException;
import java.io.InputStream;

import android.app.Activity;
import android.content.res.AssetManager;
import android.os.Bundle;
import android.widget.TextView;

public class AndroidAssets extends Activity {
/** Called when the activity is first created. */
@Override
public void onCreate(Bundle savedInstanceState) {
super.onCreate(savedInstanceState);
setContentView(R.layout.main);

TextView myText = (TextView)findViewById(R.id.mytext);

AssetManager assetManager = getAssets();
InputStream inputStream = null;

String MyStream;
try {
// 指定/assets/MyAssets.txt
inputStream = assetManager.open("MyAssets.txt");

ByteArrayOutputStream byteArrayOutputStream = new ByteArrayOutputStream();
byte[] bytes = new byte[4096];

int len;
while ((len = inputStream.read(bytes)) > 0){
byteArrayOutputStream.write(bytes, 0, len);
}

MyStream = new String(byteArrayOutputStream.toByteArray(), "UTF8");

} catch (IOException e) {
// TODO Auto-generated catch block
e.printStackTrace();
MyStream = e.toString();
}

myText.setText(MyStream);

}
}


<?xml version="1.0" encoding="utf-8"?>
<LinearLayout xmlns:android="http://schemas.android.com/apk/res/android"
android:orientation="vertical"
android:layout_width="fill_parent"
android:layout_height="fill_parent"
>
<TextView
android:layout_width="fill_parent"
android:layout_height="wrap_content"
android:text="@string/hello"
/>
<TextView
android:id="@+id/mytext"
android:layout_width="fill_parent"
android:layout_height="wrap_content"
/>
</LinearLayout>

2011年4月25日星期一

創建提供用戶選項的警告對話框(AlertDialog)

供用戶選項的AlertDialog

package com.AndroidAlertDialog;

import android.app.Activity;
import android.app.AlertDialog;
import android.content.DialogInterface;
import android.os.Bundle;
import android.view.View;
import android.widget.Button;

public class AndroidAlertDialog extends Activity {
/** Called when the activity is first created. */
@Override
public void onCreate(Bundle savedInstanceState) {
super.onCreate(savedInstanceState);
setContentView(R.layout.main);

Button buttonStartDialog = (Button)findViewById(R.id.startdialog);
buttonStartDialog.setOnClickListener(new Button.OnClickListener(){

@Override
public void onClick(View arg0) {
// TODO Auto-generated method stub

//Create AlertDialog here
AlertDialog.Builder myAlertDialog = new AlertDialog.Builder(AndroidAlertDialog.this);
myAlertDialog.setTitle("--- Title ---");
myAlertDialog.setMessage("Alert Dialog Message");
myAlertDialog.setPositiveButton("OK", new DialogInterface.OnClickListener() {

// do something when the button is clicked
public void onClick(DialogInterface arg0, int arg1) {
//...
}
});
myAlertDialog.setNegativeButton("Cancel", new DialogInterface.OnClickListener() {

// do something when the button is clicked
public void onClick(DialogInterface arg0, int arg1) {
//...
}
});
myAlertDialog.show();
}});
}

}


<?xml version="1.0" encoding="utf-8"?>
<LinearLayout xmlns:android="http://schemas.android.com/apk/res/android"
android:orientation="vertical"
android:layout_width="fill_parent"
android:layout_height="fill_parent"
>
<TextView
android:layout_width="fill_parent"
android:layout_height="wrap_content"
android:text="@string/hello"
/>
<Button
android:id="@+id/startdialog"
android:layout_width="fill_parent"
android:layout_height="wrap_content"
android:text=" Start Dialog "
/>
</LinearLayout>


相關文章:
- 利用 AlertDialog.Builder 創建包含編輯文本視圖 (EditText) 的對話框
- 實現透明的對話框

2011年4月24日星期日

如何設置使用粗體文字

如果使用於 XML, 可以通過以下設定使用正常(normal), 粗體(bold), 或斜體(italic)文字字體.

android:textStyle="bold"

如果使用 Java 碼, 可以調用 setTypeface() 函數.

例如:
mytextview.setTypeface(Typeface.DEFAULT_BOLD);

2011年4月18日星期一

獲取 Android 設備的 ID,Settings.Secure.ANDROID_ID

android.provider.Settings.Secure 類的 ANDROID_ID 值是一個第一次啟動 Android 設備時隨機生成的64位數(以十六進制字符串表示), "應在"保持設備一生不變的. (當設備執行重置出廠值時, 該值可能改變.)

       String Id = Settings.Secure.getString(getContentResolver(), Settings.Secure.ANDROID_ID);

2011年4月15日星期五

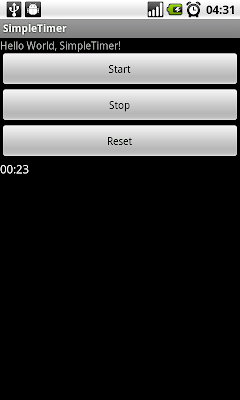
簡單的 Android 計時器(Chronometer)

android.widget.Chronometer 是一個實現簡單計時器的類.

範例:
Android 計時器(Chronometer)

package com.SimpleTimer;

import android.app.Activity;
import android.os.Bundle;
import android.os.SystemClock;
import android.view.View;
import android.widget.Button;
import android.widget.Chronometer;

public class SimpleTimer extends Activity {
/** Called when the activity is first created. */
@Override
public void onCreate(Bundle savedInstanceState) {
super.onCreate(savedInstanceState);
setContentView(R.layout.main);

Button Start = (Button)findViewById(R.id.start);
Button Stop = (Button)findViewById(R.id.stop);
Button Reset = (Button)findViewById(R.id.reset);
final Chronometer timer = (Chronometer)findViewById(R.id.timer);

Start.setOnClickListener(new Button.OnClickListener(){

@Override
public void onClick(View arg0) {
// TODO Auto-generated method stub
timer.start();
}});

Stop.setOnClickListener(new Button.OnClickListener(){

@Override
public void onClick(View arg0) {
// TODO Auto-generated method stub
timer.stop();
}});

Reset.setOnClickListener(new Button.OnClickListener(){

@Override
public void onClick(View arg0) {
// TODO Auto-generated method stub
timer.setBase(SystemClock.elapsedRealtime());
}});

}
}


<?xml version="1.0" encoding="utf-8"?>
<LinearLayout xmlns:android="http://schemas.android.com/apk/res/android"
android:orientation="vertical"
android:layout_width="fill_parent"
android:layout_height="fill_parent"
>
<TextView
android:layout_width="fill_parent"
android:layout_height="wrap_content"
android:text="@string/hello"
/>
<Button
android:id="@+id/start"
android:layout_width="fill_parent"
android:layout_height="wrap_content"
android:text="Start"
/>
<Button
android:id="@+id/stop"
android:layout_width="fill_parent"
android:layout_height="wrap_content"
android:text="Stop"
/>
<Button
android:id="@+id/reset"
android:layout_width="fill_parent"
android:layout_height="wrap_content"
android:text="Reset"
/>
<Chronometer
android:id="@+id/timer"
android:layout_gravity="center_horizontal"
android:layout_width="fill_parent"
android:layout_height="wrap_content"
/>
</LinearLayout>

2011年4月14日星期四

使用 java.util.zip 解壓 ZIP 壓縮檔案

Android API 提供 java.util.zip 包, 可以用來解壓 ZIP 壓縮檔案.

範例:
本程序解壓縮指定的 ZIP 壓縮檔案(/sdcard/test/ziptest.zip), 並儲存於指定的文件夾(/sdcard/test/).

package com.AndroidUnzip;

import java.io.BufferedInputStream;
import java.io.BufferedOutputStream;
import java.io.File;
import java.io.FileInputStream;
import java.io.FileNotFoundException;
import java.io.FileOutputStream;
import java.io.IOException;
import java.util.zip.ZipEntry;
import java.util.zip.ZipInputStream;

import android.app.Activity;
import android.os.Bundle;
import android.widget.TextView;

public class AndroidUnzip extends Activity {

TextView textMsg;
static final int BUFFER_SIZE = 4096;
String srcPath = "/sdcard/test/ziptest.zip";
String destPath = "/sdcard/test/";

String msg = "";

/** Called when the activity is first created. */
@Override
public void onCreate(Bundle savedInstanceState) {
super.onCreate(savedInstanceState);
setContentView(R.layout.main);
textMsg = (TextView)findViewById(R.id.msg);
unZip();
}

private void appendMsg(String tMsg){
msg += tMsg + "\n";
textMsg.setText(msg);
}

private void unZip(){
BufferedOutputStream bufferedOutputStream = null;
FileInputStream fileInputStream;
try {
fileInputStream = new FileInputStream(srcPath);
ZipInputStream zipInputStream = new ZipInputStream(new BufferedInputStream(fileInputStream));
ZipEntry zipEntry;


while ((zipEntry = zipInputStream.getNextEntry()) != null){

appendMsg(" ----- ");
appendMsg("Zip Entry: " + zipEntry.toString());

String zipEntryName = zipEntry.getName();
appendMsg(destPath + zipEntryName);

File file = new File(destPath + zipEntryName);

if (file.exists()){
appendMsg("Already exist! Skip");
} else {
if(zipEntry.isDirectory()){
appendMsg("make dir: " + file.getPath());
file.mkdirs();
}else{
appendMsg("unzip: " + file.getPath());

byte buffer[] = new byte[BUFFER_SIZE];
FileOutputStream fileOutputStream = new FileOutputStream(file);
bufferedOutputStream = new BufferedOutputStream(fileOutputStream, BUFFER_SIZE);

int count;
while ((count = zipInputStream.read(buffer, 0, BUFFER_SIZE)) != -1) {
bufferedOutputStream.write(buffer, 0, count);
}
bufferedOutputStream.flush();
bufferedOutputStream.close();
}
}
}

zipInputStream.close();
appendMsg(" ------------ ");
appendMsg(" - Finished - ");
} catch (FileNotFoundException e) {
// TODO Auto-generated catch block
e.printStackTrace();
appendMsg(e.toString());
}catch (IOException e) {
// TODO Auto-generated catch block
e.printStackTrace();
appendMsg(e.toString());
}
}
}


main.xml 佈局
<?xml version="1.0" encoding="utf-8"?>
<LinearLayout xmlns:android="http://schemas.android.com/apk/res/android"
android:orientation="vertical"
android:layout_width="fill_parent"
android:layout_height="fill_parent"
>
<TextView
android:layout_width="fill_parent"
android:layout_height="wrap_content"
android:text="@string/hello"
/>
<TextView
android:id="@+id/msg"
android:layout_width="fill_parent"
android:layout_height="wrap_content"
/>
</LinearLayout>


因本程序需要把解壓後的文件寫回到 SD Card, 所以須修改 AndroidManifest.xml 授予"android.permission.WRITE_EXTERNAL_STORAGE"權限.
<?xml version="1.0" encoding="utf-8"?>
<manifest xmlns:android="http://schemas.android.com/apk/res/android"
package="com.AndroidUnzip"
android:versionCode="1"
android:versionName="1.0">
<uses-sdk android:minSdkVersion="4" />
<uses-permission android:name="android.permission.WRITE_EXTERNAL_STORAGE"></uses-permission>

<application android:icon="@drawable/icon" android:label="@string/app_name">
<activity android:name=".AndroidUnzip"
android:label="@string/app_name">
<intent-filter>
<action android:name="android.intent.action.MAIN" />
<category android:name="android.intent.category.LAUNCHER" />
</intent-filter>
</activity>

</application>
</manifest>

2011年4月13日星期三

稅債票償

Published with Blogger-droid v1.6.8

2011年4月9日星期六

指定方向的特定佈局, layout-land/layout-port

一般來說, 佈局文件(例如 main.xml), 將放在 /res/layout/ 文件夾裡面. 但我們也可以創建 /res/layout-land/ 或 /res/layout-port 放置指定方向使用的佈局文件.

/res/layout/main.xml
/res/layout-land/main.xml

/res/layout/main.xml
<?xml version="1.0" encoding="utf-8"?>
<LinearLayout xmlns:android="http://schemas.android.com/apk/res/android"
android:orientation="vertical"
android:layout_width="fill_parent"
android:layout_height="fill_parent"
>
<TextView
android:layout_width="fill_parent"
android:layout_height="wrap_content"
android:text="@string/hello"
/>
<TextView
android:layout_width="fill_parent"
android:layout_height="wrap_content"
android:text="It's normal layout"
/>
<ImageView
android:layout_width="fill_parent"
android:layout_height="wrap_content"
android:src="@drawable/icon"
/>
</LinearLayout>


/res/layout-land/main.xml
<?xml version="1.0" encoding="utf-8"?>
<LinearLayout xmlns:android="http://schemas.android.com/apk/res/android"
android:orientation="vertical"
android:layout_width="fill_parent"
android:layout_height="fill_parent"
>
<TextView
android:layout_width="fill_parent"
android:layout_height="wrap_content"
android:text="@string/hello"
/>
<LinearLayout
android:orientation="horizontal"
android:layout_width="fill_parent"
android:layout_height="fill_parent">
<ImageView
android:layout_width="wrap_content"
android:layout_height="wrap_content"
android:src="@drawable/icon"
/>
<TextView
android:layout_width="fill_parent"
android:layout_height="wrap_content"
android:text="It's LANDSCAPE layout"
/>
</LinearLayout>
</LinearLayout>


2011年4月8日星期五

MyAndroid


MyAndroid

2011年4月6日星期三

世界您好,機器人替代語言!

如果你的程序支持多國語言, 例如中文, 你可以複製srings.xml文件到 res/values-zh/ 文件夾, 更改內容為中文. 當用戶語言設定為中文時, 便會顯示中文版本.


其他語言代碼可以參考 http://developer.android.com/reference/java/util/Locale.html

2011年4月3日星期日

利用 AudioManager.getStreamVolume() 調整鈴聲音量

修改前面文章"更改鈴聲模式, AudioManager.setRingerMode()"的代碼, 添加顯示和調整鈴聲音量的功能.

調整鈴聲音量

package com.AndroidRinger;

import android.app.Activity;
import android.media.AudioManager;
import android.os.Bundle;
import android.view.View;
import android.widget.Button;
import android.widget.TextView;

public class AndroidRinger extends Activity {

private AudioManager audioManager;
TextView textRingerState, textRingerVol;

/** Called when the activity is first created. */
@Override
public void onCreate(Bundle savedInstanceState) {
super.onCreate(savedInstanceState);
setContentView(R.layout.main);
Button buttonRinger = (Button)findViewById(R.id.buttonringer);
Button buttonRingerUp = (Button)findViewById(R.id.buttonringerup);
Button buttonRingerDown = (Button)findViewById(R.id.buttonringerdown);
textRingerState = (TextView)findViewById(R.id.textringerstate);
textRingerVol = (TextView)findViewById(R.id.textringervolume);

audioManager = (AudioManager)getSystemService(AUDIO_SERVICE);

buttonRinger.setOnClickListener(new Button.OnClickListener(){

@Override
public void onClick(View arg0) {
// TODO Auto-generated method stub
int ringerMode = audioManager.getRingerMode();
if(ringerMode == AudioManager.RINGER_MODE_SILENT){
audioManager.setRingerMode(AudioManager.RINGER_MODE_VIBRATE);
}else if (ringerMode == AudioManager.RINGER_MODE_VIBRATE){
audioManager.setRingerMode(AudioManager.RINGER_MODE_NORMAL);
}else{
audioManager.setRingerMode(AudioManager.RINGER_MODE_SILENT);
}

displayRingMode();
}});

buttonRingerUp.setOnClickListener(new Button.OnClickListener(){

@Override
public void onClick(View arg0) {
// TODO Auto-generated method stub
audioManager.adjustStreamVolume(AudioManager.STREAM_RING,
AudioManager.ADJUST_RAISE,
AudioManager.FLAG_ALLOW_RINGER_MODES|AudioManager.FLAG_PLAY_SOUND);
displayRingMode();
}});

buttonRingerDown.setOnClickListener(new Button.OnClickListener(){

@Override
public void onClick(View arg0) {
// TODO Auto-generated method stub
audioManager.adjustStreamVolume(AudioManager.STREAM_RING,
AudioManager.ADJUST_LOWER,
AudioManager.FLAG_ALLOW_RINGER_MODES|AudioManager.FLAG_PLAY_SOUND);
displayRingMode();
displayRingMode();
}});
}

@Override
protected void onResume() {
// TODO Auto-generated method stub
super.onResume();
displayRingMode();
}

private void displayRingMode(){
int ringerMode = audioManager.getRingerMode();
if(ringerMode == AudioManager.RINGER_MODE_SILENT){
textRingerState.setText("Ringer is Silent");
}else if (ringerMode == AudioManager.RINGER_MODE_VIBRATE){
textRingerState.setText("Ringer is Vibrate");
}else{
textRingerState.setText("Ringer is Normal");
}

int ringerVol = audioManager.getStreamVolume(AudioManager.STREAM_RING);
textRingerVol.setText("Ringer Volume: " + String.valueOf(ringerVol));
}
}


<?xml version="1.0" encoding="utf-8"?>
<LinearLayout xmlns:android="http://schemas.android.com/apk/res/android"
android:orientation="vertical"
android:layout_width="fill_parent"
android:layout_height="fill_parent"
>
<TextView
android:layout_width="fill_parent"
android:layout_height="wrap_content"
android:text="@string/hello"
/>
<Button
android:id="@+id/buttonringer"
android:layout_width="fill_parent"
android:layout_height="wrap_content"
android:text="Change Ringer Mode"
/>
<Button
android:id="@+id/buttonringerup"
android:layout_width="fill_parent"
android:layout_height="wrap_content"
android:text="Ringer VOL+"
/>
<Button
android:id="@+id/buttonringerdown"
android:layout_width="fill_parent"
android:layout_height="wrap_content"
android:text="Ringer VOL-"
/>
<TextView
android:id="@+id/textringerstate"
android:layout_width="fill_parent"
android:layout_height="wrap_content"
/>
<TextView
android:id="@+id/textringervolume"
android:layout_width="fill_parent"
android:layout_height="wrap_content"
/>
</LinearLayout>


2011年4月1日星期五

更改鈴聲模式, AudioManager.setRingerMode()

本文介紹如何通過 AudioManager.setRingerMode() 方法更改鈴聲模式.

更改鈴聲模式

package com.AndroidRinger;

import android.app.Activity;
import android.media.AudioManager;
import android.os.Bundle;
import android.view.View;
import android.widget.Button;
import android.widget.TextView;

public class AndroidRinger extends Activity {

private AudioManager audioManager;
TextView textRingerState;

/** Called when the activity is first created. */
@Override
public void onCreate(Bundle savedInstanceState) {
super.onCreate(savedInstanceState);
setContentView(R.layout.main);
Button buttonRinger = (Button)findViewById(R.id.buttonringer);
textRingerState = (TextView)findViewById(R.id.textringerstate);

audioManager = (AudioManager)getSystemService(AUDIO_SERVICE);

buttonRinger.setOnClickListener(new Button.OnClickListener(){

@Override
public void onClick(View arg0) {
// TODO Auto-generated method stub
int ringerMode = audioManager.getRingerMode();
if(ringerMode == AudioManager.RINGER_MODE_SILENT){
audioManager.setRingerMode(AudioManager.RINGER_MODE_VIBRATE);
}else if (ringerMode == AudioManager.RINGER_MODE_VIBRATE){
audioManager.setRingerMode(AudioManager.RINGER_MODE_NORMAL);
}else{
audioManager.setRingerMode(AudioManager.RINGER_MODE_SILENT);
}

displayRingMode();
}});
}

@Override
protected void onResume() {
// TODO Auto-generated method stub
super.onResume();
displayRingMode();
}

private void displayRingMode(){
int ringerMode = audioManager.getRingerMode();
if(ringerMode == AudioManager.RINGER_MODE_SILENT){
textRingerState.setText("Ringer is Silent");
}else if (ringerMode == AudioManager.RINGER_MODE_VIBRATE){
textRingerState.setText("Ringer is Vibrate");
}else{
textRingerState.setText("Ringer is Normal");
}
}
}


<?xml version="1.0" encoding="utf-8"?>
<LinearLayout xmlns:android="http://schemas.android.com/apk/res/android"
android:orientation="vertical"
android:layout_width="fill_parent"
android:layout_height="fill_parent"
>
<TextView
android:layout_width="fill_parent"
android:layout_height="wrap_content"
android:text="@string/hello"
/>
<Button
android:id="@+id/buttonringer"
android:layout_width="fill_parent"
android:layout_height="wrap_content"
android:text="Change Ringer Mode"
/>
<TextView
android:id="@+id/textringerstate"
android:layout_width="fill_parent"
android:layout_height="wrap_content"
/>
</LinearLayout>


相關文章:
- 利用 AudioManager.getStreamVolume() 調整鈴聲音量

檢查鈴聲模式

要檢查鈴聲模式: 正常,振動,靜音; 可以使用 AudioManager.

調用 getSystemService(AUDIO_SERVICE) 方法, 獲取 audioManager 對象, 再調用 audioManager 對象的 getRingerMode() 方法便可檢查目前的鈴聲模式.


package com.AndroidRinger;

import android.app.Activity;
import android.media.AudioManager;
import android.os.Bundle;
import android.view.View;
import android.widget.Button;
import android.widget.TextView;

public class AndroidRinger extends Activity {

private AudioManager audioManager;

/** Called when the activity is first created. */
@Override
public void onCreate(Bundle savedInstanceState) {
super.onCreate(savedInstanceState);
setContentView(R.layout.main);
Button buttonRinger = (Button)findViewById(R.id.buttonringer);
final TextView textRingerState = (TextView)findViewById(R.id.textringerstate);

audioManager = (AudioManager)getSystemService(AUDIO_SERVICE);

buttonRinger.setOnClickListener(new Button.OnClickListener(){

@Override
public void onClick(View arg0) {
// TODO Auto-generated method stub
int ringerMode = audioManager.getRingerMode();
if(ringerMode == AudioManager.RINGER_MODE_SILENT){
textRingerState.setText("Ringer is Silent");
}else if (ringerMode == AudioManager.RINGER_MODE_VIBRATE){
textRingerState.setText("Ringer is Vibrate");
}else{
textRingerState.setText("Ringer is Normal");
}
}});

}
}


<?xml version="1.0" encoding="utf-8"?>
<LinearLayout xmlns:android="http://schemas.android.com/apk/res/android"
android:orientation="vertical"
android:layout_width="fill_parent"
android:layout_height="fill_parent"
>
<TextView
android:layout_width="fill_parent"
android:layout_height="wrap_content"
android:text="@string/hello"
/>
<Button
android:id="@+id/buttonringer"
android:layout_width="fill_parent"
android:layout_height="wrap_content"
android:text="Check Ringer Mode"
/>
<TextView
android:id="@+id/textringerstate"
android:layout_width="fill_parent"
android:layout_height="wrap_content"
/>
</LinearLayout>


相關文章:
- 更改鈴聲模式, AudioManager.setRingerMode()