通常,使用真正的Android手機開發或調試Android軟件, 我們需要使用USB線連接手機和PC主機.
現在有一個Android手機應用程序adbWireless(可在Android Market搜索). 可以使用無線網絡連接手機和PC主機, 不必用USB線.
注意: Rooted Phone Only!
- 在手機上運行應用程序adbWireless.
2011年1月28日星期五
2011年1月27日星期四
Android 3.0預覽版和SDK Tools更新
Android的3.0是Android平台的下一個版本,注重於並平板設備的優化。現在谷歌提供Android3.0 SDK的預覽版。
在Android3.0 SDK Preview讓開發者預覽即將推出的Android3.0版本, 它包括:
- Android模擬器中使用的早期Android3.0系統映像檔
- Android3.0庫與非最後的API
- 對應超大Android虛擬設備的WXGA模擬器皮層(skin)
- Android 3.0的新文件,其中包括一個完整的API參考,新的開發指南,和Android3.0和2.3之間的API差異報告。
要注意:
- 這些在預覽SDK的API並非最終版本。某些API的行為或可用性可能會改變
- 對應預覽版的應用程序只能在模擬器運行, 不能發布.
- 於developer.android.com的文件不包括Android3.0,要讀取Android 3.0的API參考資料和開發人員指南,必須從AVD and SDK Manager安裝Android3.0預覽文檔
了解更多:
- http://android-developers.blogspot.com/2011/01/android-30-platform-preview-and-updated.html
2011年1月25日星期二
使用include重用UI組件
當我們的佈局有一些重複的UI元素, 我們可以使用<include>來節省我們的工作. 亦可以使用<include>, 在不同的活動(Activity)中使用相同的UI組件.
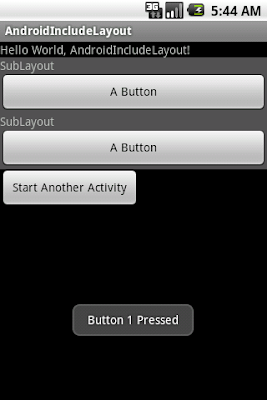
先創建重用的UI佈局文檔, sublayout.xml
在我們的主佈局文件包括<include>兩個重用的UI佈局.
main.xml
在程序代碼中, 使用下面的方法來訪問個別元素:
View subLayout1 = (View)findViewById(R.id.main1);
Button myButton_main1 = (Button)subLayout1.findViewById(R.id.mybutton);
AndroidIncludeLayout.java
同樣, 在另一個佈局亦可以重複使用相同的元素.
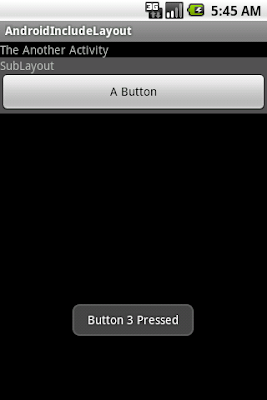
anotherlayout.xml
AnotherActivity.java
記得, 如果你想運行此應用程序, 需要修改AndroidManifest.xml添加AnotherActivity活動(Activity).

先創建重用的UI佈局文檔, sublayout.xml
<?xml version="1.0" encoding="utf-8"?>
<LinearLayout xmlns:android="http://schemas.android.com/apk/res/android"
    android:orientation="vertical"
    android:layout_width="fill_parent"
    android:layout_height="wrap_content"
    android:background="#505050"
    >
<TextView
    android:layout_width="fill_parent"
    android:layout_height="wrap_content"
    android:text="SubLayout"
    />
<Button
 android:id="@+id/mybutton"
    android:layout_width="fill_parent"
    android:layout_height="wrap_content"
    android:text=" A Button "
    />
</LinearLayout>
在我們的主佈局文件包括<include>兩個重用的UI佈局.
main.xml
<?xml version="1.0" encoding="utf-8"?>
<LinearLayout xmlns:android="http://schemas.android.com/apk/res/android"
    android:orientation="vertical"
    android:layout_width="fill_parent"
    android:layout_height="fill_parent"
    >
<TextView
    android:layout_width="fill_parent"
    android:layout_height="wrap_content"
    android:text="@string/hello"
    />
<include android:id="@+id/main1" layout="@layout/sublayout" />
<include android:id="@+id/main2" layout="@layout/sublayout" />
<Button
    android:id="@+id/startanotheractivity"
    android:layout_width="wrap_content"
    android:layout_height="wrap_content"
    android:text=" Start Another Activity "
    />
</LinearLayout>
在程序代碼中, 使用下面的方法來訪問個別元素:
View subLayout1 = (View)findViewById(R.id.main1);
Button myButton_main1 = (Button)subLayout1.findViewById(R.id.mybutton);
AndroidIncludeLayout.java
package com.AndroidIncludeLayout;

import android.app.Activity;
import android.content.Intent;
import android.os.Bundle;
import android.view.View;
import android.widget.Button;
import android.widget.Toast;

public class AndroidIncludeLayout extends Activity {
    /** Called when the activity is first created. */
    @Override
    public void onCreate(Bundle savedInstanceState) {
        super.onCreate(savedInstanceState);
        setContentView(R.layout.main);

        View subLayout1 = (View)findViewById(R.id.main1);
        View subLayout2 = (View)findViewById(R.id.main2);
        Button myButton_main1 = (Button)subLayout1.findViewById(R.id.mybutton);
        Button myButton_main2 = (Button)subLayout2.findViewById(R.id.mybutton);
        Button startAnotherActivity = (Button)findViewById(R.id.startanotheractivity);

        startAnotherActivity.setOnClickListener(new Button.OnClickListener(){

   @Override
   public void onClick(View arg0) {
    // TODO Auto-generated method stub
    Intent intent = new Intent();
             intent.setClass(AndroidIncludeLayout.this, AnotherActivity.class);
             startActivity(intent);

   }});

        myButton_main1.setOnClickListener(new Button.OnClickListener(){

   @Override
   public void onClick(View arg0) {
    // TODO Auto-generated method stub
    Toast.makeText(AndroidIncludeLayout.this, "Button 1 Pressed", Toast.LENGTH_LONG).show();
   }});

        myButton_main2.setOnClickListener(new Button.OnClickListener(){

   @Override
   public void onClick(View arg0) {
    // TODO Auto-generated method stub
    Toast.makeText(AndroidIncludeLayout.this, "Button 2 Pressed", Toast.LENGTH_LONG).show();
   }});
    }
}
同樣, 在另一個佈局亦可以重複使用相同的元素.

anotherlayout.xml
<?xml version="1.0" encoding="utf-8"?>
<LinearLayout xmlns:android="http://schemas.android.com/apk/res/android"
    android:orientation="vertical"
    android:layout_width="fill_parent"
    android:layout_height="fill_parent"
    >
<TextView
    android:layout_width="fill_parent"
    android:layout_height="wrap_content"
    android:text="The Another Activity"
    />
<include android:id="@+id/main3" layout="@layout/sublayout" />

</LinearLayout>
AnotherActivity.java
package com.AndroidIncludeLayout;

import android.app.Activity;
import android.os.Bundle;
import android.view.View;
import android.widget.Button;
import android.widget.Toast;

public class AnotherActivity extends Activity {

 @Override
 protected void onCreate(Bundle savedInstanceState) {
  // TODO Auto-generated method stub
  super.onCreate(savedInstanceState);
  setContentView(R.layout.anotherlayout);

  View AnotherSubLayout = (View)findViewById(R.id.main3);
  Button myButton_main3 = (Button)AnotherSubLayout.findViewById(R.id.mybutton);

  myButton_main3.setOnClickListener(new Button.OnClickListener(){

   @Override
   public void onClick(View arg0) {
    // TODO Auto-generated method stub
    Toast.makeText(AnotherActivity.this, "Button 3 Pressed", Toast.LENGTH_LONG).show();
   }});
 }

}
記得, 如果你想運行此應用程序, 需要修改AndroidManifest.xml添加AnotherActivity活動(Activity).
2011年1月24日星期一
使用樣式(style)來簡化在XML中定義按鈕(Button)
有時候,我們會使用許多相同樣式的按鈕; 這種情況下可以使用樣式(style)來簡化在XML中定義按鈕.
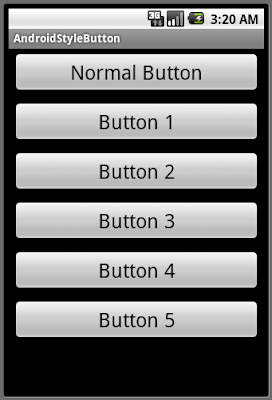
創建一個styles.xml檔在/res/values/文件夾中
然後,我們可以在佈局文件中參考它來定義按鈕.

創建一個styles.xml檔在/res/values/文件夾中
<?xml version="1.0" encoding="utf-8"?>
<resources>
<style name="SymbolButtonStyle" parent="android:Widget.Button">
 <item name="android:layout_height">wrap_content</item>
 <item name="android:layout_width">fill_parent</item>
 <item name="android:textSize">25dp</item>
 <item name="android:layout_margin">5dp</item>
</style>
</resources>
然後,我們可以在佈局文件中參考它來定義按鈕.
<?xml version="1.0" encoding="utf-8"?>
<LinearLayout xmlns:android="http://schemas.android.com/apk/res/android"
    android:orientation="vertical"
    android:layout_width="fill_parent"
    android:layout_height="fill_parent"
    >
<Button android:layout_width="fill_parent"
 android:layout_height="wrap_content"
 android:textSize="25dp"
 android:layout_margin="5dp"
 android:text="Normal Button"
 />
<Button style="@style/SymbolButtonStyle"
 android:text="Button 1" />
<Button style="@style/SymbolButtonStyle"
 android:text="Button 2" />
<Button style="@style/SymbolButtonStyle"
 android:text="Button 3" />
<Button style="@style/SymbolButtonStyle"
 android:text="Button 4" />
<Button style="@style/SymbolButtonStyle"
 android:text="Button 5" />
</LinearLayout>
2011年1月22日星期六
如何通過相對佈局(RelativeLayout)把多個圖像重疊放置於中央
下面的例子通過相對佈局(RelativeLayout)把多個圖像和視圖(View)(例如進度條)重疊放置於佈局的中央位置.


<?xml version="1.0" encoding="utf-8"?>
<LinearLayout xmlns:android="http://schemas.android.com/apk/res/android"
    android:orientation="vertical"
    android:layout_width="fill_parent"
    android:layout_height="fill_parent"
    >
<TextView
    android:layout_width="fill_parent"
    android:layout_height="wrap_content"
    android:text="@string/hello"
    />
<LinearLayout
    android:orientation="horizontal"
    android:layout_width="fill_parent"
    android:layout_height="wrap_content"
 >
<RelativeLayout
 android:layout_width="100dp"
    android:layout_height="100dp"
    android:gravity="center"
 >
 <ImageView
  android:layout_width="fill_parent"
     android:layout_height="fill_parent"
     android:layout_centerInParent="true"
     android:src="@drawable/androidbiancheng"
  />
 <ImageView
  android:layout_width="wrap_content"
     android:layout_height="wrap_content"
     android:layout_centerInParent="true"
     android:src="@drawable/icon"
  />
 <ProgressBar
     android:id="@+id/progressbar"
     android:layout_width="wrap_content"
     android:layout_height="wrap_content"
     android:layout_centerInParent="true"
     />
</RelativeLayout>
<Button
    android:layout_width="fill_parent"
    android:layout_height="wrap_content"
    android:text="A Button here"
 />
</LinearLayout>
<Button
    android:layout_width="fill_parent"
    android:layout_height="wrap_content"
    android:text="A Button here"
 />
</LinearLayout>
2011年1月15日星期六
如何通過Html.fromHtml()方法顯示兩行文字在按鈕之上
android.text.Html類把HTML字符串轉換成可顯示的樣式文本. (並非所有的HTML標記都支持)
例子:
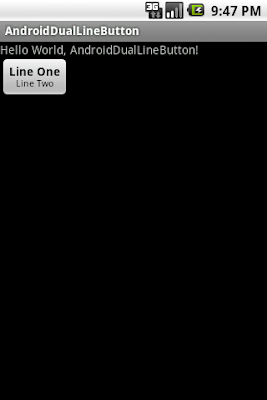
例子:

package com.AndroidDualLineButton;

import android.app.Activity;
import android.os.Bundle;
import android.text.Html;
import android.widget.Button;

public class AndroidDualLineButton extends Activity {
    /** Called when the activity is first created. */
    @Override
    public void onCreate(Bundle savedInstanceState) {
        super.onCreate(savedInstanceState);
        setContentView(R.layout.main);
        Button myButton = (Button)findViewById(R.id.mybutton);
        myButton.setText(Html.fromHtml("<b>" + "Line One" + "</b>" +  "<br />" + "<small>" + "Line Two" + "</small>"));

    }
}
水平滾動視圖(HorizontalScrollView)
水平滾動視圖(HorizontalScrollView)是一個可以水平方向滾動的佈局容器, 允許它大於物理顯示. 水平滾動視圖(HorizontalScrollView)是一個框佈局(FrameLayout), 這意味著你應該將一個包含全部滾動內容的子項放進去. 該子項本身可以是一個帶有複雜對象的佈局管理器(layout manager).
不應該使用把水平滾動視圖(HorizontalScrollView)與列表視圖(ListView)一起使用, 因為列表視圖會處理自己的滾動. 而且最重要的是,這樣會破壞了列表視圖重要的優化.
例子:
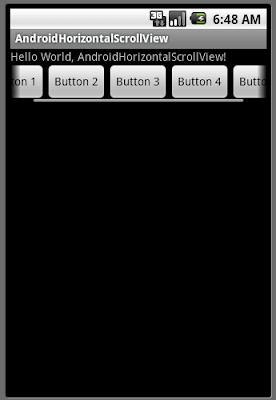
相關文章: 滾動視圖(ScrollView)
不應該使用把水平滾動視圖(HorizontalScrollView)與列表視圖(ListView)一起使用, 因為列表視圖會處理自己的滾動. 而且最重要的是,這樣會破壞了列表視圖重要的優化.
例子:
<?xml version="1.0" encoding="utf-8"?>
<LinearLayout xmlns:android="http://schemas.android.com/apk/res/android"
   android:orientation="vertical"
   android:layout_width="fill_parent"
   android:layout_height="fill_parent"
   >
<TextView
   android:layout_width="fill_parent"
   android:layout_height="wrap_content"
   android:text="@string/hello"/>
<HorizontalScrollView
 android:layout_width="wrap_content"
   android:layout_height="wrap_content">
<LinearLayout
   android:orientation="horizontal"
   android:layout_width="wrap_content"
   android:layout_height="wrap_content">
<Button
   android:layout_width="wrap_content"
   android:layout_height="wrap_content"
   android:text="Button 1"
   />
<Button
   android:layout_width="wrap_content"
   android:layout_height="wrap_content"
   android:text="Button 2"
   />
<Button
   android:layout_width="wrap_content"
   android:layout_height="wrap_content"
   android:text="Button 3"
   />
<Button
   android:layout_width="wrap_content"
   android:layout_height="wrap_content"
   android:text="Button 4"
   />
<Button
   android:layout_width="wrap_content"
   android:layout_height="wrap_content"
   android:text="Button 5"
   />
</LinearLayout>
</HorizontalScrollView>
</LinearLayout>

相關文章: 滾動視圖(ScrollView)
2011年1月14日星期五
如何利用InputFilter限制EditText的長度(字符數)
如果要限制EditText的長度, 可以使用InputFilter.
下面的例子說明如何使用InputFilter限制的EditText的長度為四個字符:
相關文章:
- 如何利用InputFilter把小寫字母轉為大寫
下面的例子說明如何使用InputFilter限制的EditText的長度為四個字符:
 final EditText input = new EditText(this);
 InputFilter[] FilterArray = new InputFilter[1];
 FilterArray[0] = new InputFilter.LengthFilter(4);
 input.setFilters(FilterArray);
相關文章:
- 如何利用InputFilter把小寫字母轉為大寫
2011年1月11日星期二
如何令標題欄(Title Bar)不顯示
令標題欄(Title Bar)不顯示, 可以使用Java程式碼:
或, 在AndroidManifest.xml內插入XML代碼:
android:theme="@android:style/Theme.NoTitleBar"
requestWindowFeature(Window.FEATURE_NO_TITLE);
或, 在AndroidManifest.xml內插入XML代碼:
android:theme="@android:style/Theme.NoTitleBar"
                  android:label="我的新名字"
                  android:theme="@android:style/Theme.NoTitleBar">
2011年1月10日星期一
如何修改應用程序的標籤
2011年1月8日星期六
2011年1月6日星期四
谷歌正式公佈: Android 3.0, 蜂窩(Honeycomb)
Official Google Mobile Blog剛剛發布一編文章"先睹為快Android3.0,蜂窩"(A Sneak Peek of Android 3.0, Honeycomb)正式公佈Android 3.0, 蜂窩(Honeycomb).
蜂窩是下一個版本的Android平台,旨在從根本上針對較大屏幕尺寸的設備,特別是平板電腦(tablets)。一種全新的,真正的虛擬和全息用戶界面。
許多 Android的現有功能真的會照耀蜂窩:精製的多任務處理(multi-tasking),典雅的通知(notifications),Android市場上超過10萬的應用程序,新的3D自定義主屏幕(Home Screen), 和重新設計的部件(Widgets) - 更豐富,更具交互性。Web瀏覽器的升級,包括標籤式瀏覽(tabbed browsing),表單自動填充(form auto-fill),與Google Chrome瀏覽器的同步,和私人瀏覽模式。
蜂窩還採用了最新的創新技術,包括擁有三維互動(3D interactions)和離線可靠性(offline reliability)的谷歌手機地圖5(Google Maps 5),超過 300萬谷歌圖書(Google eBooks),谷歌對話(Google Talk),讓你可以與其他谷歌對話(Google Talk)設備(電腦,平板電腦等)進行視頻和語音聊天。
A Sneak Peek of Android 3.0, Honeycomb - Official Google Mobile Blog: "Honeycomb also features the latest Google Mobile innovations including Google Maps 5 with 3D interactions and offline reliability, access to over 3 million Google eBooks, and Google Talk, which now allows you to video and voice chat with any other Google Talk enabled device (PC, tablet, etc)."
通過EXTRA_OUTPUT, 指定儲存圖像的路徑
前文說明如何"使用意圖MediaStore.ACTION_IMAGE_CAPTURE要求其他服務提供程序幫我們拍照", 但只返回一張縮圖.
但我們可以通過傳送一個EXTRA_OUTPUT的Extra給Intent, 指定儲存圖像的路徑.
修改前文"使用意圖MediaStore.ACTION_IMAGE_CAPTURE要求其他服務提供程序幫我們拍照"中的onClick()方法:
亦可以使用ContentResolver, 指定Android操作系統儲存圖像的標準路徑.
相關文章:
- 通過EXTRA_OUTPUT, 指定並顯示使用 ACTION_IMAGE_CAPTURE 拍攝的圖像
但我們可以通過傳送一個EXTRA_OUTPUT的Extra給Intent, 指定儲存圖像的路徑.
修改前文"使用意圖MediaStore.ACTION_IMAGE_CAPTURE要求其他服務提供程序幫我們拍照"中的onClick()方法:
  public void onClick(View arg0) {
   // TODO Auto-generated method stub

   //Specify the path of the captured image
   String strImage = Environment.getExternalStorageDirectory().getAbsolutePath()+"/mypicture.jpg";
   File myImage = new File(strImage);
   Uri uriMyImage = Uri.fromFile(myImage);

   Intent intent = new Intent(android.provider.MediaStore.ACTION_IMAGE_CAPTURE);
   intent.putExtra(android.provider.MediaStore.EXTRA_OUTPUT, uriMyImage);
   startActivityForResult(intent, 0);

  }
亦可以使用ContentResolver, 指定Android操作系統儲存圖像的標準路徑.
  public void onClick(View arg0) {
   // TODO Auto-generated method stub

   //Use the standard location for image
   Uri uriMyImage = getContentResolver().insert(Media.EXTERNAL_CONTENT_URI, new ContentValues());

   Intent intent = new Intent(android.provider.MediaStore.ACTION_IMAGE_CAPTURE);
   intent.putExtra(android.provider.MediaStore.EXTRA_OUTPUT, uriMyImage);
   startActivityForResult(intent, 0);

  }
相關文章:
- 通過EXTRA_OUTPUT, 指定並顯示使用 ACTION_IMAGE_CAPTURE 拍攝的圖像
2011年1月4日星期二
Android內建相機應用程序返回的縮圖
前文"使用意圖MediaStore.ACTION_IMAGE_CAPTURE要求其他服務提供程序幫我們拍照", 修改onActivityResult()方法使用Toast顯示位圖的寬度和高度; 會發現返回的圖像只是一個244x324的縮圖, 不是完整大小的位圖.

這是正常的, 在隨後的文章我將展示如何指定儲存圖像的路徑, 以得到全尺寸位圖.
 protected void onActivityResult(int requestCode, int resultCode, Intent data) {
// TODO Auto-generated method stub
super.onActivityResult(requestCode, resultCode, data);

if (resultCode == RESULT_OK)
{
 Bundle extras = data.getExtras();
 Bitmap bmp = (Bitmap) extras.get("data");
 imageiewImageCaptured.setImageBitmap(bmp);

 String strWidth = String.valueOf(bmp.getWidth());
 String strHeight = String.valueOf(bmp.getHeight());
 Toast.makeText(AndroidImageCapture.this,
   "Width: " + strWidth + "\n" +
   "Height: " + strHeight,
   Toast.LENGTH_LONG).show();
}

}

這是正常的, 在隨後的文章我將展示如何指定儲存圖像的路徑, 以得到全尺寸位圖.
訂閱:
文章 (Atom)


