2011年7月31日星期日

實現編輯文字(EditText)的清除按鈕

實例:
實現編輯文字(EditText)的清除按鈕

package com.AndroidEditText;

import android.app.Activity;
import android.os.Bundle;
import android.view.View;
import android.widget.Button;
import android.widget.EditText;

public class AndroidEditTextActivity extends Activity {
/** Called when the activity is first created. */
@Override
public void onCreate(Bundle savedInstanceState) {
super.onCreate(savedInstanceState);
setContentView(R.layout.main);

final EditText input = (EditText)findViewById(R.id.input);
Button buttonClear = (Button)findViewById(R.id.clear);
buttonClear.setOnClickListener(new Button.OnClickListener(){

@Override
public void onClick(View v) {
// TODO Auto-generated method stub
input.setText("");
}});

}
}


<?xml version="1.0" encoding="utf-8"?>
<LinearLayout xmlns:android="http://schemas.android.com/apk/res/android"
android:orientation="vertical"
android:layout_width="fill_parent"
android:layout_height="fill_parent"
>
<TextView
android:layout_width="fill_parent"
android:layout_height="wrap_content"
android:text="@string/hello"
/>
<RelativeLayout
android:layout_width="fill_parent"
android:layout_height="wrap_content">
<Button
android:id="@+id/clear"
android:layout_width="wrap_content"
android:layout_height="wrap_content"
android:hint="CLEAR"
android:layout_alignParentRight="true"/>
<EditText
android:id="@+id/input"
android:layout_width="fill_parent"
android:layout_height="wrap_content"
android:hint="請輸入"
android:layout_alignParentLeft="true"
android:layout_toLeftOf="@id/clear"/>

</RelativeLayout>
</LinearLayout>


2011年7月30日星期六

顯示編輯文字的提示字

可使用 android:hint 標記設置顯示編輯文字的提示字.

實例:

顯示編輯文字的提示字

<EditText  
android:layout_width="fill_parent"
android:layout_height="wrap_content"
android:hint="請輸入" />


2011年7月24日星期日

通過 Java 代碼設定 layout_width 為 50%

參考前文"怎麼設定layout_width為50%", 我們可以設置 <Button> 的重量參數(weight)設定 layout_width 為 50%.

但當我們使用 Java 代碼, 如果定義按鈕的 LayoutParams 為 LayoutParams, 我們是不能設置重量參數(weight)的!

可以把按鈕的 LayoutParams 定義為 LinearLayout.LayoutParams, 便可以通過 new LinearLayout.LayoutParams() 或 LinearLayout.LayoutParams.weight 設置重量參數(weight).

通過 Java 代碼設定 layout_width 為 50%

package com.AndroidWeight;

import android.app.Activity;
import android.os.Bundle;
import android.view.ViewGroup.LayoutParams;
import android.widget.Button;
import android.widget.LinearLayout;

public class AndroidWeightActivity extends Activity {
/** Called when the activity is first created. */
@Override
public void onCreate(Bundle savedInstanceState) {
super.onCreate(savedInstanceState);

LinearLayout layout = new LinearLayout(getApplicationContext());
layout.setOrientation(LinearLayout.HORIZONTAL);

// Half Button 1
LinearLayout subLayout1 = new LinearLayout(getApplicationContext());
LinearLayout.LayoutParams paramsSubLayout1
= new LinearLayout.LayoutParams(LayoutParams.FILL_PARENT, LayoutParams.WRAP_CONTENT, 1.0f);
subLayout1.setLayoutParams(paramsSubLayout1);
subLayout1.setOrientation(LinearLayout.VERTICAL);

Button buttonHalfWidth1 = new Button(getApplicationContext());
buttonHalfWidth1.setText("Half Width 1");
LayoutParams paramsHalfWidth1
= new LayoutParams(LayoutParams.FILL_PARENT, LayoutParams.WRAP_CONTENT);
buttonHalfWidth1.setLayoutParams(paramsHalfWidth1);

// Half Button 2
Button buttonHalfWidth2 = new Button(getApplicationContext());
buttonHalfWidth2.setText("Half Width 2");
LinearLayout.LayoutParams paramsHalfWidth2
= new LinearLayout.LayoutParams(LayoutParams.FILL_PARENT, LayoutParams.WRAP_CONTENT);
paramsHalfWidth2.weight = 1.0f;
buttonHalfWidth2.setLayoutParams(paramsHalfWidth2);

//--------
subLayout1.addView(buttonHalfWidth1);
layout.addView(subLayout1);
layout.addView(buttonHalfWidth2);

setContentView(layout);
}
}

2011年7月23日星期六

在標題欄顯示圖標(icon) - Window.FEATURE_LEFT_ICON/Window.FEATURE_RIGHT_ICON

要在標題欄顯示圖標, 先要要求窗口功能 Window.FEATURE_LEFT_ICON 和/或 Window.FEATURE_RIGHT_ICON:
requestWindowFeature(Window.FEATURE_LEFT_ICON);
requestWindowFeature(Window.FEATURE_RIGHT_ICON);

再調用 setFeatureDrawableResource() 方法來設定它.

實例:

Window.FEATURE_LEFT_ICON/Window.FEATURE_RIGHT_ICON

package com.AndroidTitleIcon;

import android.app.Activity;
import android.os.Bundle;
import android.view.Window;

public class AndroidTitleIconActivity extends Activity {
/** Called when the activity is first created. */
@Override
public void onCreate(Bundle savedInstanceState) {
super.onCreate(savedInstanceState);
requestWindowFeature(Window.FEATURE_LEFT_ICON);
requestWindowFeature(Window.FEATURE_RIGHT_ICON);
setContentView(R.layout.main);
getWindow().setFeatureDrawableResource(Window.FEATURE_LEFT_ICON,R.drawable.icon);
getWindow().setFeatureDrawableResource(Window.FEATURE_RIGHT_ICON,R.drawable.icon);
}
}


2011年7月22日星期五

在標題欄顯示進度圖標 - Window.FEATURE_INDETERMINATE_PROGRESS

要在標題欄顯示進度圖標, 先要要求窗口功能"Window.FEATURE_INDETERMINATE_PROGRESS":
requestWindowFeature(Window.FEATURE_INDETERMINATE_PROGRESS);

再調用 setProgressBarIndeterminateVisibility(true/false) 方法來顯示/隱藏它.

實例:
在標題欄顯示進度圖標 - Window.FEATURE_INDETERMINATE_PROGRESS

package com.AndroidProgressTitleBar;

import android.app.Activity;
import android.os.Bundle;
import android.view.View;
import android.view.Window;
import android.widget.Button;

public class AndroidProgressTitleBarActivity extends Activity {
/** Called when the activity is first created. */
@Override
public void onCreate(Bundle savedInstanceState) {
super.onCreate(savedInstanceState);
requestWindowFeature(Window.FEATURE_INDETERMINATE_PROGRESS);
setContentView(R.layout.main);

Button btnTurnOnProgress = (Button)findViewById(R.id.progresson);
Button btnTurnOffProgress = (Button)findViewById(R.id.progressoff);

btnTurnOnProgress.setOnClickListener(new Button.OnClickListener(){

@Override
public void onClick(View v) {
// TODO Auto-generated method stub
setProgressBarIndeterminateVisibility(true);
}});

btnTurnOffProgress.setOnClickListener(new Button.OnClickListener(){

@Override
public void onClick(View v) {
// TODO Auto-generated method stub
setProgressBarIndeterminateVisibility(false);
}});
}
}


2011年7月21日星期四

利用程式碼更改文字顏色, setTextColor()

實例:

利用程式碼更改文字顏色, setTextColor()

package com.AndroidText;

import android.app.Activity;
import android.os.Bundle;
import android.view.View;
import android.widget.Button;
import android.widget.TextView;

public class AndroidTextActivity extends Activity {

TextView text;
Button buttonChangeTextColor;

/** Called when the activity is first created. */
@Override
public void onCreate(Bundle savedInstanceState) {
super.onCreate(savedInstanceState);
setContentView(R.layout.main);
text = (TextView)findViewById(R.id.text);
buttonChangeTextColor = (Button)findViewById(R.id.changetextcolor);

buttonChangeTextColor.setOnClickListener(new Button.OnClickListener(){

public void onClick(View arg0) {
// TODO Auto-generated method stub

/*
* setTextColor(
* ((alpha << 24) & 0xFF000000)
* + ((red << 16) & 0x00FF0000)
* + ((green << 8) & 0x0000FF00)
* + (blue & 0x000000FF));
*/


//setTypeface for TextView
text.setTextColor(0xFF008080);
//setTypeface for Button
buttonChangeTextColor.setTextColor(0xFFFF0000);
}});
}
}


<?xml version="1.0" encoding="utf-8"?>
<LinearLayout xmlns:android="http://schemas.android.com/apk/res/android"
android:orientation="vertical"
android:layout_width="fill_parent"
android:layout_height="fill_parent"
>
<TextView
android:id="@+id/text"
android:layout_width="fill_parent"
android:layout_height="wrap_content"
android:text="@string/hello"
/>
<Button
android:id="@+id/changetextcolor"
android:layout_width="fill_parent"
android:layout_height="wrap_content"
android:text="Change Text Color"
/>
</LinearLayout>


2011年7月20日星期三

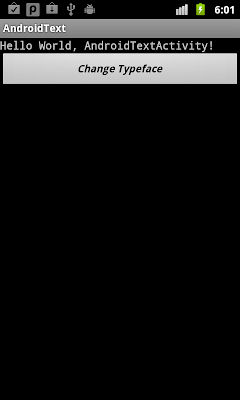
動態改變文字的字體, setTypeface(typeface, style)

我們可以使用 Java 碼, 調用 setTypeface() 方法, 改變文字的字體.

textview.setTypeface(typeface, style)

其中 typeface 參數可以是:
- Typeface.DEFAULT
- Typeface.DEFAULT_BOLD
- Typeface.MONOSPACE
- Typeface.SANS_SERIF
- Typeface.SERIF

style 參數可以是:
- Typeface.BOLD
- Typeface.BOLD_ITALIC
- Typeface.ITALIC
- Typeface.NORMAL

實例:

動態改變文字的字體, setTypeface(typeface, style)

package com.AndroidText;

import android.app.Activity;
import android.graphics.Typeface;
import android.os.Bundle;
import android.view.View;
import android.widget.Button;
import android.widget.TextView;

public class AndroidTextActivity extends Activity {

TextView text;
Button buttonChangeTypeFace;

/** Called when the activity is first created. */
@Override
public void onCreate(Bundle savedInstanceState) {
super.onCreate(savedInstanceState);
setContentView(R.layout.main);
text = (TextView)findViewById(R.id.text);
buttonChangeTypeFace = (Button)findViewById(R.id.changetypeface);

buttonChangeTypeFace.setOnClickListener(new Button.OnClickListener(){

public void onClick(View arg0) {
// TODO Auto-generated method stub

/*
* setTypeface(typeface, style)
* typeface:
* - Typeface.DEFAULT
* - Typeface.DEFAULT_BOLD
* - Typeface.MONOSPACE
* - Typeface.SANS_SERIF
* - Typeface.SERIF
*
* style:
* - Typeface.BOLD
* - Typeface.BOLD_ITALIC
* - Typeface.ITALIC
* - Typeface.NORMAL
*/


//setTypeface for TextView
text.setTypeface(Typeface.MONOSPACE, Typeface.BOLD);
//setTypeface for Button
buttonChangeTypeFace.setTypeface(Typeface.SANS_SERIF, Typeface.BOLD_ITALIC);
}});
}
}


<?xml version="1.0" encoding="utf-8"?>
<LinearLayout xmlns:android="http://schemas.android.com/apk/res/android"
android:orientation="vertical"
android:layout_width="fill_parent"
android:layout_height="fill_parent"
>
<TextView
android:id="@+id/text"
android:layout_width="fill_parent"
android:layout_height="wrap_content"
android:text="@string/hello"
/>
<Button
android:id="@+id/changetypeface"
android:layout_width="fill_parent"
android:layout_height="wrap_content"
android:text="Change Typeface"
/>
</LinearLayout>


2011年7月19日星期二

動態改變文字的大小, setTextSize()

實例:

動態改變文字的大小, setTextSize()

package com.AndroidText;

import android.app.Activity;
import android.os.Bundle;
import android.view.View;
import android.widget.Button;
import android.widget.TextView;

public class AndroidTextActivity extends Activity {

TextView text;
Button buttonChangeTextSize;

/** Called when the activity is first created. */
@Override
public void onCreate(Bundle savedInstanceState) {
super.onCreate(savedInstanceState);
setContentView(R.layout.main);
text = (TextView)findViewById(R.id.text);
buttonChangeTextSize = (Button)findViewById(R.id.changetextsize);

buttonChangeTextSize.setOnClickListener(new Button.OnClickListener(){

public void onClick(View arg0) {
// TODO Auto-generated method stub
//Change Text Size of TextView
text.setTextSize(50);
//Change Text Size of Button
buttonChangeTextSize.setTextSize(35);
}});
}
}


<?xml version="1.0" encoding="utf-8"?>
<LinearLayout xmlns:android="http://schemas.android.com/apk/res/android"
android:orientation="vertical"
android:layout_width="fill_parent"
android:layout_height="fill_parent"
>
<TextView
android:id="@+id/text"
android:layout_width="fill_parent"
android:layout_height="wrap_content"
android:text="@string/hello"
/>
<Button
android:id="@+id/changetextsize"
android:layout_width="fill_parent"
android:layout_height="wrap_content"
android:text="Change Text Size"
/>
</LinearLayout>


使用 Java 代碼動態改變按鈕的大小

我們可以使用 Java 碼, 通過改變佈局參數(LayoutParams)來改變按鈕的大小.

實例:

按鈕原來的大小
動態改變後的按鈕大小

package com.AndroidButtonSize;

import android.app.Activity;
import android.os.Bundle;
import android.view.View;
import android.view.ViewGroup.LayoutParams;
import android.widget.Button;

public class AndroidButtonSizeActivity extends Activity {
/** Called when the activity is first created. */
@Override
public void onCreate(Bundle savedInstanceState) {
super.onCreate(savedInstanceState);
setContentView(R.layout.main);

final Button button = (Button)findViewById(R.id.button);
button.setOnClickListener(new Button.OnClickListener(){

public void onClick(View v) {
// TODO Auto-generated method stub
LayoutParams params = button.getLayoutParams();
params.width = 300;
params.height = 200;
button.setLayoutParams(params);
}});
}
}


2011年7月16日星期六

谷歌發佈 Android 3.2 SDK 工具

谷歌剛剛發佈新的 Android 3.2 SDK 工具, 為用戶和開發人員添加了一些新功能. 新平台 API Level 13 包括一些API的變化。
  • 更廣泛的平板電腦優化
  • 固定大小應用程序的 zoom 的兼容性
  • SD 卡的媒體同步
  • 支持擴展屏幕的API


谷歌還同時更新了 SDK Tools (r12), Eclipse 插件 (ADT 12) 以及 NDK (r6).

詳情:
http://android-developers.blogspot.com/2011/07/android-32-platform-and-updated-sdk.html

2011年7月15日星期五

通過EXTRA_OUTPUT, 指定並顯示使用 ACTION_IMAGE_CAPTURE 拍攝的圖像

在本博客的舊文章"通過EXTRA_OUTPUT, 指定儲存圖像的路徑"中, 描述了如何指定儲存圖像的路徑, 但沒有描述如何顯示拍攝的圖像. 本文將描述如何在onActivityResult()通過 BitmapFactory 顯示拍攝的圖像.

通過EXTRA_OUTPUT, 指定並顯示使用 ACTION_IMAGE_CAPTURE 拍攝的圖像

package com.AndroidImageCapture;

import java.io.File;

import android.app.Activity;
import android.content.Intent;
import android.graphics.Bitmap;
import android.graphics.BitmapFactory;
import android.net.Uri;
import android.os.Bundle;
import android.os.Environment;
import android.view.View;
import android.widget.Button;
import android.widget.ImageView;

public class AndroidImageCaptureActivity extends Activity {

ImageView imageiewImageCaptured;
String strImage;

/** Called when the activity is first created. */
@Override
public void onCreate(Bundle savedInstanceState) {
super.onCreate(savedInstanceState);
setContentView(R.layout.main);
Button buttonImageCapture = (Button)findViewById(R.id.captureimage);
imageiewImageCaptured = (ImageView)findViewById(R.id.imagecaptured);

buttonImageCapture.setOnClickListener(buttonImageCaptureOnClickListener);
}

Button.OnClickListener buttonImageCaptureOnClickListener
= new Button.OnClickListener(){

public void onClick(View v) {
// TODO Auto-generated method stub
//Specify the path of the captured image
strImage = Environment.getExternalStorageDirectory().getAbsolutePath()+"/mypicture.jpg";
File myImage = new File(strImage);
Uri uriMyImage = Uri.fromFile(myImage);

Intent intent = new Intent(android.provider.MediaStore.ACTION_IMAGE_CAPTURE);
intent.putExtra(android.provider.MediaStore.EXTRA_OUTPUT, uriMyImage);
startActivityForResult(intent, 0);
}
};

@Override
protected void onActivityResult(int requestCode, int resultCode, Intent data) {
// TODO Auto-generated method stub
super.onActivityResult(requestCode, resultCode, data);
if (resultCode == RESULT_OK)
{
Bitmap bmp = BitmapFactory.decodeFile(strImage);
imageiewImageCaptured.setImageBitmap(bmp);
}
}
}


<?xml version="1.0" encoding="utf-8"?>
<LinearLayout xmlns:android="http://schemas.android.com/apk/res/android"
android:orientation="vertical"
android:layout_width="fill_parent"
android:layout_height="fill_parent"
>
<TextView
android:layout_width="fill_parent"
android:layout_height="wrap_content"
android:text="@string/hello"
/>
<Button
android:id="@+id/captureimage"
android:layout_width="fill_parent"
android:layout_height="wrap_content"
android:text="Call for ACTION_IMAGE_CAPTURE"
/>
<ImageView
android:id="@+id/imagecaptured"
android:layout_width="wrap_content"
android:layout_height="wrap_content"
/>
</LinearLayout>


2011年7月13日星期三

如何鎖定屏幕方向, setRequestedOrientation

我們可以調用 getResources().getConfiguration().orientation 獲得當前的屏幕方向, 然後調用 setRequestedOrientation() 方法鎖定屏幕方向.

例子:

鎖定屏幕方向

package com.AndroidFixOrientation;

import android.app.Activity;
import android.content.pm.ActivityInfo;
import android.content.res.Configuration;
import android.os.Bundle;
import android.widget.CheckBox;
import android.widget.CompoundButton;
import android.widget.CompoundButton.OnCheckedChangeListener;

public class AndroidFixOrientationActivity extends Activity {
/** Called when the activity is first created. */
@Override
public void onCreate(Bundle savedInstanceState) {
super.onCreate(savedInstanceState);
setContentView(R.layout.main);

CheckBox fixOrientation = (CheckBox)findViewById(R.id.FixOrientation);

fixOrientation.setOnCheckedChangeListener(new OnCheckedChangeListener(){

int currentOrientation = getResources().getConfiguration().orientation;

public void onCheckedChanged(CompoundButton arg0, boolean arg1) {
// TODO Auto-generated method stub
if(arg1){
switch(currentOrientation) {
case Configuration.ORIENTATION_LANDSCAPE:
setRequestedOrientation(ActivityInfo.SCREEN_ORIENTATION_LANDSCAPE);
break;
case Configuration.ORIENTATION_PORTRAIT:
setRequestedOrientation(ActivityInfo.SCREEN_ORIENTATION_PORTRAIT);
break;
default:
setRequestedOrientation(ActivityInfo.SCREEN_ORIENTATION_UNSPECIFIED);
}
}else{
setRequestedOrientation(ActivityInfo.SCREEN_ORIENTATION_UNSPECIFIED);
}
}});


}
}


2011年7月5日星期二

檢索字符串資源, getString()

有時,我們將定義我們的字符串形式的資源

我們會使用資源(resources)的方式定義我們的字符串; 例如 /res/values/strings.xml 中的 "app_name".

如果我們要檢索這樣的字符串資源, 不能直接使用 myAppName = R.string.app_name, 我們要通過 getString() 方法檢索字符串資源.

例子:

檢索字符串資源, getString()

package com.StringResource;

import android.app.Activity;
import android.os.Bundle;
import android.widget.TextView;

public class StringResourceActivity extends Activity {
/** Called when the activity is first created. */
@Override
public void onCreate(Bundle savedInstanceState) {
super.onCreate(savedInstanceState);
setContentView(R.layout.main);

TextView text1 = (TextView)findViewById(R.id.text1);
TextView text2 = (TextView)findViewById(R.id.text2);

text1.setText(R.string.app_name);

String myAppName;
//myAppName = R.string.app_name; //Error!
myAppName = getString(R.string.app_name);
text2.setText(myAppName);
}
}