2011年3月30日星期三

圖像處理

上文描述了如何"從 drawable 文件夾中加載位圖", 本文會對所加載的位圖進行一些簡單處理.

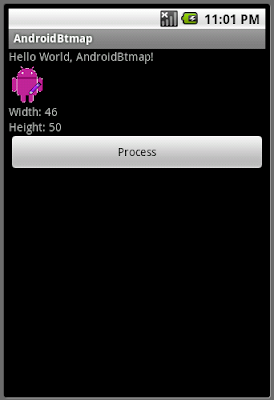
通過 Bitmap 類的 getPixels() 方法可以把 Bitmap 複製到一個整數矩陣. 每個元素對應 Bitmap 的一點. 而 32 bit 分別代表 alpha, 紅, 綠, 藍. 這樣我們便可以處理每個點. 本例子中, 每次用戶點擊按鈕, 便把圖像的紅, 綠, 藍迴轉一次(r->b, b->g, g->r), 然後利用 createBitmap() 和 setPixels() 方法創建新的 Bitmap.
圖像處理

<?xml version="1.0" encoding="utf-8"?>
<LinearLayout xmlns:android="http://schemas.android.com/apk/res/android"
android:orientation="vertical"
android:layout_width="fill_parent"
android:layout_height="fill_parent"
>
<TextView
android:layout_width="fill_parent"
android:layout_height="wrap_content"
android:text="@string/hello"
/>
<ImageView
android:id="@+id/myimage"
android:layout_width="wrap_content"
android:layout_height="wrap_content"
/>
<TextView
android:id="@+id/myimagewidth"
android:layout_width="fill_parent"
android:layout_height="wrap_content"
/>
<TextView
android:id="@+id/myimageheight"
android:layout_width="fill_parent"
android:layout_height="wrap_content"
/>
<Button
android:id="@+id/process"
android:layout_width="fill_parent"
android:layout_height="wrap_content"
android:text="Process"
/>
</LinearLayout>


package com.AndroidBtmap;

import android.app.Activity;
import android.graphics.Bitmap;
import android.graphics.BitmapFactory;
import android.os.Bundle;
import android.view.View;
import android.widget.Button;
import android.widget.ImageView;
import android.widget.TextView;

public class AndroidBtmap extends Activity {

Bitmap bitmap;
ImageView myImage;

/** Called when the activity is first created. */
@Override
public void onCreate(Bundle savedInstanceState) {
super.onCreate(savedInstanceState);
setContentView(R.layout.main);

myImage = (ImageView)findViewById(R.id.myimage);
TextView myImageWidth = (TextView)findViewById(R.id.myimagewidth);
TextView myImageHeight = (TextView)findViewById(R.id.myimageheight);
Button buttonProcess = (Button)findViewById(R.id.process);

bitmap = BitmapFactory.decodeResource(getResources(), R.drawable.androidbiancheng);
int bitmapWidth = bitmap.getWidth();
int bitmapHeight = bitmap.getHeight();

myImage.setImageBitmap(bitmap);
myImageWidth.setText("Width: " + String.valueOf(bitmapWidth));
myImageHeight.setText("Height: " + String.valueOf(bitmapHeight));

buttonProcess.setOnClickListener(new Button.OnClickListener(){

@Override
public void onClick(View arg0) {
// TODO Auto-generated method stub
bitmap = doProcess(bitmap);
myImage.setImageBitmap(bitmap);
myImage.invalidate();


}});
}

private Bitmap doProcess(Bitmap src){
int bmWidth = src.getWidth();
int bmHeight = src.getHeight();
int[] newBitmap = new int[bmWidth * bmHeight];

src.getPixels(newBitmap, 0, bmWidth, 0, 0, bmWidth, bmHeight);

for (int h = 0; h < bmHeight; h++){
for (int w = 0; w < bmWidth; w++){
int index = h * bmWidth + w;
int alpha = newBitmap[index] & 0xff000000;
int r = (newBitmap[index] >> 16) & 0xff;
int g = (newBitmap[index] >> 8) & 0xff;
int b = newBitmap[index] & 0xff;

int t = r; //Swap the color
r = g;
g = b;
b = t;

newBitmap[index] = alpha | (r << 16) | (g << 8) | b;
}
}

Bitmap bm = Bitmap.createBitmap(bmWidth, bmHeight, Bitmap.Config.ARGB_8888);
bm.setPixels(newBitmap, 0, bmWidth, 0, 0, bmWidth, bmHeight);

return bm;
}
}


2011年3月28日星期一

儲存位圖檔案

Android OS 為每個應用程序保留獨立的文件結構.

例如:
com.AndroidBtmap 應用程序包的文件位於:
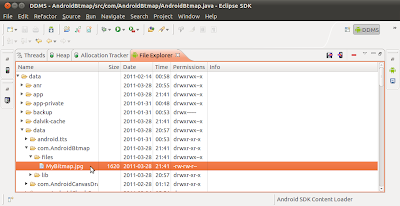
/data/data/com.AndroidBtmap/files/

修改上文"從 drawable 文件夾中加載位圖"程序, 把位圖檔案以 JPG 格式儲存於 /data/data/com.AndroidBtmap/files/ 中.

儲存位圖檔案
儲存位圖檔案

main.xml
<?xml version="1.0" encoding="utf-8"?>
<LinearLayout xmlns:android="http://schemas.android.com/apk/res/android"
android:orientation="vertical"
android:layout_width="fill_parent"
android:layout_height="fill_parent"
>
<TextView
android:layout_width="fill_parent"
android:layout_height="wrap_content"
android:text="@string/hello"
/>
<ImageView
android:id="@+id/myimage"
android:layout_width="wrap_content"
android:layout_height="wrap_content"
/>
<TextView
android:id="@+id/myimagewidth"
android:layout_width="fill_parent"
android:layout_height="wrap_content"
/>
<TextView
android:id="@+id/myimageheight"
android:layout_width="fill_parent"
android:layout_height="wrap_content"
/>
<Button
android:id="@+id/save"
android:layout_width="fill_parent"
android:layout_height="wrap_content"
android:text="Save"
/>
</LinearLayout>


package com.AndroidBtmap;

import java.io.FileNotFoundException;
import java.io.FileOutputStream;
import java.io.IOException;

import android.app.Activity;
import android.graphics.Bitmap;
import android.graphics.BitmapFactory;
import android.graphics.Bitmap.CompressFormat;
import android.os.Bundle;
import android.view.View;
import android.widget.Button;
import android.widget.ImageView;
import android.widget.TextView;

public class AndroidBtmap extends Activity {
/** Called when the activity is first created. */
@Override
public void onCreate(Bundle savedInstanceState) {
super.onCreate(savedInstanceState);
setContentView(R.layout.main);

ImageView myImage = (ImageView)findViewById(R.id.myimage);
TextView myImageWidth = (TextView)findViewById(R.id.myimagewidth);
TextView myImageHeight = (TextView)findViewById(R.id.myimageheight);
Button buttonSave = (Button)findViewById(R.id.save);

final Bitmap bitmap = BitmapFactory.decodeResource(getResources(), R.drawable.androidbiancheng);
int bitmapWidth = bitmap.getWidth();
int bitmapHeight = bitmap.getHeight();

myImage.setImageBitmap(bitmap);
myImageWidth.setText("Width: " + String.valueOf(bitmapWidth));
myImageHeight.setText("Height: " + String.valueOf(bitmapHeight));

buttonSave.setOnClickListener(new Button.OnClickListener(){

@Override
public void onClick(View arg0) {
// TODO Auto-generated method stub
FileOutputStream fos;
try {
fos = openFileOutput("MyBitmap.jpg", MODE_WORLD_READABLE);
bitmap.compress(CompressFormat.JPEG, 80, fos);
fos.flush();
fos.close();
} catch (FileNotFoundException e) {
// TODO Auto-generated catch block
e.printStackTrace();
} catch (IOException e) {
// TODO Auto-generated catch block
e.printStackTrace();
}

}});
}
}


從 drawable 文件夾中加載位圖

首先把一個位圖檔案儲存於 drawable 文件夾中, Android SDK 會為它分配一個 ID, 可以通過 "R.drawable.xxx" 被存取.

例如:
/res/drawable/androidbiancheng.png 的 ID 是 R.drawable.androidbiancheng

從 drawable 文件夾中加載位圖

佈局文件, main.xml
<?xml version="1.0" encoding="utf-8"?>
<LinearLayout xmlns:android="http://schemas.android.com/apk/res/android"
android:orientation="vertical"
android:layout_width="fill_parent"
android:layout_height="fill_parent"
>
<TextView
android:layout_width="fill_parent"
android:layout_height="wrap_content"
android:text="@string/hello"
/>
<ImageView
android:id="@+id/myimage"
android:layout_width="wrap_content"
android:layout_height="wrap_content"
/>
<TextView
android:id="@+id/myimagewidth"
android:layout_width="fill_parent"
android:layout_height="wrap_content"
/>
<TextView
android:id="@+id/myimageheight"
android:layout_width="fill_parent"
android:layout_height="wrap_content"
/>
</LinearLayout>


package com.AndroidBtmap;

import android.app.Activity;
import android.graphics.Bitmap;
import android.graphics.BitmapFactory;
import android.os.Bundle;
import android.widget.ImageView;
import android.widget.TextView;

public class AndroidBtmap extends Activity {
/** Called when the activity is first created. */
@Override
public void onCreate(Bundle savedInstanceState) {
super.onCreate(savedInstanceState);
setContentView(R.layout.main);

ImageView myImage = (ImageView)findViewById(R.id.myimage);
TextView myImageWidth = (TextView)findViewById(R.id.myimagewidth);
TextView myImageHeight = (TextView)findViewById(R.id.myimageheight);

Bitmap bitmap = BitmapFactory.decodeResource(getResources(), R.drawable.androidbiancheng);
int bitmapWidth = bitmap.getWidth();
int bitmapHeight = bitmap.getHeight();

myImage.setImageBitmap(bitmap);
myImageWidth.setText("Width: " + String.valueOf(bitmapWidth));
myImageHeight.setText("Height: " + String.valueOf(bitmapHeight));
}
}


下一篇文章:
- 儲存位圖檔案
- 圖像處理

控制 Android 內置閃光燈

從 API level 5 開始, 應用軟件可以調用函數 setFlashMode()控制 Android 設備的內置閃光燈, 充當臨時手電筒.

開啟內置閃光燈:
 Camera camera;
Parameters parameters;

camera = Camera.open();
parameters = camera.getParameters();
parameters.setFlashMode(Parameters.FLASH_MODE_TORCH);
camera.setParameters(parameters);


關閉內置閃光燈:
 parameters.setFlashMode(Parameters.FLASH_MODE_OFF);
camera.setParameters(parameters);
camera.release();


注意:
當應用程序終止時, 不要忘記調用函數 camera.release() 釋放相機功能.


2011年3月25日星期五

分析Android應用程式的內存

Dalvik 虛擬機運行時可能會進行垃圾收集(garbage-collection),但是,這並不意味著你可以忽略內存管理。作為一名 Android 應用程序開發人員,因應移動設備中更多的內存限制, 應該特別留意內存的使用。

Android開發者博客(Android Developers Blog)剛剛發布一分文章談到一些 Android SDK 中的內存分析工具,可以幫助你微調應用程序的內存使用 - 值得一看。

在文章中,展示 Allocation Tracker 和 heap dumps 如何可以幫助更加了解應用程序的內存使用情況。還展示了 Eclipse Memory Analyzer (MAT) 如何可以幫助追踪應用程序中的內存洩漏(memory leaks)。

- Android Developers Blog: Memory Analysis for Android Applications

2011年3月24日星期四

roottools: 開源的 Root 工具包項目


roottools 使開發人員方便地使用共同的 rooted 工具,更容易地編寫 rooted 應用軟件, 使東西標準化和優化.

這項目的長遠目標,是通過創建應用程序庫, 方便開發者編寫 rooted 應用程序,而不必不斷地重新編寫代碼。

http://code.google.com/p/roottools/

2011年3月19日星期六

MATCH_PARENT

從API Level 8(即Android 2.2)開始, Android API 的 layout_width 和 layout_height 新增 "MATCH_PARENT", 其實"MATCH_PARENT"基本上與"FILL_PARENT"相同("FILL_PARENT"已過時); 它們的數值都是-1(0xffffffff), 意味著該視圖盡可能填滿它的父對象減去padding的寬度或高度.

2011年3月18日星期五

Anroid市場開發人員控制台(Market Developer Console)新增應用程序統計信息

應用統計學是 Android 市場的開發人員控制台上一種新的儀表盤, 為應用程序的安裝性能提供一個概述.

它提供圖表和表格, 總結每一個應用程序隨著時間的推移的安裝趨勢, 以及在各個主要因素的分佈, 如Android平台版本, 設備, 使用國家和用戶的語言. 有關其他方面, 你也可以觀察一下你的應用程序相對於市場上其他的應用程序, 或決定下一步該怎麼發展.

Anroid市場開發人員控制台(Market Developer Console)新增應用程序統計信息


詳情: Application Stats on Android Market


2011年3月5日星期六

自由落體方程式

前文章"在畫布(Canvas)上繪畫圖形"以Math.sin()作為例子示範如何在畫布(Canvas)上繪畫圖形. 本文修改一點點, 在畫布上繪畫自由落體方程式(參考: Wikipedia - Equations for a falling body).

自由落體方程式

本實例中, 我們使用公式 d = (gt^2)/2 計算一個自由落體在某一瞬間的下降距離.

修改"在畫布(Canvas)上繪畫圖形"中的MyCanvas.java
package com.AndroidCanvasDraw;

import android.content.Context;
import android.graphics.Canvas;
import android.graphics.Color;
import android.graphics.Paint;
import android.util.AttributeSet;
import android.view.View;

public class MyCanvas extends View {

private Paint paint = new Paint(Paint.ANTI_ALIAS_FLAG);
int canvasVerticalCenter;

int initX, initY;
float initV;
final float constG = 9.8f;

public MyCanvas(Context context) {
super(context);
// TODO Auto-generated constructor stub
init();
}

public MyCanvas(Context context, AttributeSet attrs) {
super(context, attrs);
// TODO Auto-generated constructor stub
init();
}

public MyCanvas(Context context, AttributeSet attrs, int defStyle) {
super(context, attrs, defStyle);
// TODO Auto-generated constructor stub
init();
}

private void init(){
paint.setStyle(Paint.Style.FILL);
paint.setStrokeWidth(3);
paint.setColor(Color.WHITE);

initX = 0;
initY = 300;
initV = 0;
}

@Override
protected void onDraw(Canvas canvas) {
// TODO Auto-generated method stub
prepareProject();

for(int t = 0; t < getWidth(); t++){
//d = g*t*t/2
float scaledDuration = (float)t/20;
float d = constG * scaledDuration * scaledDuration /2;
float h = initY - d;

if (h >= 0f){
project(t, (int)h, canvas);
}else{
break;
}
}
}

void prepareProject(){
canvasVerticalCenter = getHeight();
}

void project(int x, int y, Canvas c){
c.drawPoint(x, canvasVerticalCenter-y, paint);
}

@Override
protected void onMeasure(int widthMeasureSpec, int heightMeasureSpec) {
// TODO Auto-generated method stub
setMeasuredDimension(MeasureSpec.getSize(widthMeasureSpec),
MeasureSpec.getSize(heightMeasureSpec));
}

}

早期的 Android 版本也可以使用片段應用程序接口(Fragments API)了

Android 3.0 SDK 提供一個新的片段應用程序接口(Fragments API).

一個 Fragment(片段)代表一項活動(Activity)的行為或部分的用戶界面(UI). 可以在一個單一的活動結合多個片段, 從而建立一個多窗格用戶界面, 和在多項活動重用一個片段. 片段可以被看作為一個活動的一個模塊. 它有自己的生命週期, 自己的輸入事件, 並可以在活動運行時添加或刪除.

但是這個新的 API 只支援蜂窩(Honeycomb), 對於早期的 Android 版本沒有幫助.

現在,谷歌發布了相同 Fragments API 的靜態庫(以及新LoaderManager和一些其他類), 這樣兼容 Android 1.6 或更高版本的應用程序便可以使用 Fragment(片段)創建平板電腦(tablet)兼容的用戶界面.

該庫("Android Compatibility package")可以通過 更新 SDK 得到.

來源: Fragments For All

2011年3月1日星期二

香港 Nexus One 系統更新 2.3.3

香港 Nexus One 用戶今天收到OTA通知"系統更新 Android 2.3.3".

香港 Nexus One 系統更新 2.3.3

雖然 Nexus One 已經是一年多前的型號, 但 Developer Phone 始終是 Developer Phone, 可以快快系統更新:)