利用 Quiz & Poll, 教師及教育工作者可以使用Google Spreadsheets輕易創建測驗和調查的應用程序。 應用程序 Quizzes and Polls 通過 Android App 或嵌入 WebPlayer 分發給學生。 電子表格也包含學生的反應和排序,可用於評估統計學生。
Quiz & Poll是項谷歌開放源代碼項目, 有興趣可以參考: http://code.google.com/p/quiz-and-poll/
http://androidbiancheng.blogspot.com/


<ListView
 android:id="@+id/list"
 android:layout_width="fill_parent"
 android:layout_height="wrap_content"
 android:background="@drawable/icon"
 android:cacheColorHint="#00000000" />

<ListView
 android:id="@+id/list"
 android:layout_width="fill_parent"
 android:layout_height="wrap_content"
 android:background="#FF500000"
 android:cacheColorHint="#00000000" />


package com.MultiChoiceList;

import android.app.Activity;
import android.os.Bundle;
import android.util.SparseBooleanArray;
import android.view.View;
import android.widget.AdapterView;
import android.widget.AdapterView.OnItemClickListener;
import android.widget.ArrayAdapter;
import android.widget.ListView;
import android.widget.TextView;

public class MultiChoiceList extends Activity {

 ListView list;
 TextView selection;

 String[] options = {"Option 1", "Option 2", "Option 3",
   "Option 4", "Option 5", "Option 6"};

    /** Called when the activity is first created. */
    @Override
    public void onCreate(Bundle savedInstanceState) {
        super.onCreate(savedInstanceState);
        setContentView(R.layout.main);
        list = (ListView)findViewById(R.id.list);
        selection = (TextView)findViewById(R.id.selection);

        ArrayAdapter<String> adapter
        = new ArrayAdapter<String>(this,
          android.R.layout.simple_list_item_multiple_choice,
          options);
        list.setChoiceMode(ListView.CHOICE_MODE_MULTIPLE);

        list.setAdapter(adapter);

        list.setOnItemClickListener(new OnItemClickListener(){

   @Override
   public void onItemClick(AdapterView<?> arg0, View arg1, int arg2,
     long arg3) {
    // TODO Auto-generated method stub
    selection.setText(ReadSelection());
   }});
    }

    String ReadSelection(){

     String selected = "";
     int cntChoice = list.getCount();
     SparseBooleanArray sparseBooleanArray = list.getCheckedItemPositions();

     for(int i = 0; i < cntChoice; i++){
      if(sparseBooleanArray.get(i)) {
       selected += list.getItemAtPosition(i).toString() + "\n";
      }
        }

     return selected;
    }
}
<?xml version="1.0" encoding="utf-8"?>
<LinearLayout xmlns:android="http://schemas.android.com/apk/res/android"
    android:orientation="vertical"
    android:layout_width="fill_parent"
    android:layout_height="fill_parent"
    >
<TextView
    android:layout_width="fill_parent"
    android:layout_height="wrap_content"
    android:text="@string/hello"
    />
<TextView
    android:id="@+id/selection"
    android:layout_width="fill_parent"
    android:layout_height="wrap_content"
    />
<ListView
 android:id="@+id/list"
 android:layout_width="fill_parent"
 android:layout_height="wrap_content"/>
</LinearLayout>

package com.MultiChoiceList;

import android.app.Activity;
import android.os.Bundle;
import android.widget.ArrayAdapter;
import android.widget.ListView;

public class MultiChoiceList extends Activity {

 ListView list;

 String[] options = {"Option 1", "Option 2", "Option 3",
   "Option 4", "Option 5", "Option 6"};

    /** Called when the activity is first created. */
    @Override
    public void onCreate(Bundle savedInstanceState) {
        super.onCreate(savedInstanceState);
        setContentView(R.layout.main);
        list = (ListView)findViewById(R.id.list);

        ArrayAdapter<String> adapter
        = new ArrayAdapter<String>(this,
          android.R.layout.simple_list_item_multiple_choice,
          options);
        list.setChoiceMode(ListView.CHOICE_MODE_MULTIPLE);

        list.setAdapter(adapter);
    }
}
<?xml version="1.0" encoding="utf-8"?>
<LinearLayout xmlns:android="http://schemas.android.com/apk/res/android"
    android:orientation="vertical"
    android:layout_width="fill_parent"
    android:layout_height="fill_parent"
    >
<TextView
    android:layout_width="fill_parent"
    android:layout_height="wrap_content"
    android:text="@string/hello"
    />
<ListView
 android:id="@+id/list"
 android:layout_width="fill_parent"
 android:layout_height="wrap_content"/>
</LinearLayout>

package com.AndroidLoadFromSD;

import java.io.File;

import android.app.Activity;
import android.graphics.Bitmap;
import android.graphics.BitmapFactory;
import android.os.Bundle;
import android.os.Environment;
import android.view.View;
import android.widget.Button;
import android.widget.ImageView;
import android.widget.Toast;

public class AndroidLoadFromSD extends Activity {

 ImageView Image;
 Button LoadButton;
 Bitmap bmImage;

  /** Called when the activity is first created. */
  @Override
  public void onCreate(Bundle savedInstanceState) {
      super.onCreate(savedInstanceState);
      setContentView(R.layout.main);
      Image = (ImageView)findViewById(R.id.image);
      LoadButton = (Button)findViewById(R.id.load);

      LoadButton.setOnClickListener(new Button.OnClickListener(){

   @Override
   public void onClick(View v) {
    // TODO Auto-generated method stub

    String extStorage = Environment.getExternalStorageDirectory().toString();
       String file = new File(extStorage, "myFile.PNG").toString();
       Bitmap bm = BitmapFactory.decodeFile(file);
          Image.setImageBitmap(bm);

          Toast.makeText(AndroidLoadFromSD.this,
                  extStorage+"/myFile.PNG",
                  Toast.LENGTH_LONG).show();

   }});
  }
}
<?xml version="1.0" encoding="utf-8"?>
<LinearLayout xmlns:android="http://schemas.android.com/apk/res/android"
  android:orientation="vertical"
  android:layout_width="fill_parent"
  android:layout_height="fill_parent"
  >
<TextView
  android:layout_width="fill_parent"
  android:layout_height="wrap_content"
  android:text="@string/hello"
  />
<Button
  android:id="@+id/load"
  android:layout_width="fill_parent"
  android:layout_height="wrap_content"
  android:text="Load Image (myFile.PNG)"
  />
<ImageView
  android:id="@+id/image"
  android:layout_width="fill_parent"
  android:layout_height="wrap_content"
  />
</LinearLayout>

package com.AndroidSaveOnSD;

import java.io.File;
import java.io.FileNotFoundException;
import java.io.FileOutputStream;
import java.io.IOException;
import java.io.OutputStream;
import android.app.Activity;
import android.graphics.Bitmap;
import android.graphics.BitmapFactory;
import android.os.Bundle;
import android.os.Environment;
import android.view.View;
import android.widget.Button;
import android.widget.ImageView;
import android.widget.Toast;

public class AndroidSaveOnSD extends Activity {

 ImageView Image;
 Button SaveButton;
 Bitmap bmImage;

    /** Called when the activity is first created. */
    @Override
    public void onCreate(Bundle savedInstanceState) {
        super.onCreate(savedInstanceState);
        setContentView(R.layout.main);
        Image = (ImageView)findViewById(R.id.image);
     SaveButton = (Button)findViewById(R.id.save);

     bmImage = BitmapFactory.decodeResource(getResources(), R.drawable.icon);
     Image.setImageBitmap(bmImage);

     SaveButton.setOnClickListener(new Button.OnClickListener(){

   @Override
   public void onClick(View v) {
    // TODO Auto-generated method stub

    String extStorage = Environment.getExternalStorageDirectory().toString();
    File file = new File(extStorage, "myFile.PNG");

    try {
     OutputStream outStream = new FileOutputStream(file);
     bmImage.compress(Bitmap.CompressFormat.PNG, 100, outStream);
     outStream.flush();
        outStream.close();
        Toast.makeText(AndroidSaveOnSD.this,
          extStorage+"/myFile.PNG",
          Toast.LENGTH_LONG).show();
    } catch (FileNotFoundException e) {
     // TODO Auto-generated catch block
     e.printStackTrace();
     Toast.makeText(AndroidSaveOnSD.this,
          e.toString(),
          Toast.LENGTH_LONG).show();
    } catch (IOException e) {
     // TODO Auto-generated catch block
     e.printStackTrace();
     Toast.makeText(AndroidSaveOnSD.this,
          e.toString(),
          Toast.LENGTH_LONG).show();
    }

   }});
    }
}
<?xml version="1.0" encoding="utf-8"?>
<LinearLayout xmlns:android="http://schemas.android.com/apk/res/android"
    android:orientation="vertical"
    android:layout_width="fill_parent"
    android:layout_height="fill_parent"
    >
<TextView
    android:layout_width="fill_parent"
    android:layout_height="wrap_content"
    android:text="@string/hello"
    />
<ImageView
    android:id="@+id/image"
    android:layout_width="fill_parent"
    android:layout_height="wrap_content"
    />
<Button
    android:id="@+id/save"
    android:layout_width="fill_parent"
    android:layout_height="wrap_content"
    android:text="Save Image (myFile.PNG)"
    />
</LinearLayout>
public class AndroidProximitySensorActivity extends Activity {
  /** Called when the activity is first created. */

 SensorManager mySensorManager;
 Sensor myProximitySensor;

 @Override
 public void onCreate(Bundle savedInstanceState) {
  super.onCreate(savedInstanceState);
  setContentView(R.layout.main);

  mySensorManager = (SensorManager)getSystemService(Context.SENSOR_SERVICE);
  myProximitySensor = mySensorManager.getDefaultSensor(Sensor.TYPE_PROXIMITY);

  if (myProximitySensor == null){
   //No Proximity Sensor!

  }else{
   mySensorManager.registerListener(proximitySensorEventListener, myProximitySensor,SensorManager.SENSOR_DELAY_NORMAL);
  }
 }

 SensorEventListener proximitySensorEventListener = new SensorEventListener(){

  @Override
  public void onAccuracyChanged(Sensor sensor, int accuracy) {
   // TODO Auto-generated method stub

  }

  @Override
  public void onSensorChanged(SensorEvent event) {
   // TODO Auto-generated method stub

   if(event.sensor.getType()==Sensor.TYPE_PROXIMITY){
    //do something
   }
  }
 };
}

package com.AndroidProgressTitle;

import android.app.Activity;
import android.os.Bundle;
import android.view.View;
import android.view.Window;
import android.widget.Button;

public class AndroidProgressTitleActivity extends Activity {
    /** Called when the activity is first created. */
    @Override
    public void onCreate(Bundle savedInstanceState) {
        super.onCreate(savedInstanceState);
        requestWindowFeature(Window.FEATURE_INDETERMINATE_PROGRESS);
        setContentView(R.layout.main);

        Button showProgress = (Button)findViewById(R.id.showprogress);
        Button hideProgress = (Button)findViewById(R.id.hideprogress);

        showProgress.setOnClickListener(new Button.OnClickListener(){

   @Override
   public void onClick(View arg0) {
    // TODO Auto-generated method stub
    setProgressBarIndeterminateVisibility(true);
   }});

        hideProgress.setOnClickListener(new Button.OnClickListener(){

   @Override
   public void onClick(View arg0) {
    // TODO Auto-generated method stub
    setProgressBarIndeterminateVisibility(false);
   }});
    }
}
<?xml version="1.0" encoding="utf-8"?>
<LinearLayout xmlns:android="http://schemas.android.com/apk/res/android"
    android:orientation="vertical"
    android:layout_width="fill_parent"
    android:layout_height="fill_parent"
    >
<TextView
    android:layout_width="fill_parent"
    android:layout_height="wrap_content"
    android:text="@string/hello"
    />
<Button
    android:id="@+id/showprogress"
    android:layout_width="fill_parent"
    android:layout_height="wrap_content"
    android:text="顯示標題進度條"
    />
<Button
    android:id="@+id/hideprogress"
    android:layout_width="fill_parent"
    android:layout_height="wrap_content"
    android:text="隱藏標題進度條"
    />
</LinearLayout>

<?xml version="1.0" encoding="utf-8"?>
<LinearLayout xmlns:android="http://schemas.android.com/apk/res/android"
    android:orientation="vertical"
    android:layout_width="fill_parent"
    android:layout_height="fill_parent"
    >
<TextView
    android:layout_width="fill_parent"
    android:layout_height="wrap_content"
    android:text="@string/hello"
    android:shadowColor="#FFFFFF"
    android:shadowRadius="5"
    android:shadowDx="10"
    android:shadowDy="10"
    />
</LinearLayout>
<?xml version="1.0" encoding="utf-8"?>
<LinearLayout xmlns:android="http://schemas.android.com/apk/res/android"
    android:orientation="vertical"
    android:layout_width="fill_parent"
    android:layout_height="fill_parent"
    >
<TextView
    android:layout_width="fill_parent"
    android:layout_height="wrap_content"
    android:text="@string/hello"
    />
<Button
    android:layout_width="fill_parent"
    android:layout_height="wrap_content"
    android:text="Click Me"
    android:onClick="onClick"
    />
</LinearLayout>
package com.AndroidOnClick;

import android.app.Activity;
import android.os.Bundle;
import android.view.View;
import android.widget.Toast;

public class AndroidOnClickActivity extends Activity {
    /** Called when the activity is first created. */
    @Override
    public void onCreate(Bundle savedInstanceState) {
        super.onCreate(savedInstanceState);
        setContentView(R.layout.main);
    }

    public void onClick(View view){
     Toast.makeText(AndroidOnClickActivity.this,
       "Button Clicked", Toast.LENGTH_LONG).show();
    }
}

package com.AndroidContacts;


import android.app.ListActivity;

import android.database.Cursor;

import android.os.Bundle;

import android.provider.Contacts.People;

import android.widget.SimpleCursorAdapter;


public class AndroidContactsActivity extends ListActivity {

    /** Called when the activity is first created. */

    @Override

    public void onCreate(Bundle savedInstanceState) {

        super.onCreate(savedInstanceState);


        String[] projection = {People._ID, People.NAME};

        Cursor cursor = managedQuery(

        		People.CONTENT_URI,		//Uri

        		projection, 			//projection

        		null, 					//selection

        		null, 					//selection arguments

        		People.NAME);			//Sort by


        String[] name = new String[] {People.NAME};

        int[] text1 = new int[] {android.R.id.text1};

        SimpleCursorAdapter adapter = new SimpleCursorAdapter(this,

        		android.R.layout.simple_list_item_1,

        		cursor,

        		name,

        		text1);


        setListAdapter(adapter);

    }

}

package com.AndroidUSB;


import android.app.Activity;

import android.content.BroadcastReceiver;

import android.content.Context;

import android.content.Intent;

import android.content.IntentFilter;

import android.os.Bundle;

import android.widget.TextView;


public class AndroidUSBActivity extends Activity {


	TextView umsState;


    /** Called when the activity is first created. */

    @Override

    public void onCreate(Bundle savedInstanceState) {

        super.onCreate(savedInstanceState);

        setContentView(R.layout.main);

        umsState = (TextView)findViewById(R.id.ums_state);


        registerReceiver(receiverUmsConnected, new IntentFilter(Intent.ACTION_UMS_CONNECTED));

		registerReceiver(receiverUmsDisConnected, new IntentFilter(Intent.ACTION_UMS_DISCONNECTED));


    }


	BroadcastReceiver receiverUmsConnected

    = new BroadcastReceiver(){


		@Override

		public void onReceive(Context arg0, Intent arg1) {

			// TODO Auto-generated method stub

			umsState.setText("USB Mass Storage Connected");

		}};


	BroadcastReceiver receiverUmsDisConnected

	= new BroadcastReceiver(){


		@Override

		public void onReceive(Context arg0, Intent arg1) {

			// TODO Auto-generated method stub

			umsState.setText("USB Mass Storage Disconnected");


		}};

}

package com.AndroidShareText;

import android.app.Activity;
import android.content.Intent;
import android.os.Bundle;
import android.view.View;
import android.widget.Button;
import android.widget.EditText;

public class AndroidShareTextActivity extends Activity {

 EditText TextInput;
 Button buttonShare;

   /** Called when the activity is first created. */
   @Override
   public void onCreate(Bundle savedInstanceState) {
       super.onCreate(savedInstanceState);
       setContentView(R.layout.main);

       TextInput = (EditText)findViewById(R.id.input);
    buttonShare = (Button)findViewById(R.id.share);

    buttonShare.setOnClickListener(new Button.OnClickListener(){

   @Override
   public void onClick(View arg0) {
    // TODO Auto-generated method stub

    String textToBeSent = TextInput.getText().toString();

    Intent intent = new Intent(Intent.ACTION_SEND);
    intent.setType("text/plain");
    intent.putExtra(Intent.EXTRA_TEXT, textToBeSent);
    startActivity(Intent.createChooser(intent, "Share..."));
   }});

   }
}
<?xml version="1.0" encoding="utf-8"?>
<LinearLayout xmlns:android="http://schemas.android.com/apk/res/android"
   android:orientation="vertical"
   android:layout_width="fill_parent"
   android:layout_height="fill_parent"
   >
<TextView
   android:layout_width="fill_parent"
   android:layout_height="wrap_content"
   android:text="@string/hello"
   />
<EditText
 android:id="@+id/input"
   android:layout_width="fill_parent"
   android:layout_height="wrap_content"
   />
<Button
 android:id="@+id/share"
   android:layout_width="fill_parent"
   android:layout_height="wrap_content"
   android:text="Share"
   />
</LinearLayout>

package com.AndroidEditText;

import android.app.Activity;
import android.graphics.drawable.Drawable;
import android.os.Bundle;
import android.view.View;
import android.widget.Button;
import android.widget.EditText;

public class AndroidEditTextActivity extends Activity {
    /** Called when the activity is first created. */
    @Override
    public void onCreate(Bundle savedInstanceState) {
        super.onCreate(savedInstanceState);
        setContentView(R.layout.main);

        final EditText input = (EditText)findViewById(R.id.input);
        Button buttonClear = (Button)findViewById(R.id.clear);
        buttonClear.setOnClickListener(new Button.OnClickListener(){

   @Override
   public void onClick(View v) {
    // TODO Auto-generated method stub
    input.setText("");
   }});

        Drawable icon = getResources().getDrawable(R.drawable.icon);

        input.setCompoundDrawablesWithIntrinsicBounds(
          icon,  //left
          icon,  //top
          icon,  //right
          icon); //bottom

    }
}

<EditText
 android:id="@+id/input"
    android:layout_width="fill_parent"
    android:layout_height="wrap_content"
    android:hint="請輸入"
    android:layout_alignParentLeft="true"
    android:layout_toLeftOf="@id/clear"
    android:drawableRight="@drawable/icon"/>

package com.AndroidEditText;

import android.app.Activity;
import android.os.Bundle;
import android.view.View;
import android.widget.Button;
import android.widget.EditText;

public class AndroidEditTextActivity extends Activity {
    /** Called when the activity is first created. */
    @Override
    public void onCreate(Bundle savedInstanceState) {
        super.onCreate(savedInstanceState);
        setContentView(R.layout.main);

        final EditText input = (EditText)findViewById(R.id.input);
        Button buttonClear = (Button)findViewById(R.id.clear);
        buttonClear.setOnClickListener(new Button.OnClickListener(){

   @Override
   public void onClick(View v) {
    // TODO Auto-generated method stub
    input.setText("");
   }});

    }
}
<?xml version="1.0" encoding="utf-8"?>
<LinearLayout xmlns:android="http://schemas.android.com/apk/res/android"
    android:orientation="vertical"
    android:layout_width="fill_parent"
    android:layout_height="fill_parent"
    >
<TextView
    android:layout_width="fill_parent"
    android:layout_height="wrap_content"
    android:text="@string/hello"
    />
<RelativeLayout
    android:layout_width="fill_parent"
    android:layout_height="wrap_content">
<Button
 android:id="@+id/clear"
    android:layout_width="wrap_content"
    android:layout_height="wrap_content"
    android:hint="CLEAR"
    android:layout_alignParentRight="true"/>
<EditText
 android:id="@+id/input"
    android:layout_width="fill_parent"
    android:layout_height="wrap_content"
    android:hint="請輸入"
    android:layout_alignParentLeft="true"
    android:layout_toLeftOf="@id/clear"/>

</RelativeLayout>
</LinearLayout>

package com.AndroidWeight;

import android.app.Activity;
import android.os.Bundle;
import android.view.ViewGroup.LayoutParams;
import android.widget.Button;
import android.widget.LinearLayout;

public class AndroidWeightActivity extends Activity {
   /** Called when the activity is first created. */
   @Override
   public void onCreate(Bundle savedInstanceState) {
       super.onCreate(savedInstanceState);

  LinearLayout layout = new LinearLayout(getApplicationContext());
  layout.setOrientation(LinearLayout.HORIZONTAL);

  // Half Button 1
  LinearLayout subLayout1 = new LinearLayout(getApplicationContext());
  LinearLayout.LayoutParams paramsSubLayout1
   = new LinearLayout.LayoutParams(LayoutParams.FILL_PARENT, LayoutParams.WRAP_CONTENT, 1.0f);
  subLayout1.setLayoutParams(paramsSubLayout1);
  subLayout1.setOrientation(LinearLayout.VERTICAL);

  Button buttonHalfWidth1 = new Button(getApplicationContext());
  buttonHalfWidth1.setText("Half Width 1");
  LayoutParams paramsHalfWidth1
   = new LayoutParams(LayoutParams.FILL_PARENT, LayoutParams.WRAP_CONTENT);
  buttonHalfWidth1.setLayoutParams(paramsHalfWidth1);

  // Half Button 2
  Button buttonHalfWidth2 = new Button(getApplicationContext());
  buttonHalfWidth2.setText("Half Width 2");
  LinearLayout.LayoutParams paramsHalfWidth2
   = new LinearLayout.LayoutParams(LayoutParams.FILL_PARENT, LayoutParams.WRAP_CONTENT);
  paramsHalfWidth2.weight = 1.0f;
  buttonHalfWidth2.setLayoutParams(paramsHalfWidth2);

  //--------
  subLayout1.addView(buttonHalfWidth1);
  layout.addView(subLayout1);
  layout.addView(buttonHalfWidth2);

  setContentView(layout);
   }
}
package com.AndroidTitleIcon;

import android.app.Activity;
import android.os.Bundle;
import android.view.Window;

public class AndroidTitleIconActivity extends Activity {
    /** Called when the activity is first created. */
    @Override
    public void onCreate(Bundle savedInstanceState) {
        super.onCreate(savedInstanceState);
        requestWindowFeature(Window.FEATURE_LEFT_ICON);
        requestWindowFeature(Window.FEATURE_RIGHT_ICON);
        setContentView(R.layout.main);
        getWindow().setFeatureDrawableResource(Window.FEATURE_LEFT_ICON,R.drawable.icon);
        getWindow().setFeatureDrawableResource(Window.FEATURE_RIGHT_ICON,R.drawable.icon);
    }
}

package com.AndroidProgressTitleBar;

import android.app.Activity;
import android.os.Bundle;
import android.view.View;
import android.view.Window;
import android.widget.Button;

public class AndroidProgressTitleBarActivity extends Activity {
    /** Called when the activity is first created. */
    @Override
    public void onCreate(Bundle savedInstanceState) {
        super.onCreate(savedInstanceState);
        requestWindowFeature(Window.FEATURE_INDETERMINATE_PROGRESS);
        setContentView(R.layout.main);

        Button btnTurnOnProgress = (Button)findViewById(R.id.progresson);
        Button btnTurnOffProgress = (Button)findViewById(R.id.progressoff);

        btnTurnOnProgress.setOnClickListener(new Button.OnClickListener(){

   @Override
   public void onClick(View v) {
    // TODO Auto-generated method stub
    setProgressBarIndeterminateVisibility(true);
   }});

        btnTurnOffProgress.setOnClickListener(new Button.OnClickListener(){

   @Override
   public void onClick(View v) {
    // TODO Auto-generated method stub
    setProgressBarIndeterminateVisibility(false);
   }});
    }
}

package com.AndroidText;

import android.app.Activity;
import android.os.Bundle;
import android.view.View;
import android.widget.Button;
import android.widget.TextView;

public class AndroidTextActivity extends Activity {

 TextView text;
 Button buttonChangeTextColor;

    /** Called when the activity is first created. */
    @Override
    public void onCreate(Bundle savedInstanceState) {
        super.onCreate(savedInstanceState);
        setContentView(R.layout.main);
        text = (TextView)findViewById(R.id.text);
        buttonChangeTextColor = (Button)findViewById(R.id.changetextcolor);

        buttonChangeTextColor.setOnClickListener(new Button.OnClickListener(){

   public void onClick(View arg0) {
    // TODO Auto-generated method stub

    /*
     * setTextColor(
     *  ((alpha << 24) & 0xFF000000)
     *  + ((red << 16) & 0x00FF0000)
     *  + ((green << 8) & 0x0000FF00)
     *  + (blue & 0x000000FF));
     */


    //setTypeface for TextView
    text.setTextColor(0xFF008080);
    //setTypeface for Button
    buttonChangeTextColor.setTextColor(0xFFFF0000);
   }});
    }
}
<?xml version="1.0" encoding="utf-8"?>
<LinearLayout xmlns:android="http://schemas.android.com/apk/res/android"
    android:orientation="vertical"
    android:layout_width="fill_parent"
    android:layout_height="fill_parent"
    >
<TextView
    android:id="@+id/text"
    android:layout_width="fill_parent"
    android:layout_height="wrap_content"
    android:text="@string/hello"
    />
<Button
    android:id="@+id/changetextcolor"
    android:layout_width="fill_parent"
    android:layout_height="wrap_content"
    android:text="Change Text Color"
    />
</LinearLayout>

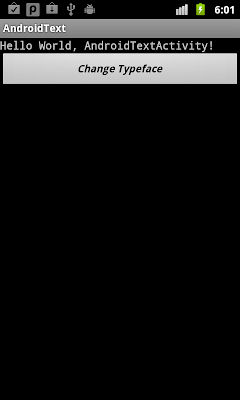
package com.AndroidText;

import android.app.Activity;
import android.graphics.Typeface;
import android.os.Bundle;
import android.view.View;
import android.widget.Button;
import android.widget.TextView;

public class AndroidTextActivity extends Activity {

 TextView text;
 Button buttonChangeTypeFace;

    /** Called when the activity is first created. */
    @Override
    public void onCreate(Bundle savedInstanceState) {
        super.onCreate(savedInstanceState);
        setContentView(R.layout.main);
        text = (TextView)findViewById(R.id.text);
        buttonChangeTypeFace = (Button)findViewById(R.id.changetypeface);

        buttonChangeTypeFace.setOnClickListener(new Button.OnClickListener(){

   public void onClick(View arg0) {
    // TODO Auto-generated method stub

    /*
     * setTypeface(typeface, style)
     * typeface:
     * - Typeface.DEFAULT
     * - Typeface.DEFAULT_BOLD
     * - Typeface.MONOSPACE
     * - Typeface.SANS_SERIF
     * - Typeface.SERIF
     *
     * style:
     * - Typeface.BOLD
     * - Typeface.BOLD_ITALIC
     * - Typeface.ITALIC
     * - Typeface.NORMAL
     */


    //setTypeface for TextView
    text.setTypeface(Typeface.MONOSPACE, Typeface.BOLD);
    //setTypeface for Button
    buttonChangeTypeFace.setTypeface(Typeface.SANS_SERIF, Typeface.BOLD_ITALIC);
   }});
    }
}
<?xml version="1.0" encoding="utf-8"?>
<LinearLayout xmlns:android="http://schemas.android.com/apk/res/android"
    android:orientation="vertical"
    android:layout_width="fill_parent"
    android:layout_height="fill_parent"
    >
<TextView
    android:id="@+id/text"
    android:layout_width="fill_parent"
    android:layout_height="wrap_content"
    android:text="@string/hello"
    />
<Button
    android:id="@+id/changetypeface"
    android:layout_width="fill_parent"
    android:layout_height="wrap_content"
    android:text="Change Typeface"
    />
</LinearLayout>

package com.AndroidText;

import android.app.Activity;
import android.os.Bundle;
import android.view.View;
import android.widget.Button;
import android.widget.TextView;

public class AndroidTextActivity extends Activity {

 TextView text;
 Button buttonChangeTextSize;

    /** Called when the activity is first created. */
    @Override
    public void onCreate(Bundle savedInstanceState) {
        super.onCreate(savedInstanceState);
        setContentView(R.layout.main);
        text = (TextView)findViewById(R.id.text);
     buttonChangeTextSize = (Button)findViewById(R.id.changetextsize);

     buttonChangeTextSize.setOnClickListener(new Button.OnClickListener(){

   public void onClick(View arg0) {
    // TODO Auto-generated method stub
    //Change Text Size of TextView
    text.setTextSize(50);
    //Change Text Size of Button
    buttonChangeTextSize.setTextSize(35);
   }});
    }
}
<?xml version="1.0" encoding="utf-8"?>
<LinearLayout xmlns:android="http://schemas.android.com/apk/res/android"
    android:orientation="vertical"
    android:layout_width="fill_parent"
    android:layout_height="fill_parent"
    >
<TextView
    android:id="@+id/text"
    android:layout_width="fill_parent"
    android:layout_height="wrap_content"
    android:text="@string/hello"
    />
<Button
    android:id="@+id/changetextsize"
    android:layout_width="fill_parent"
    android:layout_height="wrap_content"
    android:text="Change Text Size"
    />
</LinearLayout>


package com.AndroidButtonSize;

import android.app.Activity;
import android.os.Bundle;
import android.view.View;
import android.view.ViewGroup.LayoutParams;
import android.widget.Button;

public class AndroidButtonSizeActivity extends Activity {
    /** Called when the activity is first created. */
    @Override
    public void onCreate(Bundle savedInstanceState) {
        super.onCreate(savedInstanceState);
        setContentView(R.layout.main);

        final Button button = (Button)findViewById(R.id.button);
        button.setOnClickListener(new Button.OnClickListener(){

   public void onClick(View v) {
    // TODO Auto-generated method stub
    LayoutParams params = button.getLayoutParams();
       params.width = 300;
       params.height = 200;
       button.setLayoutParams(params);
   }});
    }
}

package com.AndroidImageCapture;

import java.io.File;

import android.app.Activity;
import android.content.Intent;
import android.graphics.Bitmap;
import android.graphics.BitmapFactory;
import android.net.Uri;
import android.os.Bundle;
import android.os.Environment;
import android.view.View;
import android.widget.Button;
import android.widget.ImageView;

public class AndroidImageCaptureActivity extends Activity {

 ImageView imageiewImageCaptured;
 String strImage;

    /** Called when the activity is first created. */
    @Override
    public void onCreate(Bundle savedInstanceState) {
        super.onCreate(savedInstanceState);
        setContentView(R.layout.main);
        Button buttonImageCapture = (Button)findViewById(R.id.captureimage);
        imageiewImageCaptured = (ImageView)findViewById(R.id.imagecaptured);

        buttonImageCapture.setOnClickListener(buttonImageCaptureOnClickListener);
    }

    Button.OnClickListener buttonImageCaptureOnClickListener
    = new Button.OnClickListener(){

  public void onClick(View v) {
   // TODO Auto-generated method stub
   //Specify the path of the captured image
    strImage = Environment.getExternalStorageDirectory().getAbsolutePath()+"/mypicture.jpg";
    File myImage = new File(strImage);
    Uri uriMyImage = Uri.fromFile(myImage);

    Intent intent = new Intent(android.provider.MediaStore.ACTION_IMAGE_CAPTURE);
    intent.putExtra(android.provider.MediaStore.EXTRA_OUTPUT, uriMyImage);
    startActivityForResult(intent, 0);
  }
   };

 @Override
 protected void onActivityResult(int requestCode, int resultCode, Intent data) {
  // TODO Auto-generated method stub
  super.onActivityResult(requestCode, resultCode, data);
  if (resultCode == RESULT_OK)
  {
   Bitmap bmp = BitmapFactory.decodeFile(strImage);
   imageiewImageCaptured.setImageBitmap(bmp);
  }
 }
}
<?xml version="1.0" encoding="utf-8"?>
<LinearLayout xmlns:android="http://schemas.android.com/apk/res/android"
    android:orientation="vertical"
    android:layout_width="fill_parent"
    android:layout_height="fill_parent"
    >
<TextView
    android:layout_width="fill_parent"
    android:layout_height="wrap_content"
    android:text="@string/hello"
    />
<Button
   android:id="@+id/captureimage"
   android:layout_width="fill_parent"
   android:layout_height="wrap_content"
   android:text="Call for ACTION_IMAGE_CAPTURE"
   />
<ImageView
   android:id="@+id/imagecaptured"
   android:layout_width="wrap_content"
   android:layout_height="wrap_content"
   />
</LinearLayout>

package com.AndroidFixOrientation;

import android.app.Activity;
import android.content.pm.ActivityInfo;
import android.content.res.Configuration;
import android.os.Bundle;
import android.widget.CheckBox;
import android.widget.CompoundButton;
import android.widget.CompoundButton.OnCheckedChangeListener;

public class AndroidFixOrientationActivity extends Activity {
    /** Called when the activity is first created. */
    @Override
    public void onCreate(Bundle savedInstanceState) {
        super.onCreate(savedInstanceState);
        setContentView(R.layout.main);

        CheckBox fixOrientation = (CheckBox)findViewById(R.id.FixOrientation);

        fixOrientation.setOnCheckedChangeListener(new OnCheckedChangeListener(){

         int currentOrientation = getResources().getConfiguration().orientation;

   public void onCheckedChanged(CompoundButton arg0, boolean arg1) {
    // TODO Auto-generated method stub
    if(arg1){
     switch(currentOrientation) {
      case Configuration.ORIENTATION_LANDSCAPE:
       setRequestedOrientation(ActivityInfo.SCREEN_ORIENTATION_LANDSCAPE);
       break;
      case Configuration.ORIENTATION_PORTRAIT:
       setRequestedOrientation(ActivityInfo.SCREEN_ORIENTATION_PORTRAIT);
       break;
      default:
       setRequestedOrientation(ActivityInfo.SCREEN_ORIENTATION_UNSPECIFIED);
     }
    }else{
     setRequestedOrientation(ActivityInfo.SCREEN_ORIENTATION_UNSPECIFIED);
    }
   }});


    }
}

package com.StringResource;

import android.app.Activity;
import android.os.Bundle;
import android.widget.TextView;

public class StringResourceActivity extends Activity {
    /** Called when the activity is first created. */
    @Override
    public void onCreate(Bundle savedInstanceState) {
        super.onCreate(savedInstanceState);
        setContentView(R.layout.main);

        TextView text1 = (TextView)findViewById(R.id.text1);
        TextView text2 = (TextView)findViewById(R.id.text2);

        text1.setText(R.string.app_name);

        String myAppName;
        //myAppName = R.string.app_name; //Error!
        myAppName = getString(R.string.app_name);
        text2.setText(myAppName);
    }
}

package com.AndroidMenu;

import android.app.Activity;

import android.os.Bundle;
import android.view.Menu;
import android.view.MenuItem;
import android.view.SubMenu;
import android.widget.Toast;

public class AndroidMenuActivity extends Activity {

 final static int OPTION_ID_1 = 1;
 final static int OPTION_ID_2 = 2;
 final static int OPTION_ID_3 = 3;
 final static int OPTION_ID_4 = 4;
 final static int OPTION_ID_5 = 5;

 final static int OPTION_ID_6 = 6;
 final static int OPTION_ID_6_1 = 61;
 final static int OPTION_ID_6_2 = 62;
 final static int OPTION_ID_6_3 = 63;

    /** Called when the activity is first created. */
    @Override
    public void onCreate(Bundle savedInstanceState) {
        super.onCreate(savedInstanceState);
        setContentView(R.layout.main);
    }

 @Override
 public boolean onCreateOptionsMenu(Menu menu) {
  // TODO Auto-generated method stub
  super.onCreateOptionsMenu(menu);

  //menu.add(Group, item id, order, title);
  menu.add(0, OPTION_ID_1, 0, "Option 1");
  menu.add(0, OPTION_ID_2, 1, "Option 2");
  menu.add(0, OPTION_ID_3, 2, "Option 3");
  menu.add(0, OPTION_ID_4, 3, "Option 4");
  menu.add(0, OPTION_ID_5, 4, "Option 5");

  SubMenu subMenu6 = menu.addSubMenu(0, OPTION_ID_5, 5, "SubMenu");
  subMenu6.add(0, OPTION_ID_6_1, 0, "SubMenu6.1");
  subMenu6.add(0, OPTION_ID_6_2, 0, "SubMenu6.2");
  subMenu6.add(0, OPTION_ID_6_3, 0, "SubMenu6.3");

  return true;
 }

 @Override
 public boolean onOptionsItemSelected(MenuItem item) {
  // TODO Auto-generated method stub

  switch(item.getItemId()){
  case OPTION_ID_1:
   Toast.makeText(AndroidMenuActivity.this,
     item.getTitle(),
     Toast.LENGTH_LONG).show();
   break;
  case OPTION_ID_2:
   Toast.makeText(AndroidMenuActivity.this,
     item.getTitle(),
     Toast.LENGTH_LONG).show();
   break;
  case OPTION_ID_3:
   Toast.makeText(AndroidMenuActivity.this,
     item.getTitle(),
     Toast.LENGTH_LONG).show();
   break;
  case OPTION_ID_4:
   Toast.makeText(AndroidMenuActivity.this,
     item.getTitle(),
     Toast.LENGTH_LONG).show();
   break;
  case OPTION_ID_5:
   Toast.makeText(AndroidMenuActivity.this,
     item.getTitle(),
     Toast.LENGTH_LONG).show();
   break;
  default:
   Toast.makeText(AndroidMenuActivity.this,
     item.getTitle(),
     Toast.LENGTH_LONG).show();
   break;

  }

  return true;
 }


}

package com.AndroidMenu;

import android.app.Activity;

import android.os.Bundle;
import android.view.Menu;
import android.view.MenuItem;
import android.widget.Toast;

public class AndroidMenuActivity extends Activity {

 final static int OPTION_ID_1 = 1;
 final static int OPTION_ID_2 = 2;
 final static int OPTION_ID_3 = 3;
 final static int OPTION_ID_4 = 4;
 final static int OPTION_ID_5 = 5;

    /** Called when the activity is first created. */
    @Override
    public void onCreate(Bundle savedInstanceState) {
        super.onCreate(savedInstanceState);
        setContentView(R.layout.main);
    }

 @Override
 public boolean onCreateOptionsMenu(Menu menu) {
  // TODO Auto-generated method stub
  super.onCreateOptionsMenu(menu);

  //menu.add(Group, item id, order, title);
  menu.add(0, OPTION_ID_1, 0, "Option 1");
  menu.add(0, OPTION_ID_2, 1, "Option 2");
  menu.add(0, OPTION_ID_3, 2, "Option 3");
  menu.add(0, OPTION_ID_4, 3, "Option 4");
  menu.add(0, OPTION_ID_5, 4, "Option 5");

  return true;
 }

 @Override
 public boolean onOptionsItemSelected(MenuItem item) {
  // TODO Auto-generated method stub

  switch(item.getItemId()){
  case OPTION_ID_1:
   Toast.makeText(AndroidMenuActivity.this,
     item.getTitle(),
     Toast.LENGTH_LONG).show();
   break;
  case OPTION_ID_2:
   Toast.makeText(AndroidMenuActivity.this,
     item.getTitle(),
     Toast.LENGTH_LONG).show();
   break;
  case OPTION_ID_3:
   Toast.makeText(AndroidMenuActivity.this,
     item.getTitle(),
     Toast.LENGTH_LONG).show();
   break;
  case OPTION_ID_4:
   Toast.makeText(AndroidMenuActivity.this,
     item.getTitle(),
     Toast.LENGTH_LONG).show();
   break;
  case OPTION_ID_5:
   Toast.makeText(AndroidMenuActivity.this,
     item.getTitle(),
     Toast.LENGTH_LONG).show();
   break;

  }

  return true;
 }
}
<?xml version="1.0" encoding="utf-8"?>
<manifest xmlns:android="http://schemas.android.com/apk/res/android"
    package="com.AndroidTranslucent"
    android:versionCode="1"
    android:versionName="1.0">
  <uses-sdk android:minSdkVersion="4" />

  <application android:icon="@drawable/icon" android:label="@string/app_name">
      <activity android:name=".AndroidTranslucent"
                android:label="@string/app_name"
                android:theme="@android:style/Theme.Translucent">
          <intent-filter>
              <action android:name="android.intent.action.MAIN" />
              <category android:name="android.intent.category.LAUNCHER" />
          </intent-filter>
      </activity>

  </application>
</manifest>


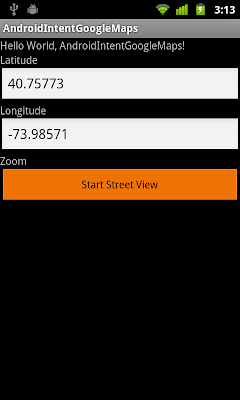
package com.AndroidIntentGoogleMaps;

import android.app.Activity;
import android.content.Intent;
import android.net.Uri;
import android.os.Bundle;
import android.view.View;
import android.widget.Button;
import android.widget.EditText;
import android.widget.Toast;

public class AndroidIntentGoogleMaps extends Activity {

 EditText inputLatitude, inputLongitude;
 Button buttonStartMaps;

 final static float DEFAULT_Latitude = (float) 40.75773;
 final static float DEFAULT_Longitude = (float) -73.985708;

    /** Called when the activity is first created. */
    @Override
    public void onCreate(Bundle savedInstanceState) {
        super.onCreate(savedInstanceState);
        setContentView(R.layout.main);

        inputLatitude = (EditText)findViewById(R.id.Latitude);
        inputLongitude = (EditText)findViewById(R.id.Longitude);
     buttonStartMaps = (Button)findViewById(R.id.startmaps);

     inputLatitude.setText(String.valueOf(DEFAULT_Latitude));
     inputLongitude.setText(String.valueOf(DEFAULT_Longitude));

     buttonStartMaps.setOnClickListener(new Button.OnClickListener(){

   @Override
   public void onClick(View arg0) {
    // TODO Auto-generated method stub
    String lat = inputLatitude.getText().toString();
    String lon = inputLongitude.getText().toString();

    String strUri = "google.streetview:cbll="+lat+","+lon;

    Toast.makeText(AndroidIntentGoogleMaps.this, strUri, Toast.LENGTH_LONG).show();

    Intent intent = new Intent(android.content.Intent.ACTION_VIEW, Uri.parse(strUri));
    startActivity(intent);
   }});

    }
}
<?xml version="1.0" encoding="utf-8"?>
<LinearLayout xmlns:android="http://schemas.android.com/apk/res/android"
    android:orientation="vertical"
    android:layout_width="fill_parent"
    android:layout_height="fill_parent"
    >
<TextView
    android:layout_width="fill_parent"
    android:layout_height="wrap_content"
    android:text="@string/hello"
    />
<TextView
    android:layout_width="fill_parent"
    android:layout_height="wrap_content"
    android:text="Latitude" />
<EditText
    android:id="@+id/Latitude"
    android:layout_width="fill_parent"
    android:layout_height="wrap_content" />
<TextView
    android:layout_width="fill_parent"
    android:layout_height="wrap_content"
    android:text="Longitude" />
<EditText
    android:id="@+id/Longitude"
    android:layout_width="fill_parent"
    android:layout_height="wrap_content" />
<TextView
    android:layout_width="fill_parent"
    android:layout_height="wrap_content"
    android:text="Zoom" />
<Button
    android:id="@+id/startmaps"
    android:layout_width="fill_parent"
    android:layout_height="wrap_content"
    android:text="Start Street View" />
</LinearLayout>


package com.AndroidIntentGoogleMaps;

import android.app.Activity;
import android.content.Intent;
import android.net.Uri;
import android.os.Bundle;
import android.view.View;
import android.widget.Button;
import android.widget.EditText;
import android.widget.SeekBar;
import android.widget.Toast;

public class AndroidIntentGoogleMaps extends Activity {

 EditText inputLatitude, inputLongitude;
 SeekBar seekbarZoom;
 Button buttonStartMaps;

 final static float DEFAULT_Latitude = (float) 40.75773;
 final static float DEFAULT_Longitude = (float) -73.985708;

    /** Called when the activity is first created. */
    @Override
    public void onCreate(Bundle savedInstanceState) {
        super.onCreate(savedInstanceState);
        setContentView(R.layout.main);

        inputLatitude = (EditText)findViewById(R.id.Latitude);
        inputLongitude = (EditText)findViewById(R.id.Longitude);
     seekbarZoom = (SeekBar)findViewById(R.id.zoom);
     buttonStartMaps = (Button)findViewById(R.id.startmaps);

     inputLatitude.setText(String.valueOf(DEFAULT_Latitude));
     inputLongitude.setText(String.valueOf(DEFAULT_Longitude));

     buttonStartMaps.setOnClickListener(new Button.OnClickListener(){

   @Override
   public void onClick(View arg0) {
    // TODO Auto-generated method stub
    String lat = inputLatitude.getText().toString();
    String lon = inputLongitude.getText().toString();
    String zoom = String.valueOf(seekbarZoom.getProgress()+1);
    String strUri = "geo:"+lat+","+lon+"?z="+zoom;

    Toast.makeText(AndroidIntentGoogleMaps.this, strUri, Toast.LENGTH_LONG).show();

    Intent intent = new Intent(android.content.Intent.ACTION_VIEW, Uri.parse(strUri));
    startActivity(intent);
   }});

    }
}
<?xml version="1.0" encoding="utf-8"?>
<LinearLayout xmlns:android="http://schemas.android.com/apk/res/android"
    android:orientation="vertical"
    android:layout_width="fill_parent"
    android:layout_height="fill_parent"
    >
<TextView
    android:layout_width="fill_parent"
    android:layout_height="wrap_content"
    android:text="@string/hello"
    />
<TextView
    android:layout_width="fill_parent"
    android:layout_height="wrap_content"
    android:text="Latitude" />
<EditText
    android:id="@+id/Latitude"
    android:layout_width="fill_parent"
    android:layout_height="wrap_content" />
<TextView
    android:layout_width="fill_parent"
    android:layout_height="wrap_content"
    android:text="Longitude" />
<EditText
    android:id="@+id/Longitude"
    android:layout_width="fill_parent"
    android:layout_height="wrap_content" />
<TextView
    android:layout_width="fill_parent"
    android:layout_height="wrap_content"
    android:text="Zoom" />
<SeekBar
    android:id="@+id/zoom"
    android:layout_width="fill_parent"
    android:layout_height="wrap_content"
    android:max="22"
    android:padding="10dp" />
<Button
    android:id="@+id/startmaps"
    android:layout_width="fill_parent"
    android:layout_height="wrap_content"
    android:text="Start Google Maps" />
</LinearLayout>