2011年2月28日星期一

在畫布(Canvas)上繪畫圖形

這是一個自定義視圖(custom view)的簡單例子, 說明如何在畫布(Canvas)上繪畫圖形.

在畫布(Canvas)上繪畫圖形

創建一個自定義的視圖類, MyCanvas.java
package com.AndroidCanvasDraw;

import android.content.Context;
import android.graphics.Canvas;
import android.graphics.Color;
import android.graphics.Paint;
import android.util.AttributeSet;
import android.view.View;

public class MyCanvas extends View {

private Paint paint = new Paint(Paint.ANTI_ALIAS_FLAG);
int canvasVerticalCenter;

public MyCanvas(Context context) {
super(context);
// TODO Auto-generated constructor stub
init();
}

public MyCanvas(Context context, AttributeSet attrs) {
super(context, attrs);
// TODO Auto-generated constructor stub
init();
}

public MyCanvas(Context context, AttributeSet attrs, int defStyle) {
super(context, attrs, defStyle);
// TODO Auto-generated constructor stub
init();
}

private void init(){
paint.setStyle(Paint.Style.FILL);
paint.setStrokeWidth(1);
paint.setColor(Color.WHITE);
}

@Override
protected void onDraw(Canvas canvas) {
// TODO Auto-generated method stub
prepareProject();
for(int i = 0; i < getWidth(); i++){
int value = (int)(Math.sin(Math.toRadians(i))*100);
project(i, value, canvas);
}
}

void prepareProject(){
canvasVerticalCenter = getHeight()/2;
}

void project(int x, int y, Canvas c){
c.drawLine(x, canvasVerticalCenter, x, canvasVerticalCenter-y, paint);
//c.drawPoint(x, canvasVerticalCenter-y, paint);
}

@Override
protected void onMeasure(int widthMeasureSpec, int heightMeasureSpec) {
// TODO Auto-generated method stub
setMeasuredDimension(MeasureSpec.getSize(widthMeasureSpec),
MeasureSpec.getSize(heightMeasureSpec));
}

}


在主代碼調用使用 MyCanvas 類.
package com.AndroidCanvasDraw;

import android.app.Activity;
import android.os.Bundle;

public class AndroidCanvasDraw extends Activity {
/** Called when the activity is first created. */
@Override
public void onCreate(Bundle savedInstanceState) {
super.onCreate(savedInstanceState);
MyCanvas myCanvas = new MyCanvas(this);
setContentView(myCanvas);
}
}


相關文章:
- 自由落體方程式

2011年2月24日星期四

向財爺大聲Say NO!


無論你對這個特區政府賤視、愚弄煙民的政策如何徹底失望也好,「表態」、「說不」是我們的權利,也是我們應有的態度,亦應珍惜我們有這種權利,向著麻木不仁的官員敢於說不,堅決反對那種凡事只要加價就可以解決問題的官僚態度。

起來吧!不願再受苦的煙民!按這裡向財爺大聲Say NO!


完整版Android 3.0 SDK

Google 現已推出 Android 3.0 SDK。它為平板電腦和類似設備提供了一個重新設計的用戶界面和所有新的開發 API。欲了解更多 Android3.0 的信息,閱讀版本說明

如果你已安裝一個現有的 SDK,通過更新SDK組件添加 Android 3.0。或者重新安裝 SDK starter package

詳情:
- Final Android 3.0 Platform and Updated SDK Tools

2011年2月23日星期三

活動(Activity),服務(Service)和廣播接收器(BroadcastReceiver)之間的通信

這是一個幫助理解活動(Activity),服務(Service)和廣播接收器(BroadcastReceiver)很好的練習. 如果能消化這段代碼, 絕對可以增加對活動,服務和廣播接收器的了解.

活動(Activity),服務(Service)和廣播接收器(BroadcastReceiver)之間的通信

本應用程序包括一個活動(testActivity)和一個服務(testService), 他們各自有自己的廣播接收器(MyReceiver 和 TestServiceReceiver).

當按下Start按鈕, testActivity會通過意圖(Intent)啟動testService.
在testService的onStartCommand()創建並啟動一個線程(thread), 在線程裡面重複發送廣播(sendBroadcast()), 把當前系統時間送給testActivity 的MyReceiver.
當MyReceiver接收到, 會把接收到的時間和新的系統時間比較, 並把延遲時間顯示出來.

當按下Stop按鈕, testActivity會發送廣播送給testService 的 TestServiceReceiver.
當TestServiceReceiver接收到, 便會停止服務.

testActivity.java
package com.testActivity;

import android.app.Activity;
import android.content.BroadcastReceiver;
import android.content.Context;
import android.content.Intent;
import android.content.IntentFilter;
import android.os.Bundle;
import android.view.View;
import android.widget.Button;
import android.widget.TextView;

public class testActivity extends Activity {

final static String MY_ACTION = "testActivity.MY_ACTION";

TextView textData;

public static final int RQS_STOP_SERVICE = 1;
MyReceiver myReceiver;

/** Called when the activity is first created. */
@Override
public void onCreate(Bundle savedInstanceState) {
super.onCreate(savedInstanceState);
setContentView(R.layout.main);

textData = (TextView)findViewById(R.id.data);
Button buttonStart = (Button)findViewById(R.id.start);
Button buttonStop = (Button)findViewById(R.id.stop);
buttonStart.setOnClickListener(buttonStartOnClickListener);
buttonStop.setOnClickListener(buttonStopOnClickListener);
}

@Override
protected void onStart() {
// TODO Auto-generated method stub
myReceiver = new MyReceiver();
IntentFilter intentFilter = new IntentFilter();
intentFilter.addAction(MY_ACTION);
registerReceiver(myReceiver, intentFilter);
super.onStart();
}

@Override
protected void onStop() {
// TODO Auto-generated method stub
unregisterReceiver(myReceiver);
super.onStop();
}

Button.OnClickListener buttonStartOnClickListener
= new Button.OnClickListener(){

@Override
public void onClick(View arg0) {
// TODO Auto-generated method stub
Intent intent = new Intent(testActivity.this, com.testActivity.testService.class);
testActivity.this.startService(intent);
}};

Button.OnClickListener buttonStopOnClickListener
= new Button.OnClickListener(){

@Override
public void onClick(View arg0) {
// TODO Auto-generated method stub
Intent intent = new Intent();
intent.setAction(testService.MY_ACTION);
intent.putExtra("RQS", RQS_STOP_SERVICE);
sendBroadcast(intent);
}};

private class MyReceiver extends BroadcastReceiver{

@Override
public void onReceive(Context arg0, Intent arg1) {
// TODO Auto-generated method stub
long timestamp = arg1.getLongExtra("timestamp", 0);
long curtime = System.currentTimeMillis();
long delay = curtime - timestamp;
textData.setText(String.valueOf(timestamp)
+ " : " + String.valueOf(curtime)
+ " delay " + String.valueOf(delay)
+ "(ms)");
}

}
}


testService.java
package com.testActivity;

import android.app.Service;
import android.content.BroadcastReceiver;
import android.content.Context;
import android.content.Intent;
import android.content.IntentFilter;
import android.os.IBinder;
import android.widget.Toast;

public class testService extends Service {

final static String MY_ACTION = "testService.MY_ACTION";

TestServiceReceiver testServiceReceiver;
boolean running;

@Override
public void onCreate() {
// TODO Auto-generated method stub
Toast.makeText(getBaseContext(),
"TestServiceReceiver.onCreate",
Toast.LENGTH_LONG).show();
testServiceReceiver = new TestServiceReceiver();
super.onCreate();
}

@Override
public IBinder onBind(Intent arg0) {
// TODO Auto-generated method stub
return null;
}

@Override
public int onStartCommand(Intent intent, int flags, int startId) {
// TODO Auto-generated method stub
Toast.makeText(getBaseContext(),
"TestServiceReceiver.onStartCommand",
Toast.LENGTH_LONG).show();
IntentFilter intentFilter = new IntentFilter();
intentFilter.addAction(MY_ACTION);
registerReceiver(testServiceReceiver, intentFilter);
running = true;

MyThread myThread = new MyThread();
myThread.start();

return super.onStartCommand(intent, flags, startId);
}


@Override
public void onDestroy() {
// TODO Auto-generated method stub
this.unregisterReceiver(testServiceReceiver);
super.onDestroy();
}

public class MyThread extends Thread {

@Override
public void run() {
// TODO Auto-generated method stub

// TODO Auto-generated method stub
while(running){
try {
Thread.sleep(1000);
} catch (InterruptedException e) {
// TODO Auto-generated catch block
e.printStackTrace();
}
Intent intent = new Intent();
intent.setAction(testActivity.MY_ACTION);
intent.putExtra("timestamp", System.currentTimeMillis());
sendBroadcast(intent);
}
}

}

public class TestServiceReceiver extends BroadcastReceiver {

@Override
public void onReceive(Context arg0, Intent arg1) {
// TODO Auto-generated method stub
int rqs = arg1.getIntExtra("RQS", 0);
if (rqs == testActivity.RQS_STOP_SERVICE){
Toast.makeText(getBaseContext(),
"TestServiceReceiver.onReceive w/ RQS_STOP_SERVICE",
Toast.LENGTH_LONG).show();
running = false;
stopSelf();
}
}
}

}


main.xml
<?xml version="1.0" encoding="utf-8"?>
<LinearLayout xmlns:android="http://schemas.android.com/apk/res/android"
android:orientation="vertical"
android:layout_width="fill_parent"
android:layout_height="fill_parent"
>
<TextView
android:layout_width="fill_parent"
android:layout_height="wrap_content"
android:text="@string/hello"
/>
<Button
android:id="@+id/start"
android:layout_width="fill_parent"
android:layout_height="wrap_content"
android:text="- Start -"
/>
<Button
android:id="@+id/stop"
android:layout_width="fill_parent"
android:layout_height="wrap_content"
android:text="- Stop -"
/>
<TextView
android:id="@+id/data"
android:layout_width="fill_parent"
android:layout_height="wrap_content"
/>
</LinearLayout>


修改AndroidManifest.xml添加 testService
<?xml version="1.0" encoding="utf-8"?>
<manifest xmlns:android="http://schemas.android.com/apk/res/android"
package="com.testActivity"
android:versionCode="1"
android:versionName="1.0">
<application android:icon="@drawable/icon" android:label="@string/app_name">
<activity android:name=".testActivity"
android:label="@string/app_name">
<intent-filter>
<action android:name="android.intent.action.MAIN" />
<category android:name="android.intent.category.LAUNCHER" />
</intent-filter>
</activity>
<service android:name=".testService"
/>
</application>
<uses-sdk android:minSdkVersion="7" />

</manifest>


2011年2月21日星期一

如何處理菜單鍵(MENU)

這是一個檢測菜單鍵(MENU)的示例代碼.

重寫onKeyDown()和onKeyDown()方法, 比較keyCode是不是需要處理的鍵.
- 如果是, 處理完成後返回true, 表示已經處理了.
- 如果不是, 傳遞給super處理.
(其他鍵也可以同樣方法處理)

如何處理菜單鍵(MENU)

package com.AndroidMenuKey;

import android.app.Activity;
import android.os.Bundle;
import android.view.KeyEvent;
import android.widget.Toast;

public class AndroidMenuKey extends Activity {
/** Called when the activity is first created. */
@Override
public void onCreate(Bundle savedInstanceState) {
super.onCreate(savedInstanceState);
setContentView(R.layout.main);
}

@Override
public boolean onKeyDown(int keyCode, KeyEvent event) {
// TODO Auto-generated method stub
if(keyCode == KeyEvent.KEYCODE_MENU){
Toast.makeText(this, "MENU Key Down", Toast.LENGTH_LONG).show();
return true;
}else{
return super.onKeyDown(keyCode, event);
}

}

@Override
public boolean onKeyUp(int keyCode, KeyEvent event) {
// TODO Auto-generated method stub
if(keyCode == KeyEvent.KEYCODE_MENU){
Toast.makeText(this, "MENU Key Up", Toast.LENGTH_LONG).show();
return true;
}else{
return super.onKeyUp(keyCode, event);
}

}


}


2011年2月20日星期日

如何利用InputFilter把小寫字母轉為大寫


 final EditText input = new EditText(this);
InputFilter[] FilterArray = new InputFilter[1];
FilterArray[0] = new InputFilter.AllCaps();
input.setFilters(FilterArray);


相關文章:
- 如何利用InputFilter限制EditText的長度(字符數)

2011年2月18日星期五

利用BitmapFactory.Options的inSampleSize對bitmap進行優化

在我的舊文章"從內部文件夾加載圖像視圖(ImageView)", "從SD Card加載圖像視圖(ImageView), 使用BitmapFactory"和"從網絡加載圖像視圖(ImageView)"中, 我展示了如何顯示位圖(bitmap), 但都是把位圖直接顯示在ImageView上. 這樣做有一個問題: 就是對系統資源很"大食", 特別是當源位圖是非常大時, 甚至可以使應用程序崩潰.

這篇文章以"從SD Card加載圖像視圖(ImageView)"為例, 首先檢查源位圖的大小, 通過BitmapFactory.Options設置inSampleSize, 這樣做可以減少對系統資源的要求.

利用BitmapFactory.Options的inSampleSize對bitmap進行優化

先把較大的圖片文件複製到SD Card中.

main.xml
<?xml version="1.0" encoding="utf-8"?>
<LinearLayout xmlns:android="http://schemas.android.com/apk/res/android"
android:orientation="vertical"
android:layout_width="fill_parent"
android:layout_height="fill_parent"
>
<TextView
android:layout_width="fill_parent"
android:layout_height="wrap_content"
android:text="@string/hello"
/>
<ImageView
android:id="@+id/imageview"
android:layout_gravity="center"
android:layout_width="fill_parent"
android:layout_height="fill_parent"
android:scaleType="center"
/>
</LinearLayout>


Java源代碼
package com.AndroidImage;

import android.app.Activity;
import android.graphics.Bitmap;
import android.graphics.BitmapFactory;
import android.os.Bundle;
import android.widget.ImageView;
import android.widget.Toast;

public class AndroidImage extends Activity {

private String imageFile = "/sdcard/AndroidSharedPreferencesEditor.png";
/** Called when the activity is first created. */

@Override
public void onCreate(Bundle savedInstanceState) {
super.onCreate(savedInstanceState);
setContentView(R.layout.main);

ImageView myImageView = (ImageView)findViewById(R.id.imageview);
//Bitmap bitmap = BitmapFactory.decodeFile(imageFile);
//myImageView.setImageBitmap(bitmap);

Bitmap bitmap;
float imagew = 300;
float imageh = 300;

BitmapFactory.Options bitmapFactoryOptions = new BitmapFactory.Options();
bitmapFactoryOptions.inJustDecodeBounds = true;
bitmap = BitmapFactory.decodeFile(imageFile, bitmapFactoryOptions);

int yRatio = (int)Math.ceil(bitmapFactoryOptions.outHeight/imageh);
int xRatio = (int)Math.ceil(bitmapFactoryOptions.outWidth/imagew);

if (yRatio > 1 || xRatio > 1){
if (yRatio > xRatio) {
bitmapFactoryOptions.inSampleSize = yRatio;
Toast.makeText(this,
"yRatio = " + String.valueOf(yRatio),
Toast.LENGTH_LONG).show();
}
else {
bitmapFactoryOptions.inSampleSize = xRatio;
Toast.makeText(this,
"xRatio = " + String.valueOf(xRatio),
Toast.LENGTH_LONG).show();
}
}
else{
Toast.makeText(this,
"inSampleSize = 1",
Toast.LENGTH_LONG).show();
}

bitmapFactoryOptions.inJustDecodeBounds = false;
bitmap = BitmapFactory.decodeFile(imageFile, bitmapFactoryOptions);
myImageView.setImageBitmap(bitmap);
}

}

2011年2月14日星期一

2011年2月10日星期四

getPreferences() vs getSharedPreferences()

在前文"Android的共享選項編輯器(SharedPreferences.Editor)"中, 通過getPreferences()方法獲得SharedPreferences對象. 這樣做SharedPreferences對象僅可用於本身的活動(activity).

如果需要在應用程序中多個活動之間分享同一個SharedPreferences對象, 可以使用底層getSharedPreferences()方法, 基本用法相同, 但需要額外提供一個指定的名稱:

public abstract SharedPreferences getSharedPreferences (String name, int mode)

對應Android 2.3.3的Android SDK現已推出

對應Android 2.3.3的Android SDK為開發人員增加了新的NFC(Near Field Communications近場通信)功能, 如寫入, 標籤,並建立點對點連接.

新的API可以啟用令人興奮的新應用, 如票務, 評分, 簽入, 廣告和其與他設備交換數據.

詳情:
http://android-developers.blogspot.com/2011/02/android-233-platform-new-nfc.html

2011年2月9日星期三

Android的共享選項編輯器(SharedPreferences.Editor)

共享選項編輯器(SharedPreferences.Editor)是一個用於修改SharedPreferences對象值的接口. 編輯選項值後, 調用commit()或apply()方法以更新SharedPreferences.

Android的共享選項編輯器(SharedPreferences.Editor)

<?xml version="1.0" encoding="utf-8"?>
<LinearLayout xmlns:android="http://schemas.android.com/apk/res/android"
android:orientation="vertical"
android:layout_width="fill_parent"
android:layout_height="fill_parent"
>
<TextView
android:layout_width="fill_parent"
android:layout_height="wrap_content"
android:text="@string/hello"
/>
<CheckBox
android:id="@+id/pref_checkbox"
android:layout_width="fill_parent"
android:layout_height="wrap_content"
/>
<EditText
android:id="@+id/pref_edittext"
android:layout_width="fill_parent"
android:layout_height="wrap_content"
/>
<Button
android:id="@+id/saveedittext"
android:layout_width="fill_parent"
android:layout_height="wrap_content"
android:text="Save EditText"
/>
</LinearLayout>


package com.AndroidSharedPreferencesEditor;

import android.app.Activity;
import android.content.SharedPreferences;
import android.os.Bundle;
import android.view.View;
import android.widget.Button;
import android.widget.CheckBox;
import android.widget.CompoundButton;
import android.widget.EditText;

public class AndroidSharedPreferencesEditor extends Activity {

CheckBox checkBox;
EditText editText;

/** Called when the activity is first created. */
@Override
public void onCreate(Bundle savedInstanceState) {
super.onCreate(savedInstanceState);
setContentView(R.layout.main);
checkBox = (CheckBox)findViewById(R.id.pref_checkbox);
editText = (EditText)findViewById(R.id.pref_edittext);
Button buttonSaveEditText = (Button)findViewById(R.id.saveedittext);
LoadPreferences();

checkBox.setOnCheckedChangeListener(new CheckBox.OnCheckedChangeListener(){

@Override
public void onCheckedChanged(CompoundButton arg0, boolean arg1) {
// TODO Auto-generated method stub
SavePref();
}});

buttonSaveEditText.setOnClickListener(new Button.OnClickListener(){

@Override
public void onClick(View arg0) {
// TODO Auto-generated method stub
SavePref();
}});

}

private void LoadPreferences(){
SharedPreferences sharedPreferences = getPreferences(MODE_PRIVATE);

boolean savedBoolean = sharedPreferences.getBoolean("PREF_BOOLEAN", false);
String savedString = sharedPreferences.getString("PREF_STRING", "");

checkBox.setChecked(savedBoolean);
editText.setText(savedString);
}

private void SavePref(){
boolean booleanCheckBox = checkBox.isChecked();
String stringEditText = editText.getText().toString();

SharedPreferences sharedPreferences = getPreferences(MODE_PRIVATE);
SharedPreferences.Editor editor = sharedPreferences.edit();
editor.putBoolean("PREF_BOOLEAN", booleanCheckBox);
editor.putString("PREF_STRING", stringEditText);
editor.commit();
}
}


相關文章:
- getPreferences() vs getSharedPreferences()

2011年2月7日星期一

對話框樣式的應用程序

一般來講, 應用程序或活動覆蓋整個屏幕. 但是可以通過android:theme, 使應用程序看起來像對話框, 就像一個浮動窗口一樣.

對話框樣式的應用程序

只需要修改AndroidManifest.xml, 在<activity>添加:
android:theme="@android:style/Theme.Dialog"

例子:
<activity android:name=".AndroidDialogTheme"
android:label="@string/app_name"
android:theme="@android:style/Theme.Dialog">


2011年2月4日星期五

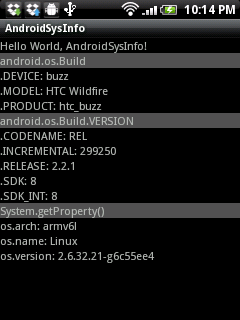
通過android.os.Build和System.getProperty()獲取系統信息(SysInfo)

HTC Wildfire的系統信息(SysInfo)

佈局文件, main.xml
<?xml version="1.0" encoding="utf-8"?>
<LinearLayout xmlns:android="http://schemas.android.com/apk/res/android"
android:orientation="vertical"
android:layout_width="fill_parent"
android:layout_height="fill_parent"
>
<TextView
android:layout_width="fill_parent"
android:layout_height="wrap_content"
android:text="@string/hello"
/>
<TextView
android:layout_width="fill_parent"
android:layout_height="wrap_content"
android:text="android.os.Build"
android:background="#505050"
/>
<TextView
android:id="@+id/device"
android:layout_width="fill_parent"
android:layout_height="wrap_content"
/>
<TextView
android:id="@+id/model"
android:layout_width="fill_parent"
android:layout_height="wrap_content"
/>
<TextView
android:id="@+id/product"
android:layout_width="fill_parent"
android:layout_height="wrap_content"
/>
<TextView
android:layout_width="fill_parent"
android:layout_height="wrap_content"
android:text="android.os.Build.VERSION"
android:background="#505050"
/>
<TextView
android:id="@+id/codename"
android:layout_width="fill_parent"
android:layout_height="wrap_content"
/>
<TextView
android:id="@+id/incremental"
android:layout_width="fill_parent"
android:layout_height="wrap_content"
/>
<TextView
android:id="@+id/release"
android:layout_width="fill_parent"
android:layout_height="wrap_content"
/>
<TextView
android:id="@+id/sdk"
android:layout_width="fill_parent"
android:layout_height="wrap_content"
/>
<TextView
android:id="@+id/sdk_int"
android:layout_width="fill_parent"
android:layout_height="wrap_content"
/>
<TextView
android:layout_width="fill_parent"
android:layout_height="wrap_content"
android:text="System.getProperty()"
android:background="#505050"
/>
<TextView
android:id="@+id/os_arch"
android:layout_width="fill_parent"
android:layout_height="wrap_content"
/>
<TextView
android:id="@+id/os_name"
android:layout_width="fill_parent"
android:layout_height="wrap_content"
/>
<TextView
android:id="@+id/os_version"
android:layout_width="fill_parent"
android:layout_height="wrap_content"
/>
</LinearLayout>


程序代碼
package com.AndroidSysInfo;

import android.app.Activity;
import android.os.Bundle;
import android.widget.TextView;

public class AndroidSysInfo extends Activity {
/** Called when the activity is first created. */
@Override
public void onCreate(Bundle savedInstanceState) {
super.onCreate(savedInstanceState);
setContentView(R.layout.main);
TextView textDevice = (TextView)findViewById(R.id.device);
TextView textModel = (TextView)findViewById(R.id.model);
TextView textProduct = (TextView)findViewById(R.id.product);

TextView textCodename = (TextView)findViewById(R.id.codename);
TextView textIncremental = (TextView)findViewById(R.id.incremental);
TextView textRelease = (TextView)findViewById(R.id.release);
TextView textSdk = (TextView)findViewById(R.id.sdk);
TextView textSdkInt = (TextView)findViewById(R.id.sdk_int);

TextView textOS_Arch = (TextView)findViewById(R.id.os_arch);
TextView textOS_Name = (TextView)findViewById(R.id.os_name);
TextView textOS_Version = (TextView)findViewById(R.id.os_version);

textDevice.setText(".DEVICE: " + android.os.Build.DEVICE);
textModel.setText(".MODEL: " + android.os.Build.MODEL);
textProduct.setText(".PRODUCT: " + android.os.Build.PRODUCT);

textCodename.setText(".CODENAME: " + android.os.Build.VERSION.CODENAME);
textIncremental.setText(".INCREMENTAL: " + android.os.Build.VERSION.INCREMENTAL);
textRelease.setText(".RELEASE: " + android.os.Build.VERSION.RELEASE);
textSdk.setText(".SDK: " + android.os.Build.VERSION.SDK);
textSdkInt.setText(".SDK_INT: " + String.valueOf(android.os.Build.VERSION.SDK_INT));

textOS_Arch.setText("os.arch: " + System.getProperty("os.arch"));
textOS_Name.setText("os.name: " + System.getProperty("os.name"));
textOS_Version.setText("os.version: " + System.getProperty("os.version"));
}
}


Android Event 02-02-2011全程播


2011年2月3日星期四

谷歌宣布Android市場網站

谷歌推出了Android市場網站(http://market.android.com/),讓你直接從瀏覽器瀏覽和搜索Android應用程序。

Android Market的網站內,可以直接發送應用程序到你的Android設備,與朋友通過Twitter分享應用程序。亦可以從網站或從Android設備直接閱讀和發布應用程序評論。

另外, 到網站使用谷歌帳戶登錄, 並點擊"My Market Account"可以看到你所購買或下載的應用程序,使管理應用程序非常容易。

2011年2月1日星期二

利用剪貼板管理器(ClipboardManager)執行複製和粘貼(Copy and Paste)

剪貼板管理器(ClipboardManager)是一個剪貼板服務的接口, 用於在剪貼板放置和檢索文本.

從系統獲取剪貼板管理器:

ClipboardManager clipboardManager
= (ClipboardManager)getSystemService(CLIPBOARD_SERVICE);


在剪貼板放置文本:

clipboardManager.setText("Text place in ClipboardManager");


在剪貼板檢索文本:

clipboardManager.getText();