2013年12月31日星期二
2013年12月28日星期六
創建圓角的EditText
創建圓角的EditText:
首先創建/res/drawable/roundcorner.xml文件.
在佈局文件, 設置android:background="@drawable/roundcorner".
首先創建/res/drawable/roundcorner.xml文件.
<?xml version="1.0" encoding="utf-8"?>
<shape xmlns:android="http://schemas.android.com/apk/res/android"
    android:padding="5dp"
    android:shape="rectangle" >
    <solid android:color="#B0B0B0" />
    <corners
        android:bottomLeftRadius="10dp"
        android:bottomRightRadius="10dp"
        android:topLeftRadius="10dp"
        android:topRightRadius="10dp" />
</shape>
在佈局文件, 設置android:background="@drawable/roundcorner".
<LinearLayout xmlns:android="http://schemas.android.com/apk/res/android"
    xmlns:tools="http://schemas.android.com/tools"
    android:layout_width="match_parent"
    android:layout_height="match_parent"
    android:orientation="vertical"
    android:paddingBottom="@dimen/activity_vertical_margin"
    android:paddingLeft="@dimen/activity_horizontal_margin"
    android:paddingRight="@dimen/activity_horizontal_margin"
    android:paddingTop="@dimen/activity_vertical_margin"
    tools:context=".MainActivity" >

    <TextView
        android:layout_width="wrap_content"
        android:layout_height="wrap_content"
        android:text="@string/hello_world" />

    <EditText
        android:id="@+id/editText1"
        android:layout_width="match_parent"
        android:layout_height="wrap_content"
        android:layout_margin="10sp"
        android:drawablePadding="5dp"
        android:drawableStart="@drawable/ic_launcher"
        android:gravity="left|bottom"
        android:textColor="#F0F0F0"
        android:background="@drawable/roundcorner"
        android:hint="hello" >
    </EditText>

</LinearLayout>
在EditText上添加圖標
在EditText上添加圖標的實例:
<LinearLayout xmlns:android="http://schemas.android.com/apk/res/android"
    xmlns:tools="http://schemas.android.com/tools"
    android:layout_width="match_parent"
    android:layout_height="match_parent"
    android:orientation="vertical"
    android:paddingBottom="@dimen/activity_vertical_margin"
    android:paddingLeft="@dimen/activity_horizontal_margin"
    android:paddingRight="@dimen/activity_horizontal_margin"
    android:paddingTop="@dimen/activity_vertical_margin"
    tools:context=".MainActivity" >

    <TextView
        android:layout_width="wrap_content"
        android:layout_height="wrap_content"
        android:text="@string/hello_world" />

    <EditText
        android:id="@+id/editText1"
        android:layout_width="match_parent"
        android:layout_height="wrap_content"
        android:layout_margin="10sp"
        android:drawablePadding="5dp"
        android:drawableStart="@drawable/ic_launcher"
        android:gravity="left|bottom"
        android:textColor="#F0F0F0"
        android:background="#B0B0B0"
        android:hint="hello" >
    </EditText>

</LinearLayout>
2013年12月24日星期二
Google Maps Android API Utility Library (谷歌地圖AndroidAPI工具庫)
Google Maps Android API Utility Library (谷歌地圖AndroidAPI工具庫) 是一個開放源碼的類庫, 為地圖應用程序提供先進的功能. 這是提供源代碼的 GitHub 網站.
Maps Shortcuts: Android Maps Utility Library
Maps Shortcuts: Android Maps Utility Library
2013年12月18日星期三
2013年12月10日星期二
2013年12月8日星期日
實現 GestureDetector.OnGestureListener 檢測手勢
這個示例代碼通過實現 GestureDetector.OnGestureListener 檢測用戶的手勢操作:
相關帖子:
- 手勢檢測 GestureDetector.SimpleOnGestureListener
 |
| 實現 GestureDetector.OnGestureListener 檢測手勢 |
package com.example.androidgesturedetector;

import android.os.Bundle;
import android.app.Activity;
import android.support.v4.view.GestureDetectorCompat;
import android.view.GestureDetector;
import android.view.MotionEvent;
import android.widget.TextView;

public class MainActivity extends Activity {

 String info;
 TextView infoView;
 private GestureDetectorCompat myGestureDetectorCompat;

 @Override
 protected void onCreate(Bundle savedInstanceState) {
  super.onCreate(savedInstanceState);
  // setContentView(R.layout.activity_main);
  infoView = new TextView(this);
  setContentView(infoView);

  info = "";
  infoView.setText(info);

  myGestureDetectorCompat = new GestureDetectorCompat(this,
    myOnGestureListener);
 }

 @Override
 public boolean onTouchEvent(MotionEvent event) {
  myGestureDetectorCompat.onTouchEvent(event);
  return super.onTouchEvent(event);
 }

 GestureDetector.OnGestureListener myOnGestureListener = new
   GestureDetector.OnGestureListener() {

  @Override
  public boolean onDown(MotionEvent e) {
   info = "onDown - " + e.getX() + " : " + e.getY() + "\n";
   infoView.setText(info);
   return false;
  }

  @Override
  public boolean onFling(MotionEvent e1, MotionEvent e2, float velocityX,
    float velocityY) {
   info += "onFling - " + "\n" + " e1 - " + e1.getX() + " : "
     + e1.getY() + "\n" + " e2 - " + e2.getX() + " : "
     + e2.getY() + "\n" + " velocityX = " + velocityX + "\n"
     + " velocityY = " + velocityY + "\n";
   infoView.setText(info);
   return false;
  }

  @Override
  public void onLongPress(MotionEvent e) {
   info += "onLongPress - " + e.getX() + " : " + e.getY() + "\n";
   infoView.setText(info);
  }

  @Override
  public boolean onScroll(MotionEvent arg0, MotionEvent arg1, float arg2,
    float arg3) {
   info += "onScroll\n";
   infoView.setText(info);
   return false;
  }

  @Override
  public void onShowPress(MotionEvent e) {
   info += "onShowPress - " + e.getX() + " : " + e.getY() + "\n";
   infoView.setText(info);
  }

  @Override
  public boolean onSingleTapUp(MotionEvent e) {
   info += "onSingleTapUp - " + e.getX() + " : " + e.getY() + "\n";
   infoView.setText(info);
   return false;
  }
 };

}
相關帖子:
- 手勢檢測 GestureDetector.SimpleOnGestureListener
2013年12月2日星期一
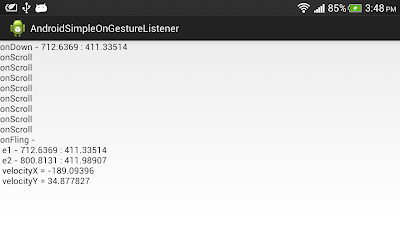
手勢檢測 GestureDetector.SimpleOnGestureListener
GestureDetector.SimpleOnGestureListener 類為檢測手勢(Gesture)提供一種簡單的方式. 它實現了 GestureDetector.OnGestureListener 和 GestureDetector.OnDoubleTapListener 的所有方法. 你只需要擴展 GestureDetector.SimpleOnGestureListener 子類,並重寫所需的方法便可以。
返回值: 如果該事件被消耗掉 return true,否則 return false.
示例代碼:
相關帖子:
- 實現 GestureDetector.OnGestureListener 檢測手勢
返回值: 如果該事件被消耗掉 return true,否則 return false.
示例代碼:
package com.example.androidsimpleongesturelistener;

import android.os.Bundle;
import android.support.v4.view.GestureDetectorCompat;
import android.view.GestureDetector;
import android.view.MotionEvent;
import android.widget.TextView;
import android.app.Activity;

public class MainActivity extends Activity {

 private GestureDetectorCompat myGestureDetector;
 String info;
 TextView infoView;

 @Override
 protected void onCreate(Bundle savedInstanceState) {
  super.onCreate(savedInstanceState);
  //setContentView(R.layout.activity_main);
  infoView = new TextView(this);
  setContentView(infoView);

  info = "";
  infoView.setText(info);

  myGestureDetector =
    new GestureDetectorCompat(this, new MyGestureListener());
 }

 @Override
 public boolean onTouchEvent(MotionEvent event) {
  this.myGestureDetector.onTouchEvent(event);
  return super.onTouchEvent(event);
 }

 class MyGestureListener extends GestureDetector.SimpleOnGestureListener {

  @Override
  public boolean onDoubleTap(MotionEvent e) {
   info += "onDoubleTap - " +
     e.getX() + " : " + e.getY() +
     "\n";
   infoView.setText(info);
   return super.onDoubleTap(e);
  }

  @Override
  public boolean onDoubleTapEvent(MotionEvent e) {
   info += "onDoubleTapEvent - " +
     e.getX() + " : " + e.getY() +
     "\n";
   infoView.setText(info);
   return super.onDoubleTapEvent(e);
  }

  @Override
  public boolean onDown(MotionEvent e) {
   info = "onDown - " +
     e.getX() + " : " + e.getY() +
     "\n";
   infoView.setText(info);
   return super.onDown(e);
  }

  @Override
  public boolean onFling(MotionEvent e1, MotionEvent e2, float velocityX,
    float velocityY) {
   info += "onFling - " + "\n" +
     " e1 - " + e1.getX() + " : " + e1.getY() + "\n" +
     " e2 - " + e2.getX() + " : " + e2.getY() + "\n" +
     " velocityX = " + velocityX + "\n" +
     " velocityY = " + velocityY + "\n";
   infoView.setText(info);
   return super.onFling(e1, e2, velocityX, velocityY);
  }

  @Override
  public void onLongPress(MotionEvent e) {
   info += "onLongPress - " +
     e.getX() + " : " + e.getY() +
     "\n";
   infoView.setText(info);
   super.onLongPress(e);
  }

  @Override
  public boolean onScroll(MotionEvent e1, MotionEvent e2,
    float distanceX, float distanceY) {
   /*
   info += "onScroll - " + "\n" +
     " e1 - " + e1.getX() + " : " + e1.getY() + "\n" +
     " e2 - " + e2.getX() + " : " + e2.getY() + "\n" +
     " distanceX = " + distanceX + "\n" +
     " distanceY = " + distanceY + "\n";
   infoView.setText(info);
   */
   info += "onScroll\n";
   infoView.setText(info);
   return super.onScroll(e1, e2, distanceX, distanceY);
  }

  @Override
  public void onShowPress(MotionEvent e) {
   info += "onShowPress - " +
     e.getX() + " : " + e.getY() +
     "\n";
   infoView.setText(info);
   super.onShowPress(e);
  }

  @Override
  public boolean onSingleTapConfirmed(MotionEvent e) {
   info += "onSingleTapConfirmed - " +
     e.getX() + " : " + e.getY() +
     "\n";
   infoView.setText(info);
   return super.onSingleTapConfirmed(e);
  }

  @Override
  public boolean onSingleTapUp(MotionEvent e) {
   info += "onSingleTapUp - " +
     e.getX() + " : " + e.getY() +
     "\n";
   infoView.setText(info);
   return super.onSingleTapUp(e);
  }
 }
}
 |
| 手勢檢測 GestureDetector.SimpleOnGestureListener |
相關帖子:
- 實現 GestureDetector.OnGestureListener 檢測手勢
2013年11月2日星期六
2013年10月24日星期四
2013年10月11日星期五
Density-independent Pixels (密度獨立像素)
一個教導如何針對不同Android設備, 不同分辨率的問題, 創建統一用戶界面(UI)的視頻教程.
DesignBytes: Density-independent Pixels
This introductory video explains how Android app designers can easily work across different screen pixel densities by using the density-independent pixel (abbreviated dp or dip), a virtual pixel unit that keeps things the same physical size across device. Understanding dp units is critical to a successful Android app design workflow.
2013年9月30日星期一
如何請求重新佈局/繪製 - requestLayout()/invalidate()
如果一個視圖(View)有一些視覺變化, 希望系統重新佈局/繪製, 可以調用函數 requestLayout() 或 invalidate().
- 調用 requestLayout() 函數將安排重新佈局.
- 調用 invalidate() 函數會調用onDraw(android.graphics.Canvas).
- 調用 requestLayout() 函數將安排重新佈局.
- 調用 invalidate() 函數會調用onDraw(android.graphics.Canvas).
2013年9月27日星期五
水平放置單選按鈕(RadioButton)
    <RadioGroup
        android:id="@+id/radiogroup2"
        android:layout_width="match_parent"
        android:layout_height="wrap_content"
        android:orientation="horizontal" >

        <RadioButton
            android:id="@+id/radiobutton1"
            android:layout_width="0dp"
            android:layout_height="wrap_content"
            android:layout_weight="1"
            android:text="option 1" />

        <RadioButton
            android:id="@+id/radiobutton2"
            android:layout_width="0dp"
            android:layout_height="wrap_content"
            android:layout_weight="1"
            android:text="option 2" />
    </RadioGroup>
2013年9月4日星期三
2013年8月17日星期六
圖像像素化 (Image Pixelization)
本視頻演示了一些實現對圖像像素化效果((Image Pixelization))的基本位圖處理(Bitmap manipulation)技術. 以及使用AsyncTask從UI線程移至後台工作線程, 以減少UI線程的負荷.
示例代碼: http://developer.android.com/shareables/devbytes/ImagePixelization.zip
2013年8月15日星期四
2013年7月25日星期四
谷歌推出 Chromecast (HDMI 串流電視棒), 只售 $35 美元
Google 還宣布 Google Cast 開發者網站, 提供 Google Cast Developer Preview. 通過 Google Cast Developer Preview, 可以開發運行在 Android, iOS, 和 Chrome 上的 sender 應用程序, 以及運行在縮減版本的Chrome 上的 receiver 應用程序.
2013年7月24日星期三
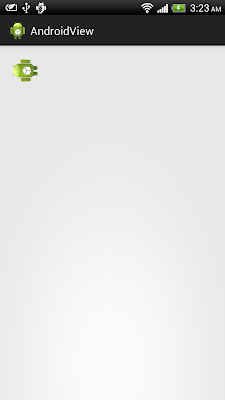
通過 Java 設定旋轉角度 setRotation()
適用 API Level 11:
 |
| 通過 Java 設定旋轉角度 |
package com.example.androidview;

import android.os.Bundle;
import android.app.Activity;
import android.widget.ImageView;

public class MainActivity extends Activity {

 @Override
 protected void onCreate(Bundle savedInstanceState) {
  super.onCreate(savedInstanceState);
  setContentView(R.layout.activity_main);

  ImageView image = (ImageView)findViewById(R.id.image);
  image.setRotation(270);
 }

}
<RelativeLayout xmlns:android="http://schemas.android.com/apk/res/android"
    xmlns:tools="http://schemas.android.com/tools"
    android:layout_width="match_parent"
    android:layout_height="match_parent"
    android:paddingBottom="@dimen/activity_vertical_margin"
    android:paddingLeft="@dimen/activity_horizontal_margin"
    android:paddingRight="@dimen/activity_horizontal_margin"
    android:paddingTop="@dimen/activity_vertical_margin"
    tools:context=".MainActivity" >

    <ImageView
        android:id="@+id/image"
        android:layout_width="wrap_content"
        android:layout_height="wrap_content"
        android:src="@drawable/ic_launcher" />

</RelativeLayout>
通過XML設定旋轉角度 android:rotation
例子:
<RelativeLayout xmlns:android="http://schemas.android.com/apk/res/android"
    xmlns:tools="http://schemas.android.com/tools"
    android:layout_width="match_parent"
    android:layout_height="match_parent"
    android:paddingBottom="@dimen/activity_vertical_margin"
    android:paddingLeft="@dimen/activity_horizontal_margin"
    android:paddingRight="@dimen/activity_horizontal_margin"
    android:paddingTop="@dimen/activity_vertical_margin"
    tools:context=".MainActivity" >

    <ImageView
        android:id="@+id/image"
        android:layout_width="match_parent"
        android:layout_height="match_parent"
        android:src="@drawable/ic_launcher"
        android:rotation="45.0" />

</RelativeLayout>
2013年7月17日星期三
比爾·蓋茨在微軟研究院教育高峰會2013開幕主題演講
Bill Gates Opening Keynote at Microsoft Research Faculty Summit 2013
微軟董事長比爾·蓋茨在微軟研究院教育高峰會2013討論計算研究如何可以改善我們的世界.
2013年7月13日星期六
2013年7月11日星期四
2013年6月28日星期五
2013年6月26日星期三
2013年6月25日星期二
2013年6月24日星期一
2013年6月19日星期三
2013年6月15日星期六
Facebook上發布的數據,包括所有國家的安全要求
Facebook上公布包括所有(美國)國家安全要求的數據: http://newsroom.fb.com/News/636/Facebook-Releases-Data-Including-All-National-Security-Requests.
谷歌又一新計劃項目: Project Loon
世界上三分之二人口還沒有上網! 谷歌的新項目 Project Loon 是一個行駛在太空邊緣的氣球網絡, 這些氣球上行駛邊緣空間,它的目的旨在連接在農村和偏遠地區的人, 幫助填補網絡覆蓋, 以及在災難發生後為人們帶來重新的聯機. http://www.google.com/loon/
2013年6月13日星期四
2013年6月9日星期日
2013年6月8日星期六
視頻: 自定義活動動畫(Custom Activity Animations)
Window Animations 是一個製作活動間過渡動畫的簡單方法. 這個視頻涵蓋可定制動畫的不同技術。
DevBytes: Custom Activity Animations
DevBytes: Custom Activity Animations
2013年6月3日星期一
2013年6月2日星期日
當Android遇上谷歌地圖 - Google I/O 2013 視頻
使用 Google Maps Android API 建立直觀和引人入勝的移動地圖應用程序. 這段視頻展示創新的方式來整合地圖和Android傳感器與Android上的谷歌服務. 探討可視化背景, 個性化和及時信息的概念.
2013年4月22日星期一
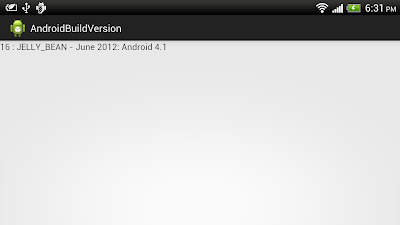
通過讀取 android.os.Build.VERSION.SDK_INT 獲得操作系統版本
 |
| 通過讀取 android.os.Build.VERSION.SDK_INT 獲得操作系統版本 |
package com.example.androidbuildversion;


import java.util.Arrays;
import java.util.List;

import android.os.Bundle;
import android.app.Activity;
import android.widget.TextView;

public class MainActivity extends Activity {

 final static Integer[] VersionCode = {
  android.os.Build.VERSION_CODES.BASE,
  android.os.Build.VERSION_CODES.BASE_1_1,
  android.os.Build.VERSION_CODES.CUPCAKE,
  android.os.Build.VERSION_CODES.CUR_DEVELOPMENT,
  android.os.Build.VERSION_CODES.DONUT,
  android.os.Build.VERSION_CODES.ECLAIR,
  android.os.Build.VERSION_CODES.ECLAIR_0_1,
  android.os.Build.VERSION_CODES.ECLAIR_MR1,
  android.os.Build.VERSION_CODES.FROYO,
  android.os.Build.VERSION_CODES.GINGERBREAD,
  android.os.Build.VERSION_CODES.GINGERBREAD_MR1,
  android.os.Build.VERSION_CODES.HONEYCOMB,
  android.os.Build.VERSION_CODES.HONEYCOMB_MR1,
  android.os.Build.VERSION_CODES.HONEYCOMB_MR2,
  android.os.Build.VERSION_CODES.ICE_CREAM_SANDWICH,
  android.os.Build.VERSION_CODES.ICE_CREAM_SANDWICH_MR1,
  android.os.Build.VERSION_CODES.JELLY_BEAN,
  android.os.Build.VERSION_CODES.JELLY_BEAN_MR1
 };

 final static String[] Version = {
  "BASE - October 2008: The original, first, version of Android",
  "BASE_1_1 - February 2009: First Android update, officially called 1.1",
  "CUPCAKE - May 2009: Android 1.5",
  "CUR_DEVELOPMENT - Magic version number for a current development build",
  "DONUT - September 2009: Android 1.6",
  "ECLAIR - November 2009: Android 2.0",
  "ECLAIR_0_1 - December 2009: Android 2.0.1",
  "ECLAIR_MR1 - January 2010: Android 2.1",
  "FROYO - June 2010: Android 2.2",
  "GINGERBREAD - November 2010: Android 2.3",
  "GINGERBREAD_MR1 - February 2011: Android 2.3.3",
  "HONEYCOMB - February 2011: Android 3.0",
  "HONEYCOMB_MR1 - May 2011: Android 3.1",
  "HONEYCOMB_MR2 - June 2011: Android 3.2",
  "ICE_CREAM_SANDWICH - October 2011: Android 4.0",
  "ICE_CREAM_SANDWICH_MR1 - December 2011: Android 4.0.3",
  "JELLY_BEAN - June 2012: Android 4.1",
  "JELLY_BEAN_MR1 - Android 4.2: Moar jelly beans!"
 };

 @Override
 protected void onCreate(Bundle savedInstanceState) {
  super.onCreate(savedInstanceState);
  //setContentView(R.layout.activity_main);
  TextView textVersion = new TextView(this);
  setContentView(textVersion);

  int SDKversion = android.os.Build.VERSION.SDK_INT;
  int matched = Arrays.asList(VersionCode).indexOf((int)SDKversion);
  if(matched == -1){
   textVersion.setText(String.valueOf(SDKversion)
     + " : " + "unknown!");
  }else{
   textVersion.setText(String.valueOf(SDKversion)
     + " : " + Version[matched]);
  }
 }

}
2013年4月20日星期六
2013年4月12日星期五
runOnUiThread(), 在用戶界面線程上運行
在 Android 上, 應用程序不能在後台線程更新用戶界面. 如果你需要在後台線程更新用戶界面, 一個非常簡單的方法是
呼叫 runOnUiThread(Runnable action) 方法. action Runnable 會在稍後的UI線程上運行.
 runOnUiThread(new Runnable(){

  @Override
  public void run() {
         //do something on UI here
  }

 });
2013年4月11日星期四
如何檢查目前是否運行在UI線程
可以使用下面的程序碼檢查目前是否運行在UI線程:
if(Looper.getMainLooper().getThread() == Thread.currentThread()){
 //目前運行在UI線程
}else{
 目前運行不是在UI線程
}
2013年3月28日星期四
开源中国, 中国最大的开源技术社区
开源中国 www.oschina.net 成立于2008年8月,是中国最大的开源技术社区。我们传播开源的理念,推广开源项目,为 IT 开发者提供了一个发现、使用、并交流开源技术的平台。目前开源中国已收录超过两万款开源软件。
经过不断的改进,目前开源中国社区已经形成了由开源软件库、代码分享、资讯、翻译、讨论区和博客等几大频道内容。
经过不断的改进,目前开源中国社区已经形成了由开源软件库、代码分享、资讯、翻译、讨论区和博客等几大频道内容。
2013年2月20日星期三
視頻 - 在平板電腦上運行的Ubuntu
Ubuntu for tablets - Full video
Ubuntu 創始人 Mark Shuttleworth 解釋 在平板電腦上運行的Ubuntu.
Ubuntu 創始人 Mark Shuttleworth 解釋 在平板電腦上運行的Ubuntu.
2013年2月6日星期三
實現自動滾動的文本視圖 - marquee
通過 marquee 實現自動滾動的文本視圖的例子:
<RelativeLayout xmlns:android="http://schemas.android.com/apk/res/android"
    xmlns:tools="http://schemas.android.com/tools"
    android:layout_width="match_parent"
    android:layout_height="match_parent"
    tools:context=".MainActivity" >

    <TextView
        android:layout_width="wrap_content"
        android:layout_height="wrap_content"
        android:layout_centerHorizontal="true"
        android:layout_centerVertical="true"
        android:singleLine="true"
        android:scrollHorizontally="true"
        android:ellipsize="marquee"
        android:marqueeRepeatLimit ="marquee_forever"
        android:focusable="true"
        android:focusableInTouchMode="true"
        android:textSize="28sp"
        android:text="Android編程: .............滾動文字" />

</RelativeLayout>
2013年2月2日星期六
2013年1月30日星期三
2013年1月3日星期四
在Android上顯示TTF/OTF
"OTF" 是 OpenType 字體, 在大多數現代操作系統中使用.
"TTF" 是 TrueType 字體, 適用於Windows的首選.
要在Android上顯示TTF/OTF, 首先要下載和複製到/assets/fonts 文件夾. 可以在這裡找到一些免費的字體. 注意, 僅複製所需要的字體文件, 否則,很浪費內存資源, 甚至不能加載/運行!
程序代碼:
"TTF" 是 TrueType 字體, 適用於Windows的首選.
要在Android上顯示TTF/OTF, 首先要下載和複製到/assets/fonts 文件夾. 可以在這裡找到一些免費的字體. 注意, 僅複製所需要的字體文件, 否則,很浪費內存資源, 甚至不能加載/運行!
程序代碼:
package com.example.androidfonts;

import android.os.Bundle;
import android.app.Activity;
import android.graphics.Typeface;
import android.widget.TextView;

public class MainActivity extends Activity {

 @Override
 protected void onCreate(Bundle savedInstanceState) {
  super.onCreate(savedInstanceState);
  setContentView(R.layout.activity_main);

  TextView ttfView = (TextView)findViewById(R.id.ttf);
  TextView otfView = (TextView)findViewById(R.id.otf);

  Typeface ttfFace_FreeMonoBold = Typeface.createFromAsset(getAssets(),
    "fonts/FreeMonoBold.ttf");
  Typeface otfFace_FreeSansBoldOblique = Typeface.createFromAsset(getAssets(),
    "fonts/FreeSansBoldOblique.otf");

  ttfView.setTypeface(ttfFace_FreeMonoBold);
  ttfView.setTextSize(28);
  otfView.setTypeface(otfFace_FreeSansBoldOblique);
  otfView.setTextSize(28);

 }

}
<LinearLayout xmlns:android="http://schemas.android.com/apk/res/android"
    xmlns:tools="http://schemas.android.com/tools"
    android:layout_width="match_parent"
    android:layout_height="match_parent"
    android:orientation="vertical"
    tools:context=".MainActivity" >

    <TextView
        android:layout_width="wrap_content"
        android:layout_height="wrap_content"
        android:text="@string/hello_world" />
    <TextView
        android:id="@+id/ttf"
        android:layout_width="wrap_content"
        android:layout_height="wrap_content"
        android:text="Hello! I'm TTF" />
    <TextView
        android:id="@+id/otf"
        android:layout_width="wrap_content"
        android:layout_height="wrap_content"
        android:text="Hello! I'm OTF" />

</LinearLayout>
訂閱:
留言 (Atom)


