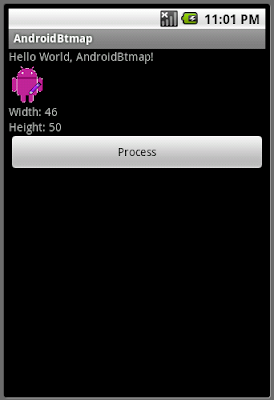
通過 Bitmap 類的 getPixels() 方法可以把 Bitmap 複製到一個整數矩陣. 每個元素對應 Bitmap 的一點. 而 32 bit 分別代表 alpha, 紅, 綠, 藍. 這樣我們便可以處理每個點. 本例子中, 每次用戶點擊按鈕, 便把圖像的紅, 綠, 藍迴轉一次(r->b, b->g, g->r), 然後利用 createBitmap() 和 setPixels() 方法創建新的 Bitmap.

<?xml version="1.0" encoding="utf-8"?>
<LinearLayout xmlns:android="http://schemas.android.com/apk/res/android"
    android:orientation="vertical"
    android:layout_width="fill_parent"
    android:layout_height="fill_parent"
    >
<TextView
    android:layout_width="fill_parent"
    android:layout_height="wrap_content"
    android:text="@string/hello"
    />
<ImageView
    android:id="@+id/myimage"
    android:layout_width="wrap_content"
    android:layout_height="wrap_content"
    />
<TextView
    android:id="@+id/myimagewidth"
    android:layout_width="fill_parent"
    android:layout_height="wrap_content"
    />
<TextView
    android:id="@+id/myimageheight"
    android:layout_width="fill_parent"
    android:layout_height="wrap_content"
    />
<Button
    android:id="@+id/process"
    android:layout_width="fill_parent"
    android:layout_height="wrap_content"
    android:text="Process"
    />
</LinearLayout>
package com.AndroidBtmap;

import android.app.Activity;
import android.graphics.Bitmap;
import android.graphics.BitmapFactory;
import android.os.Bundle;
import android.view.View;
import android.widget.Button;
import android.widget.ImageView;
import android.widget.TextView;

public class AndroidBtmap extends Activity {

 Bitmap bitmap;
 ImageView myImage;

    /** Called when the activity is first created. */
    @Override
    public void onCreate(Bundle savedInstanceState) {
        super.onCreate(savedInstanceState);
        setContentView(R.layout.main);

        myImage = (ImageView)findViewById(R.id.myimage);
        TextView myImageWidth = (TextView)findViewById(R.id.myimagewidth);
        TextView myImageHeight = (TextView)findViewById(R.id.myimageheight);
        Button buttonProcess = (Button)findViewById(R.id.process);

        bitmap = BitmapFactory.decodeResource(getResources(), R.drawable.androidbiancheng);
        int bitmapWidth  = bitmap.getWidth();
        int bitmapHeight = bitmap.getHeight();

        myImage.setImageBitmap(bitmap);
        myImageWidth.setText("Width: " + String.valueOf(bitmapWidth));
        myImageHeight.setText("Height: " + String.valueOf(bitmapHeight));

        buttonProcess.setOnClickListener(new Button.OnClickListener(){

   @Override
   public void onClick(View arg0) {
    // TODO Auto-generated method stub
    bitmap = doProcess(bitmap);
    myImage.setImageBitmap(bitmap);
    myImage.invalidate();


   }});
    }

    private Bitmap doProcess(Bitmap src){
     int bmWidth  = src.getWidth();
        int bmHeight = src.getHeight();
     int[] newBitmap = new int[bmWidth * bmHeight];

     src.getPixels(newBitmap, 0, bmWidth, 0, 0, bmWidth, bmHeight);

     for (int h = 0; h < bmHeight; h++){
      for (int w = 0; w < bmWidth; w++){
       int index = h * bmWidth + w;
       int alpha = newBitmap[index] & 0xff000000;
       int r = (newBitmap[index] >> 16) & 0xff;
       int g = (newBitmap[index] >> 8) & 0xff;
       int b = newBitmap[index] & 0xff;

       int t = r; //Swap the color
       r = g;
       g = b;
       b = t;

       newBitmap[index] = alpha | (r << 16) | (g << 8) | b;
      }
     }

     Bitmap bm = Bitmap.createBitmap(bmWidth, bmHeight, Bitmap.Config.ARGB_8888);
  bm.setPixels(newBitmap, 0, bmWidth, 0, 0, bmWidth, bmHeight);

  return bm;
    }
}
沒有留言:
發佈留言