2009年12月31日星期四

上下文菜單(ContextMenu)

Android的上下文菜單(ContextMenu)類似選項菜單(OptionsMenu), 上下文菜單可以註冊到任何視圖對象(View Object), 最常用在ListView的選項上. 當一個視圖註冊了一個上下文菜單(使用registerForContextMenu(View view)), 在該視圖對象上“長按”(按住約 2秒), 將顯示一個浮動的上下文菜單,提供有關該項目的相關功能.

ContextMenu

上下文菜單項不支持圖標或快捷鍵.

要創建一個上下文菜單, 必須重寫Activity的上下文菜單回調方法: onCreateContextMenu() 和 onContextItemSelected(). 在onCreateContextMenu()回調方法中, 可以使用add()方法添加單項, 或擴展一個XML定義的菜單資源(menu resource). 然後使用registerForContextMenu()將ContextMenu註冊到視圖上.

在這個例子中, 我們將註冊一個上下文菜單在整個屏幕上, 因此, 首先修改main.xml為整個LinearLayout添加一個id.
<?xml version="1.0" encoding="utf-8"?>
<LinearLayout xmlns:android="http://schemas.android.com/apk/res/android"
android:orientation="vertical"
android:layout_width="fill_parent"
android:layout_height="fill_parent"
android:id="@+id/wholeview"
>
<TextView
android:layout_width="fill_parent"
android:layout_height="wrap_content"
android:text="@string/hello"
/>
</LinearLayout>


然後修改主程序重寫onCreateContextMenu() 和 onContextItemSelected(), 並在onCreate()方法中把上下文菜單註冊到LinearLayout上.
package com.AndroidContextMenu;

import android.app.Activity;
import android.os.Bundle;
import android.view.ContextMenu;
import android.view.MenuItem;
import android.view.View;
import android.view.ContextMenu.ContextMenuInfo;
import android.widget.LinearLayout;
import android.widget.Toast;
import android.widget.AdapterView.AdapterContextMenuInfo;

public class AndroidContextMenu extends Activity {
/** Called when the activity is first created. */
@Override
public void onCreate(Bundle savedInstanceState) {
super.onCreate(savedInstanceState);
setContentView(R.layout.main);
LinearLayout wholeWiew = (LinearLayout)findViewById(R.id.wholeview);
registerForContextMenu(wholeWiew);
}

@Override
public boolean onContextItemSelected(MenuItem item) {
// TODO Auto-generated method stub
switch(item.getItemId()){
case 0:
Toast.makeText(this, "Option 0", Toast.LENGTH_LONG).show();
return true;
case 1:
Toast.makeText(this, "Option 1", Toast.LENGTH_LONG).show();
return true;
case 2:
Toast.makeText(this, "Option 2", Toast.LENGTH_LONG).show();
return true;
default:
return super.onContextItemSelected(item);
}


}

@Override
public void onCreateContextMenu(ContextMenu menu, View v,
ContextMenuInfo menuInfo) {
// TODO Auto-generated method stub
super.onCreateContextMenu(menu, v, menuInfo);
menu.add(0, 0, 0, "Option 0");
menu.add(0, 1, 0, "Option 1");
menu.add(0, 2, 0, "Option 2");
}
}


AlertDialog.Builder, 可能是創建對話框最簡單的方法.

AlertDialog.Builder是一個公共靜態類(public static class), 即是可以直接調用創建一個警告對話框(AlertDialog). 它可能是創建對話框最簡單的方法.

AlertDialog


new AlertDialog.Builder(this)
.setTitle("Title").setMessage("Message")
.setPositiveButton("OK",
new DialogInterface.OnClickListener() {
public void onClick(DialogInterface dialog, int which) {
}
}).show();


使用Menu.add(int groupId, int itemId, int order, CharSequence title)設定Options Menu

除了使用XML定義Options Menu外, OptionsMenu亦可以程式碼實現, 使用Menu.add(int groupId, int itemId, int order, CharSequence title)設定Options Menu.

Options Menu

修改主程序, 重寫onCreateOptionsMenu(Menu)和onOptionsItemSelected(MenuItem):

@Override
public boolean onCreateOptionsMenu(Menu menu) {
// TODO Auto-generated method stub
menu.add(0, 0, 0, "Option 0");
menu.add(0, 1, 1, "Option 1");
menu.add(0, 2, 2, "Option 2");
menu.add(0, 3, 3, "Option 3");
return true;
}

@Override
public boolean onOptionsItemSelected(MenuItem item) {
// TODO Auto-generated method stub
switch(item.getItemId()){
case (0):
break;
case (1):
break;
case (2):
break;
case (3):
break;
}
return true;
}


使用XML定義Options Menu(選項菜單)

Options Menu

首先創建一個文件夾, /res/menu

並創建一個新/res/menu/的menu.xml文件
<?xml version="1.0" encoding="UTF-8"?>
<menu xmlns:android="http://schemas.android.com/apk/res/android">
<item android:id="@+id/opt1"
android:title="Option 1" />
<item android:id="@+id/opt2"
android:title="Option 3" />
<item android:id="@+id/opt3"
android:title="Option 3" />
</menu>


修改主程序, 重寫onCreateOptionsMenu(Menu)和onOptionsItemSelected(MenuItem):
 @Override
public boolean onCreateOptionsMenu(Menu menu) {
// TODO Auto-generated method stub
MenuInflater menuInflater = getMenuInflater();
menuInflater.inflate(R.menu.menu, menu);
return true;
}

@Override
public boolean onOptionsItemSelected(MenuItem item) {
// TODO Auto-generated method stub
switch(item.getItemId()){
case (R.id.opt1):
break;
case (R.id.opt2):
break;
case (R.id.opt3):
break;
}
return true;
}


除了使用XML外, OptionsMenu亦可以程式碼實現, 使用Menu.add(int groupId, int itemId, int order, CharSequence title)設定Options Menu.


使用ImageButton.setImageResource加載圖像

上一篇文章闡釋了如何使用XML定義ImageButton, 亦可以使用程式碼實現類似的效果.


預先準備三個按鈕的圖像, 分別顯示normal, focused 和 pressed 三種狀態, 並且儲存到/res/drawable-mdpi/文件夾中.

normalfocusedpressed

修改佈局文件(/res/layout/main.xml)
<?xml version="1.0" encoding="utf-8"?>
<LinearLayout xmlns:android="http://schemas.android.com/apk/res/android"
android:orientation="vertical"
android:layout_width="fill_parent"
android:layout_height="fill_parent"
>
<TextView
android:layout_width="fill_parent"
android:layout_height="wrap_content"
android:text="@string/hello"
/>
<ImageButton
android:id="@+id/imagebutton"
android:layout_width="wrap_content"
android:layout_height="wrap_content"
android:background="@drawable/normal"
/>
</LinearLayout>


在主程序重寫setOnFocusChangeListener()和setOnClickListener(), 使用ImageButton.setImageResource加載圖像.
package com.AndroidImageButton;

import android.app.Activity;
import android.os.Bundle;
import android.view.View;
import android.widget.ImageButton;

public class AndroidImageButton extends Activity {

ImageButton imageButton;

/** Called when the activity is first created. */
@Override
public void onCreate(Bundle savedInstanceState) {
super.onCreate(savedInstanceState);
setContentView(R.layout.main);

imageButton = (ImageButton)findViewById(R.id.imagebutton);

imageButton.setOnClickListener(imageButtonOnClickListener);
imageButton.setOnFocusChangeListener(imageButtonOnFocusChangeListener);
}

private ImageButton.OnClickListener imageButtonOnClickListener
= new ImageButton.OnClickListener(){

@Override
public void onClick(View v) {
// TODO Auto-generated method stub
imageButton.setImageResource(R.drawable.pressed);
}

};

private ImageButton.OnFocusChangeListener imageButtonOnFocusChangeListener
= new ImageButton.OnFocusChangeListener(){

@Override
public void onFocusChange(View v, boolean hasFocus) {
// TODO Auto-generated method stub
if (hasFocus==true)
{
imageButton.setImageResource(R.drawable.focused);
}
else
{
imageButton.setImageResource(R.drawable.normal);
}
}

};
}

2009年12月30日星期三

如何使用XML定義ImageButton?

ImageButton這個名字意味著它是一個有圖像的按鈕, 而且可以在不同狀態(normal, focused and pressed)有不同圖像的按鈕.

Normal:
normal

Focused:
focused

Pressed:
pressed

預先準備三個按鈕的圖像, 分別顯示normal, focused 和 pressed 三種狀態, 並且儲存到/res/drawable-mdpi/文件夾中.

normalfocusedpressed

在/res/drawable-mdpi/文件夾中創建一個selector.xml文件
<?xml version="1.0" encoding="UTF-8"?>
<selector xmlns:android="http://schemas.android.com/apk/res/android">
<item
android:state_focused="true"
android:state_pressed="false"
android:drawable="@drawable/focused" />
<item
android:state_focused="true"
android:state_pressed="true"
android:drawable="@drawable/pressed" />
<item
android:state_focused="false"
android:state_pressed="true"
android:drawable="@drawable/pressed" />
<item
android:drawable="@drawable/normal" />
</selector>


修改佈局文件(/res/layout/main.xml)
<?xml version="1.0" encoding="utf-8"?>
<LinearLayout xmlns:android="http://schemas.android.com/apk/res/android"
android:orientation="vertical"
android:layout_width="fill_parent"
android:layout_height="fill_parent"
>
<TextView
android:layout_width="fill_parent"
android:layout_height="wrap_content"
android:text="@string/hello"
/>
<ImageButton
android:layout_width="wrap_content"
android:layout_height="wrap_content"
android:src="@drawable/selector"
/>
</LinearLayout>


除了使用XML, 亦可使用ImageButton.setImageResource加載圖像.


RelativeLayout (相對佈局)

RelativeLayout可讓子視圖根據他的父視圖或其他視圖指定本的相對位置. 因此, 可以根據各種條件對齊兩個元件; 例如: 右邊, 以下, 中間, 中間偏左...等等.

元件的表現是根據提出的次序, 所以如果使用XML來指定這個佈局, 被用作定位的元件必須在被參考前列出.

例子:


<?xml version="1.0" encoding="utf-8"?>
<RelativeLayout xmlns:android="http://schemas.android.com/apk/res/android"
android:layout_width="fill_parent"
android:layout_height="wrap_content"
>
<TextView android:id="@+id/label"
android:layout_width="fill_parent"
android:layout_height="wrap_content"
android:layout_marginTop="20px"
android:text="Type here:" />
<EditText android:id="@+id/entry"
android:layout_width="fill_parent"
android:layout_height="wrap_content"
android:layout_below="@id/label" />
<Button android:id="@+id/ok"
android:layout_width="wrap_content"
android:layout_height="wrap_content"
android:layout_below="@id/entry"
android:layout_alignParentRight="true"
android:layout_marginLeft="10px"
android:text="OK" />
<Button android:layout_width="wrap_content"
android:layout_height="wrap_content"
android:layout_toLeftOf="@id/ok"
android:layout_alignTop="@id/ok"
android:text="Cancel" />
<TextView
android:layout_width="wrap_content"
android:layout_height="wrap_content"
android:layout_alignParentBottom="true"
android:layout_centerInParent="true"
android:text="http://androidbiancheng.blogspot.com/" />
</RelativeLayout>


相關文章:
- 如何通過相對佈局(RelativeLayout)把多個圖像重疊放置於中央


2009年12月29日星期二

TableLayout (表格佈局)

TableLayout將子元素排成行和列. TableLayout容器不會顯示行, 列或單元格的邊界線. 表格(Table)可以留空單元格, 但單元格不能跨越列.

TableRow對象是TableLayout的子視圖(每個TableRow定義了一個表中的一行). 每一行具有零或多個單元格, 每個單元格被其他View定義. 所以, 一行中的單元格可以由多種視圖對象組成, 如ImageView或TextView對象. 一個單元格也可是ViewGroup對象(例如,您可以嵌套另一個 TableLayout作為一個單元格).


<?xml version="1.0" encoding="utf-8"?>
<TableLayout xmlns:android="http://schemas.android.com/apk/res/android"
android:layout_width="fill_parent"
android:layout_height="fill_parent"
>
<TextView
android:text="TableLayout"
/>
<TableRow>
<TextView
android:text="AAA"
android:background="#808080"
/>
<TextView
android:text="BBB"
android:background="#404040"
/>
</TableRow>

<TableRow>
<TextView
android:text="CCC"
android:background="#404040"
/>
<TextView
android:text="DDD"
android:background="#808080"
/>
<TextView
android:text="EEE"
android:background="#404040"
/>
</TableRow>
<TableRow>
<Button
android:layout_width="wrap_content"
android:layout_height="wrap_content"
android:text="A Button"
/>
</TableRow>
</TableLayout>


2009年12月28日星期一

LinearLayout (線性佈局)

LinearLayout將所有子元素根據orientation屬性的定義向垂直方向或水平方向排成直線. 所有子元素一個接一個地疊上, 所以一個垂直的列每行(row)只有一個子元素, 不管它有多寬; 一個橫向的列只有一行高(最高的子元素,加上填充(padding)). LinearLayout亦顧及每個子元素的邊沿(margin)和重力(gravity; 左, 中或右對齊).

例子:

LinearLayout

<?xml version="1.0" encoding="utf-8"?>
<LinearLayout xmlns:android="http://schemas.android.com/apk/res/android"
android:layout_width="fill_parent"
android:layout_height="wrap_content"
android:orientation="vertical"
android:background="#808080"
>
<TextView
android:layout_width="fill_parent"
android:layout_height="wrap_content"
android:text="It's a Vertical LinearLayout"
/>
<Button
android:layout_width="wrap_content"
android:layout_height="wrap_content"
android:text="Button 1"
/>
<Button
android:layout_width="wrap_content"
android:layout_height="wrap_content"
android:text="Button 2"
/>
<Button
android:layout_width="wrap_content"
android:layout_height="wrap_content"
android:text="Button 3"
/>
<LinearLayout
android:layout_width="fill_parent"
android:layout_height="wrap_content"
android:orientation="horizontal"
android:background="#404040"
>
<TextView
android:layout_width="wrap_content"
android:layout_height="wrap_content"
android:text="It's a Horizontal LinearLayout"
/>
<Button
android:layout_width="wrap_content"
android:layout_height="wrap_content"
android:text="A"
/>
<Button
android:layout_width="wrap_content"
android:layout_height="wrap_content"
android:text="B"
/>
<Button
android:layout_width="wrap_content"
android:layout_height="wrap_content"
android:text="C"
/>
</LinearLayout>
</LinearLayout>


FrameLayout (框佈局)

FrameLayout是最簡單的佈局對象. 它基本上是一個空白的屏幕, 你可以在以後填充一個對象 - 例如,換入和換出圖片. 所有放置在FrameLayout上是的子元素都會被放置在屏幕的左上角, 不能指定不同位置.

後加的子元素會被放置在以前的子元素上面, 部分或完全掩蓋他們(除非新的對象是透明的)。

看看這個例子:

FrameLayout

<?xml version="1.0" encoding="utf-8"?>
<FrameLayout xmlns:android="http://schemas.android.com/apk/res/android"
android:orientation="vertical"
android:layout_width="fill_parent"
android:layout_height="fill_parent"
>
<TextView
android:layout_width="wrap_content"
android:layout_height="wrap_content"
android:text="AAAAAAAAAAAAAAAAAA"
/>
<Button
android:layout_width="wrap_content"
android:layout_height="wrap_content"
android:text="Button"
/>
<TextView
android:layout_width="wrap_content"
android:layout_height="wrap_content"
android:text="CCCCCC"
/>
</FrameLayout>


2009年12月27日星期日

Layout (佈局)

Layout(佈局)是在某個Activity上的用戶界面的架構, 它定義佈局的結構,並包含所有用戶界面的元素. Layout可以有兩種聲明方式:

.使用XML方式: Android提供一個簡單的XML詞彙表對應View類和它的子類, 如那些widgets和layouts.

.在運行時實行: 可以在應用程序中以編程方式創建View和ViewGroup對象(和控制它們的屬性)編程.

在以後的文章中我將簡單介紹一些基本的layouts, 例如: FrameLayout, LinearLayout, TableLayout, RelativeLayout.

View & ViewGroup (視圖和視圖組)

View(視圖)是用戶界面的基本構建組件, 在屏幕上佔有矩形區域, 並負責屏幕繪製和事件處理. View是Widget(小工具)的基類. Widget是用於創建交互式UI組件(按鈕, 文本輸入等).

ViewGroup(視圖組)是View的子類, 是一個特殊的View, 它可包含其他View. ViewGroup是各種layouts(佈局)的基類, 而layouts是承載其他View(或其他ViewGroups)並規定其佈局屬性, 但本身是無形的容器.

[即是基本上,所有可以看到的UI組件都是View的子類, 而ViewGroup是負責組件的佈局.]

Google自家品牌, Nexus One!

傳說中最快明年(2010)一月可以推出市場, Google自家品牌的Android Phone, Nexus One.

Nexus One Google Phone (Images, Release Date, Specs etc.)

Leaked images of the new Nexus Google phone made by HTC,
Release date 5th January.
Capacative screen trackball, snapdragon they are all here !!!!
This is the HTC Passion/Dragon !!
Specifications:
(all these are confirmed)

1Ghz Snaprdragon processor

Accelerated OpenGLS graphic support

5mp camera

OLED display !!! (so nice)

Running android 2.1

Then everything else like bluetoot, wi fi etc.

2009年12月25日星期五

設置RadioGroup的背景顏色

延續早前的一篇文章, RadioGroup. 如果連續使用多過一組RadioGroup, 這是很難分辨某個RadioButton究竟屬於哪一組RadioGroup. 利用不同背景顏色是一個解決方案.


設置背景顏色可以使用下面的語句:
android:background="#rrggbb"

試試更改RadioGroup文章的佈局文件, 看看效果:
<?xml version="1.0" encoding="utf-8"?>
<LinearLayout xmlns:android="http://schemas.android.com/apk/res/android"
android:orientation="vertical"
android:layout_width="fill_parent"
android:layout_height="fill_parent"
>
<TextView
android:layout_width="fill_parent"
android:layout_height="wrap_content"
android:text="@string/hello"
/>
<RadioGroup
android:layout_width="fill_parent"
android:layout_height="wrap_content"
android:checkedButton="@+id/option1"
android:id="@+id/radiogrooup"
android:background="#808080"
>
<RadioButton
android:text="Option 1"
android:id="@+id/option1"
/>
<RadioButton
android:text="Option 2"
android:id="@+id/option2"
/>
<RadioButton
android:text="Option 3"
android:id="@+id/option3"
/>
<RadioButton
android:text="Option 4"
android:id="@+id/option4"
/>
</RadioGroup>
<RadioGroup
android:layout_width="fill_parent"
android:layout_height="wrap_content"
android:checkedButton="@+id/option1"
android:id="@+id/radiogrooup"
android:background="#008000"
>
<RadioButton
android:text="Option A"
android:id="@+id/optionA"
/>
<RadioButton
android:text="Option B"
android:id="@+id/optionB"
/>
<RadioButton
android:text="Option C"
android:id="@+id/optionC"
/>
</RadioGroup>
<Button
android:id="@+id/clear"
android:layout_width="wrap_content"
android:layout_height="wrap_content"
android:text="Clear"
/>
</LinearLayout>

Android上的Python

前一編已經介紹過Android Scripting Environment (ASE), 及安裝步驟. 現在試試使用Python編寫一個腳本語言的小程序.

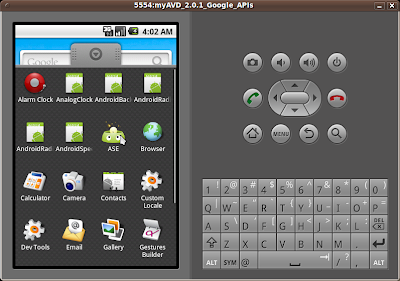
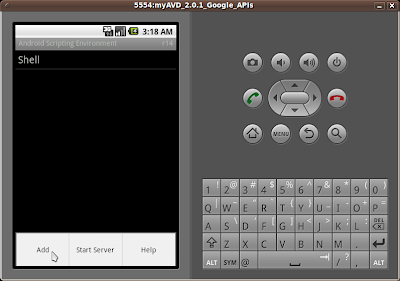
- 在Android模擬器的Application List上開啟ASE.
Start ASE

- 這時會列出已安裝的腳本程序範例, 我們將要創建一個新的程序. - 按MENU鍵, 選擇Add.
Add Script

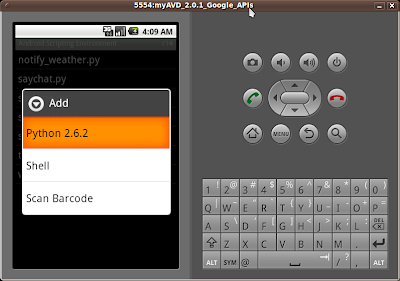
- 選擇Python 2.6.2
Select Python 2.6.2

- 輸入文件名, hellopython.py
hellopython.py

- 在原有程序碼中加入這句:
droid.makeToast("Hello Python")
Add program code

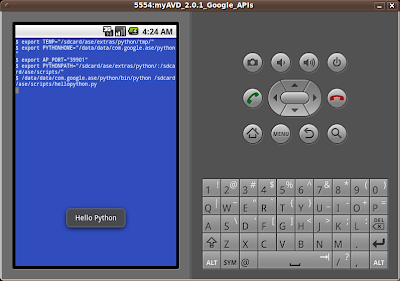
- 按MENU鍵, 選擇Save & Run
Save & Run

- 完成
Finished

Android Scripting Environment (ASE) - Android設備上的腳本語言

Android Scripting Environment (ASE) 使Android設備可以使用腳本語言. 用戶可以直接在Android上編輯和執行腳本, 使用大大簡化的界面存取許多成熟的API.

在Android模擬器上安裝Android Scripting Environment (ASE):

- 使用包含有SD Card的AVD開啟Android模擬器. (參考: 如何在Eclipse創建Android Virtual Devices(AVDs))

- 在Android模擬器的主屏幕上開啟Browser.

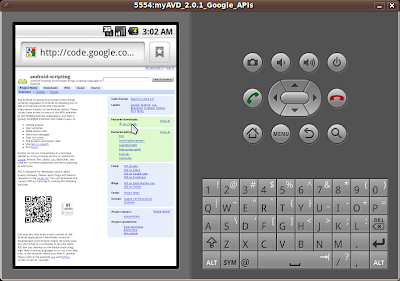
- 進入網站http://code.google.com/p/android-scripting/, 點擊右邊ase_r15.apk鏈結, 並下載. (或直接進入http://android-scripting.googlecode.com/files/ase_r15.apk下載)
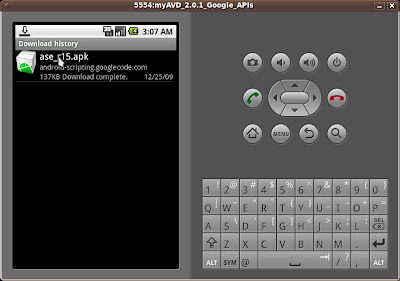
browse to the web site: android-scripting
- 點擊下載了的檔案, ase_r15.apk.
Download ase_r15.apk
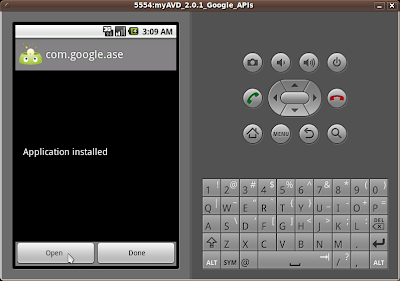
- 點擊Install.
Install ase_r15.apk
- 點擊Open
Open
- 點擊接受或拒絕
Accept or Refuse
- 按MENU鍵, 選擇Interpreters.
Interpreters
- 再按MENU鍵, 選擇Add.
Add Interpreters
- 選擇Python 2.6.2 (作為一個例子)
Add Python 2.6.2

Download Python 2.6.2
- Python已經安裝完成了.
Finished

在下一篇文章, Android上的Python, 我將演示使用Python編寫一個腳本語言的小程序.

2009年12月24日星期四

如何複製檔案到SD Card

Android SDK提供一個調試工具,Dalvik Debug Monitor Server (DDMS),它提供端口轉發服務(port-forwarding services),設備上的屏幕捕捉(screen capture on the device),線及堆(thread and heap)的信息,logcat,進程(process)和無線電狀態(radio state)信息,"扮"來電和短信(incoming call and SMS spoofing),"扮"位置數據(location data spoofing), 等等.

通過DDMS, 用戶可以複製檔案到Android設備或SD Card上, 也可以由Android設備或SD Card上複製檔案下來.

如何複製檔案到SD Card

- 首先預備一個包括有SD Card的Android Virtual Device(AVD).

- 開啟Eclipse, 以及Android 模擬器.

- 把Eclipse設定為DDMS的Perspective. 點擊 Window -> Open Perspective -> Other..., 選擇DDMS, 點擊 OK
Open Perspective

DDMS

- 左邊選擇emulator..., 右邊選擇File Explorer
File Explorer

- 右上角有兩個圖標, 您可以通過這兩個圖標"Pull a file from device"及"Push a file onto the device"
Pull a file from device及Push a file onto the device

如何在Eclipse創建Android Virtual Devices(AVDs)

Android Virtual Devices(AVDs)是Android Emulator的配置選項,讓你更好的模擬實際設備.

通過在Eclipse創建Android Virtual Devices(AVDs):

- 開啟Eclipse.
- 點擊 Window -> Android SDK And AVD Manager
點擊 Window -> Android SDK And AVD Manager

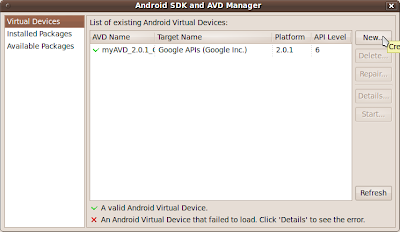
- 左邊選擇Virtual Devices, 點擊 New...
Android SDK And AVD Manager

- 設定Name, Target, SD Card(容量大小或檔案), Skin...等等. 再開啟Create AVD.
Create new AVD

- 等一下, 完成!
完成!

Cannot complete the install because one or more required items could not be found

有時當要在Eclipse之上安裝新功能(例如: Android SDK)時, 會出現類似"Cannot complete the install because one or more required items could not be found"的錯誤.

這是因為Eclipse是以Plug-ins的形式安裝新功能, 當要安裝的新功能需要另一些尚未安裝的功能, 這時Eclipse會根據"Available Software Sites"的設定搜索. 大多數都可以在"http://download.eclipse.org/releases/galileo"找到. 但可能"Available Software Sites"中未有加入"http://download.eclipse.org/releases/galileo", 便會出現類似的錯誤.

[假設你正在使用 Galileo!]

如何把"http://download.eclipse.org/releases/galileo"加進"Available Software Sites":

- 開啟Eclipse.
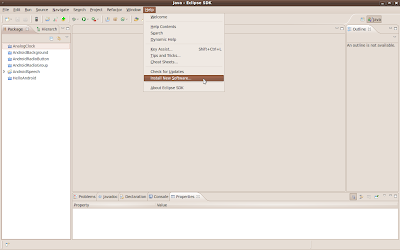
- 點擊 Help -> Install New Software...
Install New Software...

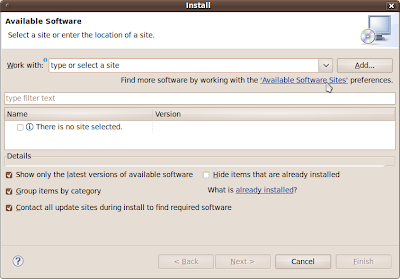
- 點擊 "Available Software Sites"
Install - Available Software

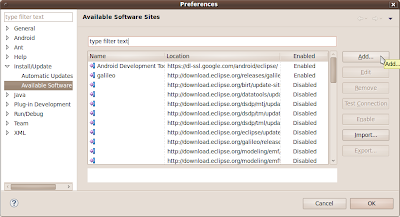
- 左邊選擇Available Software Sites, 檢查是否包括"http://download.eclipse.org/releases/galileo", 如果沒有, 點擊 Add.
Available Software Sites

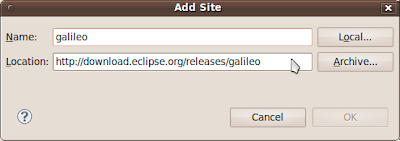
- 在"Name"輸入"galileo", 在"Location"輸入"http://download.eclipse.org/releases/galileo", 點擊 OK.
Add Site

究竟"Android"如何讀? Text-To-Speech (TTS)

很多人也不大清楚究竟"Android"應該如何讀? 最好由Android自己讀給你聽.

Text-To-Speech (TTS)

自從由Android version 1.6開始, 新增了一項語音合成功能, Text-To-Speech (TTS). 這項功能令Android設備能夠“說”出不同語言. 你也可以教Android自己讀"Android"給你聽.

根據以下設定創建一個Android Application, AndroidSpeech.
Project name: AndroidSpeech
Build Target: Google APIs/Platform 2.0 API/Level 5
Application name: AndroidSpeech
Package name: com.AndroidSpeech
Creative Activity: AndroidSpeech
Min SDK Version: 5
Create Android Applicatio: AndroidSpeech


並根據下面的例子修改佈局文件(/res/layout/main.xml)及主程序(AndroidSpeech.java).

main.xml

<?xml version="1.0" encoding="utf-8"?>
<LinearLayout xmlns:android="http://schemas.android.com/apk/res/android"
android:orientation="vertical"
android:layout_width="fill_parent"
android:layout_height="fill_parent"
>
<TextView
android:layout_width="fill_parent"
android:layout_height="wrap_content"
android:text="Android如何讀?"
/>
<Button
android:id="@+id/button"
android:layout_width="wrap_content"
android:layout_height="wrap_content"
android:text="機器人讀給你聽..."
/>
</LinearLayout>


AndroidSpeech.java

package com.AndroidSpeech;

import android.app.Activity;
import android.os.Bundle;
import android.speech.tts.TextToSpeech;
import android.speech.tts.TextToSpeech.OnInitListener;
import android.view.View;
import android.widget.Button;

public class AndroidSpeech extends Activity implements OnInitListener{

TextToSpeech TTS;

/** Called when the activity is first created. */
@Override
public void onCreate(Bundle savedInstanceState) {
super.onCreate(savedInstanceState);
setContentView(R.layout.main);

TTS = new TextToSpeech(this, this);

Button button = (Button)findViewById(R.id.button);
button.setOnClickListener(buttonOnClickListener);
}

private Button.OnClickListener buttonOnClickListener =
new Button.OnClickListener(){

public void onClick(View arg0) {
// TODO Auto-generated method stub
String textAndroid = "Android";
TTS.speak(textAndroid, TextToSpeech.QUEUE_ADD, null);
}

};

public void onInit(int arg0) {
// TODO Auto-generated method stub

}

@Override
protected void onDestroy() {
// TODO Auto-generated method stub
super.onDestroy();
TTS.shutdown();
}
}


相關文章: An introduction to Text-To-Speech in Android
相關文章: 檢查語音合成功能, Text-To-Speech (TTS)
相關文章: 為Android詞典加入英語發聲功能