即時編譯(Just-in-time Compilation,JIT),又稱動態轉譯(Dynamic Translation),是一種通過在運行時將位元組碼翻譯為機器碼,從而改善位元組碼編譯語言性能的技術。即時編譯前期的兩個運行時理論是位元組碼編譯和動態編譯。
在編譯為位元組碼的系統如 Limb 程式語言,Smalltalk,UCSD P-System, Perl,GNU CLISP,和 Java 的早期版本中, 原始碼被翻譯為一種中間表示即位元組碼。 位元組碼不是任何特定計算機的機器碼, 它可以在多種計算機體系中移植。 位元組碼被解釋著運行在虛擬機里。
動態編譯環境是一種在執行時使用編譯器的編譯環境。 例如, 多數 Common Lisp 系統有一個編譯函數,他可以編譯在運行時創建的函數。
在即時編譯環境下, 位元組碼的編譯是第一步, 它將原始碼遞歸到可移植和可優化的中間表示。位元組碼被部署到目標系統。 當執行代碼時,運行時環境的編譯器將位元組碼翻譯為本地機器碼。 基於每個文件或每個函數:函數僅僅在他們要被執行時才會被編譯。
目標是要組合利用本地和位元組碼編譯的多種優勢:多數重量級的任務如原始碼解析和基本性能的優化在編譯時處理,將位元組碼編譯為機器碼比起從原始碼編譯為機器碼要快得多。部署位元組碼是可移植的,而機器碼只限於特定的系統結構。 從位元組碼到機器碼編譯器的實現更容易,因為大部分工作已經在實現位元組碼編譯器時完成。 ~ 維基百科
Android最新的Dalvik VM便加入了Just In Time (JIT)編譯器. ~ Android Developers Blog: Dalvik JIT
2010年5月27日星期四
2010年5月26日星期三
獲取已安裝軟件包(InstalledPackages)及其活動(Activity)的信息.
跟上一篇文章"Android 的功能編號(feature ID), PackageManager 和 getSystemAvailableFeatures()"差不多, 這個程序也是通過PackageManager獲得一些系統信息: 已安裝軟件包(InstalledPackages)及其活動(Activity).
首先程序會調用PackageManager.getInstalledPackages()獲取已安裝軟件包的信息, 並以列表視圖(ListView)形式顯示, 當點擊任何軟件包時, 會再以列表視圖(ListView)顯示其活動(Activity), 再當點擊任何活動時, 會以Toast顯示其名稱.


另一值得注意的是本程序只有一個列表活動(ListActivity), 一個列表視圖(ListView), 但有機會應用到兩個適配器上; 這可以在onListItemClick()中檢查ListView.getAdapter()從而辨認現在所使用的適配器.
main.xml
AndroidInstalledPackages.java
首先程序會調用PackageManager.getInstalledPackages()獲取已安裝軟件包的信息, 並以列表視圖(ListView)形式顯示, 當點擊任何軟件包時, 會再以列表視圖(ListView)顯示其活動(Activity), 再當點擊任何活動時, 會以Toast顯示其名稱.


另一值得注意的是本程序只有一個列表活動(ListActivity), 一個列表視圖(ListView), 但有機會應用到兩個適配器上; 這可以在onListItemClick()中檢查ListView.getAdapter()從而辨認現在所使用的適配器.
main.xml
<?xml version="1.0" encoding="utf-8"?>
<LinearLayout xmlns:android="http://schemas.android.com/apk/res/android"
  android:orientation="vertical"
  android:layout_width="fill_parent"
  android:layout_height="fill_parent"
  >
<TextView
 android:id="@+id/currentview"
  android:layout_width="fill_parent"
  android:layout_height="wrap_content"
  />
<Button
 android:id="@+id/reload"
 android:layout_width="fill_parent"
 android:layout_height="wrap_content"
 android:text="Reload InstalledPackages"
 />
<ListView
android:id="@android:id/list"
android:layout_width="fill_parent"
android:layout_height="wrap_content" />
<TextView
android:id="@android:id/empty"
android:layout_width="fill_parent"
android:layout_height="wrap_content"
android:text="No Data" />
</LinearLayout>
AndroidInstalledPackages.java
package com.AndroidInstalledPackages;

import java.util.List;

import android.app.ListActivity;
import android.content.pm.ActivityInfo;
import android.content.pm.PackageInfo;
import android.content.pm.PackageManager;
import android.os.Bundle;
import android.view.View;
import android.widget.ArrayAdapter;
import android.widget.Button;
import android.widget.ListView;
import android.widget.TextView;
import android.widget.Toast;

public class AndroidInstalledPackages extends ListActivity {

 List<PackageInfo> PackageInfoList;
 ArrayAdapter<PackageInfo> PackageArrayAdapter;
 ActivityInfo[] ActivityInfoArray;
 ArrayAdapter<ActivityInfo> ActivityInfoAdapter;

 TextView currentView;
 Button buttonReload;

   /** Called when the activity is first created. */
   @Override
   public void onCreate(Bundle savedInstanceState) {
       super.onCreate(savedInstanceState);
       setContentView(R.layout.main);
       currentView = (TextView)findViewById(R.id.currentview);
       buttonReload = (Button)findViewById(R.id.reload);

       loadPackageInfoList();

       buttonReload.setOnClickListener( new Button.OnClickListener(){

   @Override
   public void onClick(View v) {
    // TODO Auto-generated method stub
    loadPackageInfoList();
   }
       });

   }

   private void loadPackageInfoList(){
    PackageInfoList = getPackageManager().getInstalledPackages(PackageManager.GET_ACTIVITIES);
       PackageArrayAdapter = new ArrayAdapter<PackageInfo>(this, R.layout.list, PackageInfoList);
       setListAdapter(PackageArrayAdapter);

       currentView.setText("getInstalledPackages");
       buttonReload.setEnabled(false);
   }

 @Override
 protected void onListItemClick(ListView l, View v, int position, long id) {
  // TODO Auto-generated method stub
  //super.onListItemClick(l, v, position, id);

  if (l.getAdapter()==PackageArrayAdapter){
   ActivityInfoArray = PackageInfoList.get(position).activities;
   if (ActivityInfoArray!=null)
   {
    ActivityInfoAdapter = new ArrayAdapter<ActivityInfo>(this, R.layout.list, ActivityInfoArray);
    setListAdapter(ActivityInfoAdapter);

          currentView.setText("activities");
          buttonReload.setEnabled(true);
   }
   else{
    Toast.makeText(this, "Empty", Toast.LENGTH_LONG).show();
   }
  }
  else{
   CharSequence info = ActivityInfoArray[position].name;
   Toast.makeText(this, info, Toast.LENGTH_LONG).show();
  }

 }

}
2010年5月25日星期二
Android的功能編號(feature ID), PackageManager 和 getSystemAvailableFeatures()
Android支持很多的硬件和軟件功能。例子如包括羅盤(compass)和加速度(accelerometer)傳感器, 相機(camera), 和Live Wallpapers. 不過, 並非每個設備都支持所有功能. Android定義了功能標識(feature IDs). 每個功能Android平台都定義了一個相應的功能編號(feature ID). 例如, 羅盤的feature ID為"android.hardware.sensor.compass",而Live Wallpapers的feature ID"android.software.live_wallpapers".
在PackageManager類中, 每個這些ID也有一個相應的Java-語言的常數, 可以在運行時使查詢是否支持這些功能.
getSystemAvailableFeatures()方法可獲取在系統上功能的列表.
但是,這個程序在模擬器運行時, 總是只可以找到"android.harware.camera"和"android.harware.camera.autofocus". 筆者也不清楚! 希望各位能指出原因, Thx:)

/res/layout/featurelist.xml
/res/layout/main
AndroidFeatureList.java
相關文章: 獲取已安裝軟件包(InstalledPackages)及其活動(Activity)的信息
在PackageManager類中, 每個這些ID也有一個相應的Java-語言的常數, 可以在運行時使查詢是否支持這些功能.
getSystemAvailableFeatures()方法可獲取在系統上功能的列表.
但是,這個程序在模擬器運行時, 總是只可以找到"android.harware.camera"和"android.harware.camera.autofocus". 筆者也不清楚! 希望各位能指出原因, Thx:)

/res/layout/featurelist.xml
<?xml version="1.0" encoding="utf-8"?>
<TextView
 xmlns:android="http://schemas.android.com/apk/res/android"
 android:id="@+id/rowtext"
 android:layout_width="fill_parent"
 android:layout_height="40px"
 android:textSize="15sp" />
/res/layout/main
<?xml version="1.0" encoding="utf-8"?>
<LinearLayout xmlns:android="http://schemas.android.com/apk/res/android"
   android:orientation="vertical"
   android:layout_width="fill_parent"
   android:layout_height="fill_parent"
   >
<TextView
   android:layout_width="fill_parent"
   android:layout_height="wrap_content"
   android:text="@string/hello"
   />
<ListView
 android:id="@android:id/list"
 android:layout_width="fill_parent"
 android:layout_height="wrap_content" />
<TextView
 android:id="@android:id/empty"
 android:layout_width="fill_parent"
 android:layout_height="wrap_content"
 android:text="No Data" />
</LinearLayout>
AndroidFeatureList.java
package com.AndroidFeatureList;

import android.app.ListActivity;
import android.content.pm.FeatureInfo;
import android.os.Bundle;
import android.widget.ArrayAdapter;

public class AndroidFeatureList extends ListActivity {
    /** Called when the activity is first created. */
    @Override
    public void onCreate(Bundle savedInstanceState) {
        super.onCreate(savedInstanceState);
        setContentView(R.layout.main);

        FeatureInfo[] myFeatureInfo = getPackageManager().getSystemAvailableFeatures();
        ArrayAdapter<FeatureInfo> itemList = new ArrayAdapter<FeatureInfo>(this, R.layout.featurelist, myFeatureInfo);

        setListAdapter(itemList);
    }
}
相關文章: 獲取已安裝軟件包(InstalledPackages)及其活動(Activity)的信息
Android 2.2 ("Froyo")新的錯誤報告功能
在即將發布的Android將包括一個新的錯誤報告功能, 以支援Android Market的應用程序.
當一個應用程序凍結或停止響應,用戶只需要直接從手機上點擊一個按鈕便可以發送一個錯誤報告給開發人員. 新的按鈕出現在應用程序錯誤對話框, 如果用戶選擇點擊它,Android設備上的谷歌反饋客戶端將分析衝撞的應用程序, 和撰寫包括作出診斷需要的信息的錯誤報告. 該系統是建立在與用戶的隱私 - 應用程序開發者將不會收到任何可以識別用戶的資料。用戶還可以預覽所有將被發送信息.
當開發者登錄到自己的Android Market的出版者帳戶, 便可以看到該報告. 再沒有更多的盲目的調試!
來源: Android Developers Blog: Android Application Error Reports: "Android 2.2 ('Froyo')"
2010年5月24日星期一
Adobe Flash Player 10.1 beta for Android 2.2現在已經可以下載!
Adobe Flash Player 10.1 beta for Android 2.2 現在可以在Android Market下載, 支援Google Nexus One和其他 Android 2.2的設備, 讓你的Android可以完全訪問包括視頻, 遊戲, 互動媒體和網絡應用程序的網站.
你的Android設備必須運行的Android 2.2, 才能夠從Android Market發現, 下載並安裝Flash Player 10.1測試版. 使用Android 2.2設備訪問以下鏈接: Download Flash Player 10.1 beta for Android: http://www.adobe.com/go/getfp10android
來源: Flash Player 10.1 for Android
你的Android設備必須運行的Android 2.2, 才能夠從Android Market發現, 下載並安裝Flash Player 10.1測試版. 使用Android 2.2設備訪問以下鏈接: Download Flash Player 10.1 beta for Android: http://www.adobe.com/go/getfp10android
來源: Flash Player 10.1 for Android
2010年5月23日星期日
要強制重繪View,調用invalidate()
本例子會在onTouchEvent()之內處理ACTION_UP, ACTION_DOWN 和 ACTION_MOVE 事件. 當用戶觸摸(ACTION_MOVE)或移動(ACTION_DOWN), R.drawable.icon會顯示和跟隨移動. 這是通過event.getX()和event.getY()獲得事件位置, 然後通過調用invalidate()強制重繪View.

繼續使用上一篇文章"處理自定義視圖的事件(Event)"的程序代碼, 修改MyView.java

繼續使用上一篇文章"處理自定義視圖的事件(Event)"的程序代碼, 修改MyView.java
package com.AndroidView;

import android.content.Context;
import android.graphics.Bitmap;
import android.graphics.BitmapFactory;
import android.graphics.Canvas;
import android.graphics.Color;
import android.graphics.Paint;
import android.util.AttributeSet;
import android.view.MotionEvent;
import android.view.View;
import android.widget.Toast;

public class MyView extends View {

 private Paint myPaint = new Paint(Paint.ANTI_ALIAS_FLAG);
 private Context myContext;
 Bitmap myBitmap;

 private int locX, locY;
 private int offX, offY;
 private boolean showImage = false;

 public MyView(Context context) {
  super(context);
  // TODO Auto-generated constructor stub
  init(context);
 }

 public MyView(Context context, AttributeSet attrs) {
  super(context, attrs);
  // TODO Auto-generated constructor stub
  init(context);
 }

 public MyView(Context context, AttributeSet attrs, int defStyle) {
  super(context, attrs, defStyle);
  // TODO Auto-generated constructor stub
  init(context);
 }

 private void init(Context context){
  myContext = context;
  myBitmap = BitmapFactory.decodeResource(getResources(), R.drawable.icon);
  offX = myBitmap.getWidth()/2;
  offY = myBitmap.getHeight()/2;
 }

 @Override
 protected void onMeasure(int widthMeasureSpec, int heightMeasureSpec) {
  // TODO Auto-generated method stub
  //super.onMeasure(widthMeasureSpec, heightMeasureSpec);

  setMeasuredDimension(MeasureSpec.getSize(widthMeasureSpec),
    MeasureSpec.getSize(heightMeasureSpec));
 }

 @Override
 protected void onDraw(Canvas canvas) {
  // TODO Auto-generated method stub
  //super.onDraw(canvas);

  if (showImage){
   canvas.drawColor(Color.BLACK);
   canvas.drawBitmap(myBitmap, locX-offX, locY-offY, null);
  }
 }

 @Override
 public boolean onTouchEvent(MotionEvent event) {
  // TODO Auto-generated method stub

  int action = event.getAction();

  if ((action == MotionEvent.ACTION_DOWN)||
    (action == MotionEvent.ACTION_MOVE)){
   locX = (int)event.getX();
   locY = (int)event.getY();
   showImage = true;
   invalidate();
  }
  else if (action == MotionEvent.ACTION_UP){
   showImage = false;
   invalidate();
  }


  return true;
 }

}
2010年5月22日星期六
處理自定義視圖的事件(Event)
延伸前兩次文章"建立自定義視圖(Custom View)"和"通過XML調用自定義視圖(Custom View)", 本文示範如何處理自定義視圖的事件.

- 修改自定義視圖類, MyView.java, 重寫onTouchEvent(MotionEvent event)方法.
next: 要強制重繪View,調用invalidate()

- 修改自定義視圖類, MyView.java, 重寫onTouchEvent(MotionEvent event)方法.
package com.AndroidView;

import android.content.Context;
import android.graphics.Canvas;
import android.graphics.Color;
import android.graphics.Paint;
import android.util.AttributeSet;
import android.view.MotionEvent;
import android.view.View;
import android.widget.Toast;

public class MyView extends View {

private Paint myPaint = new Paint(Paint.ANTI_ALIAS_FLAG);
private Context myContext;

public MyView(Context context) {
 super(context);
 // TODO Auto-generated constructor stub
 myContext = context;
}

public MyView(Context context, AttributeSet attrs) {
 super(context, attrs);
 // TODO Auto-generated constructor stub
 myContext = context;
}

public MyView(Context context, AttributeSet attrs, int defStyle) {
 super(context, attrs, defStyle);
 // TODO Auto-generated constructor stub
 myContext = context;
}

@Override
protected void onMeasure(int widthMeasureSpec, int heightMeasureSpec) {
 // TODO Auto-generated method stub
 //super.onMeasure(widthMeasureSpec, heightMeasureSpec);

 setMeasuredDimension(MeasureSpec.getSize(widthMeasureSpec),
   MeasureSpec.getSize(heightMeasureSpec));
}

@Override
protected void onDraw(Canvas canvas) {
 // TODO Auto-generated method stub
 //super.onDraw(canvas);

 int radius;
 int height = getMeasuredHeight();
 int width = getMeasuredWidth();
 int centerX = width/2;
 int centerY = height/2;

 if (height>width){
  radius = width/2;
 }
 else{
  radius = height/2;
 }

 myPaint.setStyle(Paint.Style.STROKE);
 myPaint.setColor(Color.WHITE);

 myPaint.setStrokeWidth(1);
 canvas.drawLine(centerX, centerY-10, centerX, centerY+10, myPaint);
 canvas.drawLine(centerX-10, centerY, centerX+10, centerY, myPaint);

 myPaint.setStrokeWidth(10);
 myPaint.setColor(Color.RED);
 canvas.drawRect(0, 0, width, height, myPaint);

 myPaint.setStrokeWidth(3);
 myPaint.setColor(Color.GREEN);


 canvas.drawCircle(centerX, centerY, radius, myPaint);
}

@Override
public boolean onTouchEvent(MotionEvent event) {
 // TODO Auto-generated method stub

 int action = event.getAction();

 if (action == MotionEvent.ACTION_DOWN){
  Toast.makeText(myContext, "ACTION_DOWN", Toast.LENGTH_LONG).show();
 }
 else if (action == MotionEvent.ACTION_UP){
  Toast.makeText(myContext, "ACTION_UP", Toast.LENGTH_LONG).show();
 }

 return true;
}

}
next: 要強制重繪View,調用invalidate()
2010年5月21日星期五
通過XML調用自定義視圖(Custom View)
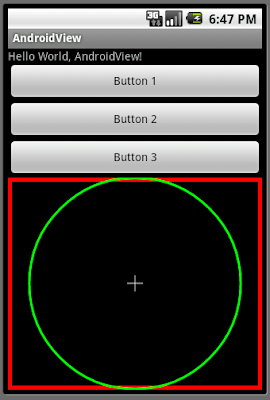
前文"建立自定義視圖(Custom View)"通過程序代碼setContentView(myView)調用自定義視圖. 現在看看如何通過XML調用自定義視圖.

- 繼續使用使用前文的MyView Class, 不需修改.
- 修改佈局文件main.xml
添加三個虛設的按鍵, 和一個自定義視圖.
- 修改onCreate()方法, 使用main設定佈局.
next: 處理自定義視圖的事件(Event)

- 繼續使用使用前文的MyView Class, 不需修改.
- 修改佈局文件main.xml
添加三個虛設的按鍵, 和一個自定義視圖.
<?xml version="1.0" encoding="utf-8"?>
<LinearLayout xmlns:android="http://schemas.android.com/apk/res/android"
  android:orientation="vertical"
  android:layout_width="fill_parent"
  android:layout_height="fill_parent"
  >
<TextView
  android:layout_width="fill_parent"
  android:layout_height="wrap_content"
  android:text="@string/hello"
  />
<Button
  android:layout_width="fill_parent"
  android:layout_height="wrap_content"
  android:text="Button 1"
  />
<Button
  android:layout_width="fill_parent"
  android:layout_height="wrap_content"
  android:text="Button 2"
  />
<Button
  android:layout_width="fill_parent"
  android:layout_height="wrap_content"
  android:text="Button 3"
  />
<view
class="com.AndroidView.MyView"
  android:layout_width="fill_parent"
  android:layout_height="fill_parent"
/>
</LinearLayout>
- 修改onCreate()方法, 使用main設定佈局.
    public void onCreate(Bundle savedInstanceState) {
      super.onCreate(savedInstanceState);
      setContentView(R.layout.main);

      //MyView myView = new MyView(this);
      //setContentView(myView);
  }
next: 處理自定義視圖的事件(Event)
對應Android 2.2的android-sdk_r06已供下載.
Android剛剛發佈SDK Tools, Revision 6版本, 對應Android 2.2. 可以從Android Developers網站下載.
安裝程序可以參考另一篇文章"在 Linux(ubuntu)上安裝Eclipse + Android SDK"
如果你已經安裝了Android 1.6 SDK或更高版本, 可以使 用Android SDK and AVD Manager升級Android SDK, 不需要重新安裝.
Android 2.2 Official Video
安裝程序可以參考另一篇文章"在 Linux(ubuntu)上安裝Eclipse + Android SDK"
如果你已經安裝了Android 1.6 SDK或更高版本, 可以使 用Android SDK and AVD Manager升級Android SDK, 不需要重新安裝.
Android 2.2 Official Video
建立自定義視圖(Custom View)
在Android, 你可以擴展視圖類(View), 從而建立自定義的視圖類.

- 首先, 擴展View定義新類:
public class MyView extends View
- 重寫構造函數:
public MyView(Context context)
public MyView(Context context, AttributeSet attrs)
public MyView(Context context, AttributeSet attrs, int defStyle)
- 重寫protected void onMeasure(int widthMeasureSpec, int heightMeasureSpec)
必須重寫此方法, 調用setMeasuredDimension(int, int)方法設定measuredWith和measuredHeight.
簡單起見, 本例子只使用下面的代碼設定measuredWith和measuredHeight:
setMeasuredDimension(MeasureSpec.getSize(widthMeasureSpec), MeasureSpec.getSize(heightMeasureSpec));
- 重寫protected void onDraw(Canvas canvas)
這裡是你實際繪製你的視圖的代碼.
- 在public void onCreate(Bundle savedInstanceState)設置使用你的自定義視圖.
MyView myView = new MyView(this);
setContentView(myView);
MyView.java
AndroidView.java
next: 通過XML調用自定義視圖(Custom View)

- 首先, 擴展View定義新類:
public class MyView extends View
- 重寫構造函數:
public MyView(Context context)
public MyView(Context context, AttributeSet attrs)
public MyView(Context context, AttributeSet attrs, int defStyle)
- 重寫protected void onMeasure(int widthMeasureSpec, int heightMeasureSpec)
必須重寫此方法, 調用setMeasuredDimension(int, int)方法設定measuredWith和measuredHeight.
簡單起見, 本例子只使用下面的代碼設定measuredWith和measuredHeight:
setMeasuredDimension(MeasureSpec.getSize(widthMeasureSpec), MeasureSpec.getSize(heightMeasureSpec));
- 重寫protected void onDraw(Canvas canvas)
這裡是你實際繪製你的視圖的代碼.
- 在public void onCreate(Bundle savedInstanceState)設置使用你的自定義視圖.
MyView myView = new MyView(this);
setContentView(myView);
MyView.java
package com.AndroidView;

import android.content.Context;
import android.graphics.Canvas;
import android.graphics.Color;
import android.graphics.Paint;
import android.util.AttributeSet;
import android.view.View;

public class MyView extends View {

 private Paint myPaint = new Paint(Paint.ANTI_ALIAS_FLAG);

 public MyView(Context context) {
  super(context);
  // TODO Auto-generated constructor stub
 }

 public MyView(Context context, AttributeSet attrs) {
  super(context, attrs);
  // TODO Auto-generated constructor stub
 }

 public MyView(Context context, AttributeSet attrs, int defStyle) {
  super(context, attrs, defStyle);
  // TODO Auto-generated constructor stub
 }

 @Override
 protected void onMeasure(int widthMeasureSpec, int heightMeasureSpec) {
  // TODO Auto-generated method stub
  //super.onMeasure(widthMeasureSpec, heightMeasureSpec);

  setMeasuredDimension(MeasureSpec.getSize(widthMeasureSpec),
    MeasureSpec.getSize(heightMeasureSpec));
 }

 @Override
 protected void onDraw(Canvas canvas) {
  // TODO Auto-generated method stub
  //super.onDraw(canvas);

  int radius;
  int height = getMeasuredHeight();
  int width = getMeasuredWidth();
  int centerX = width/2;
  int centerY = height/2;

  if (height>width){
   radius = width/2;
  }
  else{
   radius = height/2;
  }

  myPaint.setStyle(Paint.Style.STROKE);
  myPaint.setColor(Color.WHITE);

  myPaint.setStrokeWidth(1);
  canvas.drawLine(centerX, centerY-10, centerX, centerY+10, myPaint);
  canvas.drawLine(centerX-10, centerY, centerX+10, centerY, myPaint);

  myPaint.setStrokeWidth(10);
  myPaint.setColor(Color.RED);
  canvas.drawRect(0, 0, width, height, myPaint);

  myPaint.setStrokeWidth(3);
  myPaint.setColor(Color.GREEN);


  canvas.drawCircle(centerX, centerY, radius, myPaint);
 }

}
AndroidView.java
package com.AndroidView;

import android.app.Activity;
import android.os.Bundle;

public class AndroidView extends Activity {
   /** Called when the activity is first created. */
   @Override
   public void onCreate(Bundle savedInstanceState) {
       super.onCreate(savedInstanceState);
       //setContentView(R.layout.main);

       MyView myView = new MyView(this);
       setContentView(myView);
   }
}
next: 通過XML調用自定義視圖(Custom View)
2010年5月19日星期三
Twitter for Android: Google的示範
Google建立了一個Android的示例應用程序, Twitter for Android,以展示UI功能和行為模式的最佳做法, 來幫助第三方開發者創建更豐富的應用. Twitter for Android是Google與Twitter合作的工作的例子, 怎樣可以自定義和如何構建一個既有趣,功能強大的應用程序. 這個博客帖展示了這些模式的實現以及一些建議.
這個應用程序, Twitter for Android, 很快會在Android開源項目(Android Open Source Project)下開源應用程序代碼.
Twitter for Android可在Android Market即時下載, 兼容Android 2.1/2.0, 即將推出更多的支持.
來源: Android Developers Blog: Twitter for Android: A closer look at Android’s evolving UI patterns: "Twitter for Android is available in Android Market for immediate download. It is compatible with Android 2.1/2.0 devices, with support coming soon for more."
浮動窗口(Floating Window), android:theme="@android:style/Theme.Dialog"
一般來說, 一個活動(Activity)會分配一個全屏幕, 但亦可以浮動窗口(Floating Window)形式顯示. 只需要在AndroidManifest.xml中把activity的android:theme設置為"@android:style/Theme.Dialog"即可.

AndroidManifest.xml

AndroidManifest.xml
<?xml version="1.0" encoding="utf-8"?>
<manifest xmlns:android="http://schemas.android.com/apk/res/android"
      package="com.AndroidFloatingWindow"
      android:versionCode="1"
      android:versionName="1.0">
    <application android:icon="@drawable/icon" android:label="@string/app_name">
        <activity android:name=".AndroidFloatingWindow"
                  android:label="@string/app_name"
                  android:theme="@android:style/Theme.Dialog"
                  >
            <intent-filter>
                <action android:name="android.intent.action.MAIN" />
                <category android:name="android.intent.category.LAUNCHER" />
            </intent-filter>
        </activity>

    </application>
    <uses-sdk android:minSdkVersion="4" />

</manifest>
2010年5月12日星期三
關於pseudo-random
如果你運行前文的"Android 的隨機數字產生器", 你會發現若你選擇Random(long seed), 與及使用相同的seek, 其所產生的數字是相同的. 這是因為該應用程序每次只產生第一個生成的數字, 而所謂pseudo-random並不是真正的隨機, 而是按照一定的算法產生類似隨機的數字.
接下來, 改動一下代碼, 將有更明確的理解. 這裡有兩個Activity, 第一個AndroidRandom選擇constructor和seek, 第二個RunRandom從而建構一個隨機數字產生器, 如果繼續點擊便會繼續產生下一個隨機數字.


main.xml
AndroidRandom.java
runrandom.xml
RunRandom.java
AndroidManifest.xml
接下來, 改動一下代碼, 將有更明確的理解. 這裡有兩個Activity, 第一個AndroidRandom選擇constructor和seek, 第二個RunRandom從而建構一個隨機數字產生器, 如果繼續點擊便會繼續產生下一個隨機數字.


main.xml
<?xml version="1.0" encoding="utf-8"?>
<LinearLayout xmlns:android="http://schemas.android.com/apk/res/android"
    android:orientation="vertical"
    android:layout_width="fill_parent"
    android:layout_height="fill_parent"
    >
<TextView
    android:layout_width="fill_parent"
    android:layout_height="wrap_content"
    android:text="@string/hello"
    />
<RadioGroup
 android:layout_width="fill_parent"
 android:layout_height="wrap_content"
 android:checkedButton="@+id/milliseconds"
 android:id="@+id/contructor" >
<RadioButton
 android:text="Random()"
 android:id="@+id/milliseconds" />
<RadioButton
 android:text="Random(long seed)"
 android:id="@+id/seed" />
</RadioGroup>
<EditText
   android:layout_width="fill_parent"
   android:layout_height="wrap_content"
   android:inputType="number"
   android:id="@+id/seeknumber"
 />
<Button
   android:layout_width="fill_parent"
   android:layout_height="wrap_content"
   android:text="Construct a Random Generate"
   android:id="@+id/construct"
 />
</LinearLayout>
AndroidRandom.java
package com.AndroidRandom;

import java.util.Random;

import android.app.Activity;
import android.content.Intent;
import android.os.Bundle;
import android.view.View;
import android.widget.Button;
import android.widget.EditText;
import android.widget.RadioButton;
import android.widget.TextView;

public class AndroidRandom extends Activity {

    RadioButton rbRandomMilliseconds, rbRandomSeek;
    EditText etSeekNumber;
    Button buttonConstruct;

    /** Called when the activity is first created. */
    @Override
    public void onCreate(Bundle savedInstanceState) {
        super.onCreate(savedInstanceState);
        setContentView(R.layout.main);

        rbRandomMilliseconds = (RadioButton)findViewById(R.id.milliseconds);
        rbRandomSeek = (RadioButton)findViewById(R.id.seed);
        etSeekNumber = (EditText)findViewById(R.id.seeknumber);
        buttonConstruct = (Button)findViewById(R.id.construct);

        buttonConstruct.setOnClickListener(buttonConstructOnClickListener);
    }

    private Button.OnClickListener buttonConstructOnClickListener
     = new Button.OnClickListener(){

   @Override
   public void onClick(View v) {

    String strTypeOfConstructor, strInitSeek;

    // TODO Auto-generated method stub
    if (rbRandomMilliseconds.isChecked()){
     strTypeOfConstructor = "RandomMilliseconds";
    }
    else{
     strTypeOfConstructor = "RandomSeek";
    }

    strInitSeek = etSeekNumber.getText().toString();

    Intent intent = new Intent(AndroidRandom.this,RunRandom.class);
    Bundle bundle = new Bundle();
    bundle.putString("keyTypeOfConstructor", strTypeOfConstructor);
    bundle.putString("keyInitSeek", strInitSeek);
    intent.putExtras(bundle);
    startActivity(intent);

   }

    };

}
runrandom.xml
<?xml version="1.0" encoding="utf-8"?>
<LinearLayout xmlns:android="http://schemas.android.com/apk/res/android"
    android:orientation="vertical"
    android:layout_width="fill_parent"
    android:layout_height="fill_parent"
    >
<TextView
    android:layout_width="fill_parent"
    android:layout_height="wrap_content"
    android:id="@+id/typeofconstructor"
    />
<RadioGroup
 android:layout_width="fill_parent"
 android:layout_height="wrap_content"
 android:checkedButton="@+id/typeint"
 android:id="@+id/type" >
<RadioButton
 android:text="int"
 android:id="@+id/typeint" />
<RadioButton
 android:text="long"
 android:id="@+id/typelong" />
<RadioButton
 android:text="double"
 android:id="@+id/typedouble" />
<RadioButton
 android:text="float"
 android:id="@+id/typefloat" />
</RadioGroup>
<Button
   android:layout_width="fill_parent"
   android:layout_height="wrap_content"
   android:text="Generate Random number"
   android:id="@+id/generate"
 />
<TextView
   android:layout_width="fill_parent"
   android:layout_height="wrap_content"
   android:id="@+id/generatednumber"
 />
</LinearLayout>
RunRandom.java
package com.AndroidRandom;

import java.util.Random;

import android.app.Activity;
import android.os.Bundle;
import android.view.View;
import android.widget.Button;
import android.widget.RadioButton;
import android.widget.TextView;

public class RunRandom extends Activity {

    TextView tvTypeofconstructor;
    RadioButton rbInt, rbLong, rbDouble, rbFloat;
    Button buttonGenerate;
    TextView textGeneratedNumber;


    Long initSeek;
    Random myRandom;

 @Override
 protected void onCreate(Bundle savedInstanceState) {
  // TODO Auto-generated method stub
  super.onCreate(savedInstanceState);
  setContentView(R.layout.runrandom);
  tvTypeofconstructor = (TextView)findViewById(R.id.typeofconstructor);
        rbInt = (RadioButton)findViewById(R.id.typeint);
        rbLong = (RadioButton)findViewById(R.id.typelong);
        rbDouble = (RadioButton)findViewById(R.id.typedouble);
        rbFloat = (RadioButton)findViewById(R.id.typefloat);
        buttonGenerate = (Button)findViewById(R.id.generate);
        textGeneratedNumber = (TextView)findViewById(R.id.generatednumber);

        buttonGenerate.setOnClickListener(buttonGenerateOnClickListener);


        Bundle bundle = this.getIntent().getExtras();
        String typeOfConstructor = bundle.getString("keyTypeOfConstructor");
        String strInitSeek = bundle.getString("keyInitSeek");

        if (typeOfConstructor.equals("RandomMilliseconds")){
         tvTypeofconstructor.setText("Random()");
   myRandom = new Random();
  }
  else{
   Long tSeek;
   if (strInitSeek.equals(""))
   {
    tvTypeofconstructor.setText("Random(0)");
    tSeek = 0L;
   }
   else
   {
    tvTypeofconstructor.setText("Random(" + strInitSeek + ")");
    tSeek = Long.decode(strInitSeek);
   }
   myRandom = new Random(tSeek);
  }
 }

 private Button.OnClickListener buttonGenerateOnClickListener
 = new Button.OnClickListener(){

  @Override
  public void onClick(View v) {

   if (rbInt.isChecked()){
    textGeneratedNumber.setText(String.valueOf(myRandom.nextInt()));
   }
   else if (rbLong.isChecked()){
    textGeneratedNumber.setText(String.valueOf(myRandom.nextLong()));
   }
   else if (rbDouble.isChecked()){
    textGeneratedNumber.setText(String.valueOf(myRandom.nextDouble()));
   }
   else{
    textGeneratedNumber.setText(String.valueOf(myRandom.nextFloat()));
   }
  }

 };
}
AndroidManifest.xml
<?xml version="1.0" encoding="utf-8"?>
<manifest xmlns:android="http://schemas.android.com/apk/res/android"
      package="com.AndroidRandom"
      android:versionCode="1"
      android:versionName="1.0">
    <application android:icon="@drawable/icon" android:label="@string/app_name">
        <activity android:name=".AndroidRandom"
                  android:label="@string/app_name">
            <intent-filter>
                <action android:name="android.intent.action.MAIN" />
                <category android:name="android.intent.category.LAUNCHER" />
            </intent-filter>
        </activity>
 <activity android:name=".RunRandom"></activity>
    </application>
    <uses-sdk android:minSdkVersion="4" />
</manifest>
2010年5月10日星期一
Android的隨機數字產生器
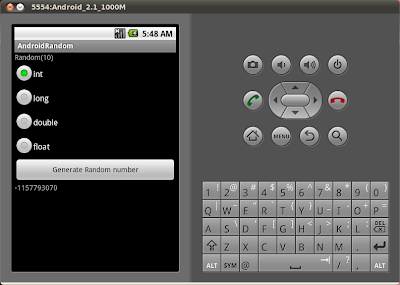
Android提供java.util.Random類以產生不同類型,如int, long, double和float的偽隨機(pseudo-random)數.

它提供兩個公共構造函數, Random()和Random(long seed).
Random(): 以當前時間的毫秒位作為初始狀態, 建構一個隨機數字產生器.
Random(long seed): 以一個特定的種子數作為初始狀態, 建構一個隨機數字產生器.
main.xml
AndroidRandom.java
相關文章: 關於pseudo-random

它提供兩個公共構造函數, Random()和Random(long seed).
Random(): 以當前時間的毫秒位作為初始狀態, 建構一個隨機數字產生器.
Random(long seed): 以一個特定的種子數作為初始狀態, 建構一個隨機數字產生器.
main.xml
<?xml version="1.0" encoding="utf-8"?>
<LinearLayout xmlns:android="http://schemas.android.com/apk/res/android"
    android:orientation="vertical"
    android:layout_width="fill_parent"
    android:layout_height="fill_parent"
    >
<TextView
    android:layout_width="fill_parent"
    android:layout_height="wrap_content"
    android:text="@string/hello"
    />
<RadioGroup
 android:layout_width="fill_parent"
 android:layout_height="wrap_content"
 android:checkedButton="@+id/milliseconds"
 android:id="@+id/contructor" >
<RadioButton
 android:text="Random()"
 android:id="@+id/milliseconds" />
<RadioButton
 android:text="Random(long seed)"
 android:id="@+id/seed" />
</RadioGroup>
<RadioGroup
 android:layout_width="fill_parent"
 android:layout_height="wrap_content"
 android:checkedButton="@+id/typeint"
 android:id="@+id/type" >
<RadioButton
 android:text="int"
 android:id="@+id/typeint" />
<RadioButton
 android:text="long"
 android:id="@+id/typelong" />
<RadioButton
 android:text="double"
 android:id="@+id/typedouble" />
<RadioButton
 android:text="float"
 android:id="@+id/typefloat" />
</RadioGroup>
<EditText
   android:layout_width="fill_parent"
   android:layout_height="wrap_content"
   android:inputType="number"
   android:id="@+id/seeknumber"
 />
<Button
   android:layout_width="fill_parent"
   android:layout_height="wrap_content"
   android:text="Generate Random number"
   android:id="@+id/generate"
 />
<TextView
   android:layout_width="fill_parent"
   android:layout_height="wrap_content"
   android:id="@+id/generatednumber"
 />
</LinearLayout>
AndroidRandom.java
package com.AndroidRandom;

import java.util.Random;

import android.app.Activity;
import android.os.Bundle;
import android.view.View;
import android.widget.Button;
import android.widget.EditText;
import android.widget.RadioButton;
import android.widget.TextView;

public class AndroidRandom extends Activity {

    RadioButton rbRandomMilliseconds, rbRandomSeek;
    RadioButton rbInt, rbLong, rbDouble, rbFloat;
    EditText etSeekNumber;
    Button buttonGenerate;
    TextView textGeneratedNumber;


    /** Called when the activity is first created. */
    @Override
    public void onCreate(Bundle savedInstanceState) {
        super.onCreate(savedInstanceState);
        setContentView(R.layout.main);

        rbRandomMilliseconds = (RadioButton)findViewById(R.id.milliseconds);
        rbRandomSeek = (RadioButton)findViewById(R.id.seed);
        rbInt = (RadioButton)findViewById(R.id.typeint);
        rbLong = (RadioButton)findViewById(R.id.typelong);
        rbDouble = (RadioButton)findViewById(R.id.typedouble);
        rbFloat = (RadioButton)findViewById(R.id.typefloat);
        etSeekNumber = (EditText)findViewById(R.id.seeknumber);
        buttonGenerate = (Button)findViewById(R.id.generate);
        textGeneratedNumber = (TextView)findViewById(R.id.generatednumber);

        buttonGenerate.setOnClickListener(buttonGenerateOnClickListener);
    }

    private Button.OnClickListener buttonGenerateOnClickListener
     = new Button.OnClickListener(){

   @Override
   public void onClick(View v) {

    Random myRandom;

    // TODO Auto-generated method stub
    if (rbRandomMilliseconds.isChecked()){
     myRandom = new Random();
    }
    else{
     Long tSeek;
     if (etSeekNumber.getText().toString().equals(""))
     {
      tSeek = 0L;
      etSeekNumber.setText("0");
     }
     else
     {
      tSeek = Long.decode(etSeekNumber.getText().toString());
     }
     myRandom = new Random(tSeek);
    }

    if (rbInt.isChecked()){
     textGeneratedNumber.setText(String.valueOf(myRandom.nextInt()));
    }
    else if (rbLong.isChecked()){
     textGeneratedNumber.setText(String.valueOf(myRandom.nextLong()));
    }
    else if (rbDouble.isChecked()){
     textGeneratedNumber.setText(String.valueOf(myRandom.nextDouble()));
    }
    else{
     textGeneratedNumber.setText(String.valueOf(myRandom.nextFloat()));
    }
   }

    };

}
相關文章: 關於pseudo-random
2010年5月6日星期四
Android-x86 Project: 跑在PC上的Android
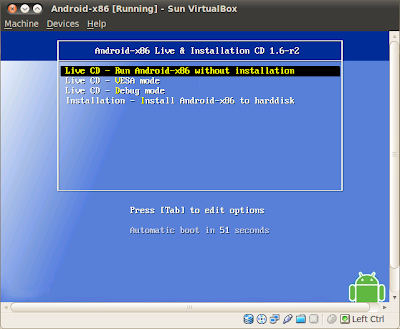
 前文介紹過LiveAndroid, Android-x86亦是相似, 是一個把Android開源項目移植到x86平台的項目.
與LiveAndroid相同, Android-x86亦可以運行在Sun VirtualBox之上, 這裡不再重述了, 請參考另一篇文章"在Sun VirtualBox上安裝LiveAndroid".


最新發布 ase_r22.apk, Android上的腳本語言.
, 可以瀏覽android-scripting下載.
相關文章: Android Scripting Environment (ASE) - Android設備上的腳本語言.
2010年5月5日星期三
在Ubuntu 10.04 LTS上安裝sun-java6-JDK
在以前的文章"在 Linux(ubuntu)上安裝Eclipse + Android SDK"提及可以使用"sudo apt-get install sun-java6-jdk"指令在Ubuntu上安裝sun-java6-jdk.
但在剛剛發布的Ubuntu 10.04 LTS中, sun-java6-JDK包已在Ubuntu存檔中刪除, 我們需要多兩個步驟, 把Canonical Partner Repository加入.
開啟Terminal, 輸入下面的三個指令:
sudo add-apt-repository "deb http://archive.canonical.com/ lucid partner"
sudo apt-get update
sudo apt-get install sun-java6-jdk
但在剛剛發布的Ubuntu 10.04 LTS中, sun-java6-JDK包已在Ubuntu存檔中刪除, 我們需要多兩個步驟, 把Canonical Partner Repository加入.
開啟Terminal, 輸入下面的三個指令:
sudo add-apt-repository "deb http://archive.canonical.com/ lucid partner"
sudo apt-get update
sudo apt-get install sun-java6-jdk
2010年5月3日星期一
Android上的開源繁體中文輸入法(Traditional Chinese IME)
Android繁體中文輸入法(Traditional Chinese IME on Android)是一個20%由谷歌台北辦事處發起的輸入法項目(IME), 現在是谷歌代碼(Google Code)的開源項目. 它包括兩個主要的繁體中文輸入法, 注音(Zhuyin)及倉頡(Cangjie).

該項目是基於Android的輸入法框架(Android input method framework), 如開源LatinIME, 它的代碼保持細小, 可讀, 和在Apache(Apache license)許可證下開放源碼.
有興趣在這個項目之上建立新輸入方法, 看看ZhuyinIME和CangjieIME如何擴展AbstractIME, 並建立各自的Editor和WordDictionary子類構成繁體中文字符(Traditional Chinese characters).
來源: Open-sourcing Traditional Chinese IME on Android - Google Open Source Blog
訂閱:
留言 (Atom)